android 动画入门(一)
准备花一些时间研究下androd动画,因为一些酷的效果是离不开动画的,但是所有的知识都是要从最基本的讲起,只有把基础打好,学一些高级的技术或者效果才会有思路,而不会在某一基础点卡住,今天就讲下动画的入门知识,
我们知道android动画有好几种,什么属性动画,过渡动画等,这篇讲下动画最基础,在属性动画出现之前就是view 动画了,
它有二种
第一类是Tween动画,就是对view进行(旋转、平移、放缩和渐变)等动画。
第二类就是 Frame动画,就好像看电影一样,只是帧每表播放的很快,这样就感觉我们的肉眼就感觉是动画,
Tween动画
tween动画有四种,如图:
tween动画可以在xml中定义也可以用android自带的类实现,如果要在xml中定义的话,首先要在res文件夹下创建一个anim文件夹,然后创建的xml文件就放在anim文件夹下,在使用的时候就是R.anim.(创建的动画xml)
alpha动画
第一个讲alpha动画,这是因为这是四种中最简单的,首先在anim文件夹下创建一个alpha.xml文件,
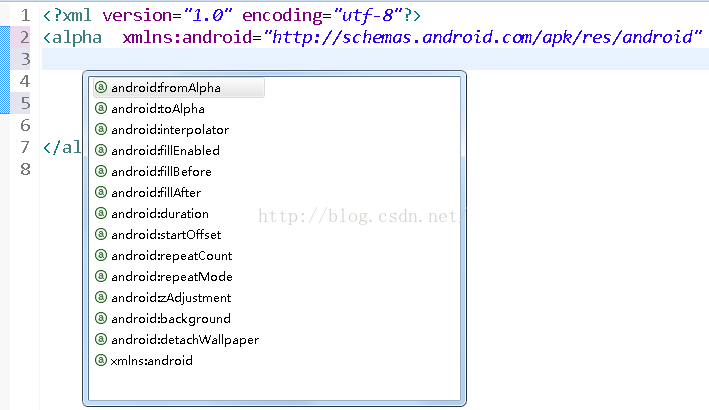
发现alpha动画有那么多属性,其实除了
android:fromAlpha=""
android:toAlpha=""
这二个属性,其他属性都是和其他三种共有的,先把上面的二个属性讲下,android:fromAlpha就是渐变动画起始的渐变度,android:toAlpha是结束时候的透明度,0表示完全透明就是看不到,1表示完全可见,
<?xml version="1.0" encoding="utf-8"?>
<alpha xmlns:android="http://schemas.android.com/apk/res/android"
android:fromAlpha="0"
android:toAlpha="1"
>
</alpha>
代码使用:
final Animation alpha = AnimationUtils.loadAnimation(this, R.anim.alpha);
iv_anim = (ImageView) findViewById(R.id.iv_anim);
btn_start_anim.setOnClickListener(new OnClickListener() {
@Override
public void onClick(View v) {
iv_anim.setAnimation(alpha);
}
});
效果:
这是因为动画执行需要时间,在xml文件中并没有这属性,那么现在添加这个动画执行时间的属性:android:duration="3000" 单位为毫表,为了演示效果我把时间设置长点,方便看效果:
总结:动画一定要设置时间,否则无效
ranslate动画
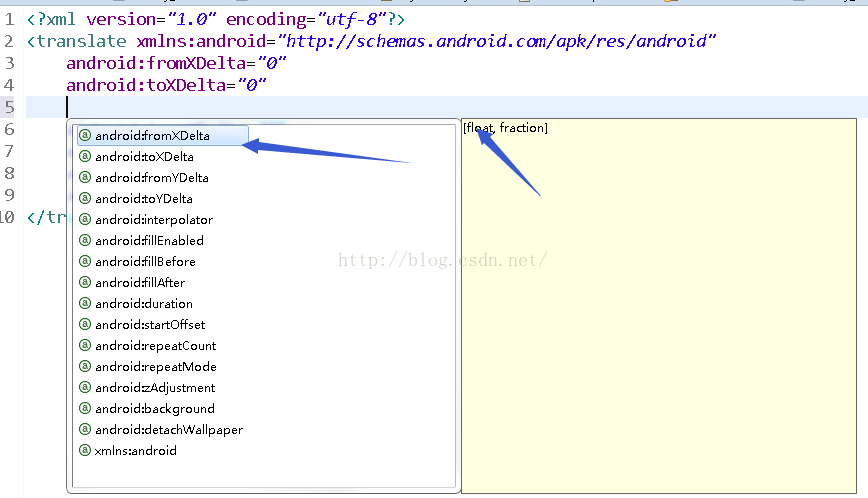
就是让view控件在屏幕上可以移动,先看下translate动画都有那些属性:
上面的前四个方法都是平移动画独有的,其他都是共有的,现在对其四个属性进行详细说明:
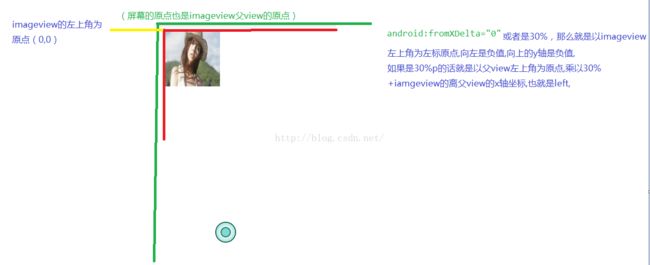
android:fromXDelta="" 起点x轴方向坐标值,这些数值可以是数字 百分比,比如:30,30%,30%p,这些数据分别是代表什么意思呢?30是代表以自身view的左上角为原点,进行向右移动30像素,30%表示以自身view的宽度(width)*30%为起始x轴坐标点,30%p这个是当前执行动画view的父view左上角为坐标点的父view的宽度*30%,记住是以哪个为坐标点为参考点很重要,如图:
android:toXDelta="" 平移结束后的x轴方向终点坐标
android:fromYDelta="" //同理上
android:toYDelta=""//同理上
现在写例子验证下刚才讲的原理是否正确,
布局文件:
<?xml version="1.0" encoding="utf-8"?>
<RelativeLayout xmlns:android="http://schemas.android.com/apk/res/android"
    android:layout_width="match_parent"
    android:layout_height="match_parent"
    android:background="#ffffff"
  >
    <Button
        android:id="@+id/btn_start"
        android:layout_width="200px"
        android:layout_height="60px"
        android:text="开始动画"
        />
    <ImageView
        android:id="@+id/iv_anim"
        android:layout_width="150px"
        android:layout_height="150px"
        android:background="@mipmap/aa"
        android:layout_marginTop="20px"
        android:layout_marginLeft="20px"
        android:layout_below="@+id/btn_start"
        />
</RelativeLayout>
看到我宽和高为什么用了px而不是dp呢?是为了我在屏幕上画点,以方便画图
动画xml文件:
<?xml version="1.0" encoding="utf-8"?>
<translate xmlns:android="http://schemas.android.com/apk/res/android"
    android:fromXDelta="0"
    android:toXDelta="80"
    android:fromYDelta="0"
    android:toYDelta="80"
    android:duration="5000"
    android:fillAfter="true"
    >
</translate>
android:fillAfter意思是动画执行后动画停留在结束的位置
执行动画
btn_start = (Button) findViewById(R.id.btn_start);
iv_anim = (ImageView) findViewById(R.id.iv_anim);

final Animation animation = AnimationUtils.loadAnimation(this,R.anim.transalate);
btn_start.setOnClickListener(new View.OnClickListener() {
    @Override
    public void onClick(View v) {
        iv_anim.startAnimation(animation);
    }
});
点击button执行动画, 效果,
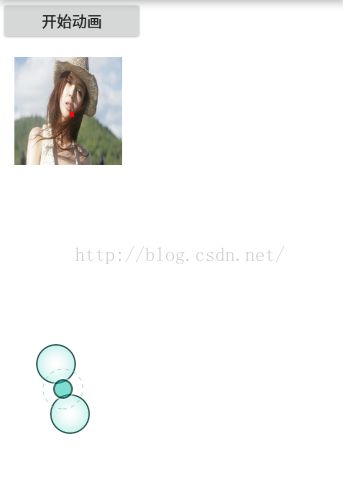
我现在自定义一个view,画一个点就是结束动画时候的点,那么这个点的x,y轴坐标怎么算呢
x=imageview (android:layout_marginLeft=20) +80(平移的像素)=100
y=imageview(android:layout_marginTop=20)+80(平移后的像素)+button的高度为60px=160,
public class MyPointView extends View {
    public MyPointView(Context context) {
        super(context);
    }

    public MyPointView(Context context, AttributeSet attrs) {
        super(context, attrs);
    }

    public MyPointView(Context context, AttributeSet attrs, int defStyleAttr) {
        super(context, attrs, defStyleAttr);
    }
    @Override
    protected void onDraw(Canvas canvas) {
        Paint paint = new Paint();
        paint.setColor(Color.RED);//设置画笔为红色
        paint.setStrokeWidth(6);//设置画笔的宽度
        canvas.drawPoint(100,160,paint);
    }
}
动画执行之前图:
开始动画执行:
ok,表示上面的分析完全正确,如果你想往上,就得修改下终点的y坐标了,把值改为负值就行,比如我改为-20,
<?xml version="1.0" encoding="utf-8"?>
<translate xmlns:android="http://schemas.android.com/apk/res/android"
    android:fromXDelta="0"
    android:toXDelta="0"
    android:fromYDelta="0"
    android:toYDelta="-20"
    android:duration="5000"
    android:fillAfter="true"
    >
</translate>
这个表示x轴坐标不变,y轴向上移动20px,
ok,效果和预想的一样,学会了这个我们可以做2个简单的demo玩玩,如果做过什么图片上传的,让你选择时从本地选图片还是拍摄,或者用过友盟分享的都知道,也有这种效果,今天就实现下,简单的不行不行的,
首先看下布局文件怎么弄的
<?xml version="1.0" encoding="utf-8"?>
<RelativeLayout xmlns:android="http://schemas.android.com/apk/res/android"
    android:layout_width="match_parent"
    android:layout_height="match_parent"
    android:background="#ffffff"
  >
    <Button
        android:id="@+id/btn_start"
        android:layout_width="200px"
        android:layout_height="60px"
        android:text="开始动画"
        />
    <ImageView
        android:id="@+id/iv_anim"
        android:layout_width="match_parent"
        android:layout_height="200px"
        android:background="@mipmap/aa"
        android:layout_alignParentBottom="true"
        android:layout_marginBottom="-200px"
        />
    <com.example.animdemo.MyPointView
        android:layout_width="wrap_content"
        android:layout_height="wrap_content"
        ></com.example.animdemo.MyPointView>
</RelativeLayout>
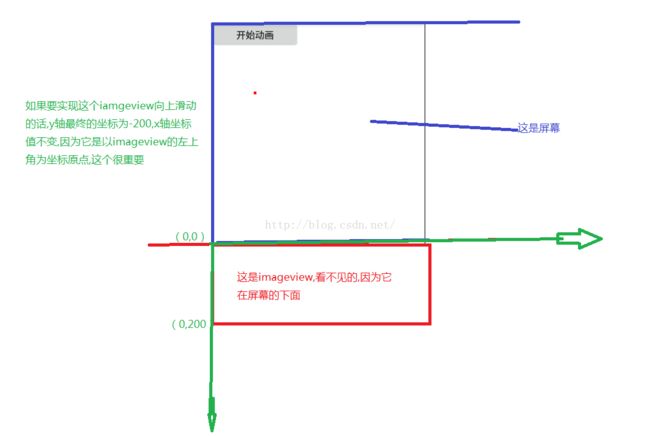
分析图:
根据上面的分析 动画xml:
<?xml version="1.0" encoding="utf-8"?>
<translate xmlns:android="http://schemas.android.com/apk/res/android"
android:fromXDelta="0"
android:toXDelta="0"
android:fromYDelta="0"
android:toYDelta="-200"
android:duration="2000"
android:fillAfter="true"
    >
</translate>
效果:
不是有很多是点击从底部弹来,再点击就收起,收起的动画,
<?xml version="1.0" encoding="utf-8"?>
<translate xmlns:android="http://schemas.android.com/apk/res/android"
    android:fromXDelta="0"
    android:toXDelta="0"
    android:fromYDelta="-200"
    android:toYDelta="0"
    android:duration="2000"
    android:fillAfter="true"
    >
</translate>
final Animation animation = AnimationUtils.loadAnimation(this,R.anim.transalate);
final Animation downAnimation = AnimationUtils.loadAnimation(this,R.anim.downtranslate);
btn_start.setOnClickListener(new View.OnClickListener() {
    @Override
    public void onClick(View v) {
        if(!isFirst){
            iv_anim.startAnimation(animation);
            isFirst = true;
        }else{
            iv_anim.startAnimation(downAnimation);
            isFirst = false;
        }
    }
});
效果:
收起的动画x轴起点是-200px,终点x轴坐标是0,这就可以得出一个结论
当动画执行后,它所在的原点还是原来的位置,而不是动画之前的位置为原点
上面都是用定值,因为我们知道android;fromXDelta可以是数值,百分比,现在就使用百分比显示下,
<?xml version="1.0" encoding="utf-8"?>
<translate xmlns:android="http://schemas.android.com/apk/res/android"
    android:fromXDelta="0"
    android:toXDelta="0"
    android:fromYDelta="0"
    android:toYDelta="-100%"
    android:duration="2000"
    android:fillAfter="true"
    >
</translate>
效果:
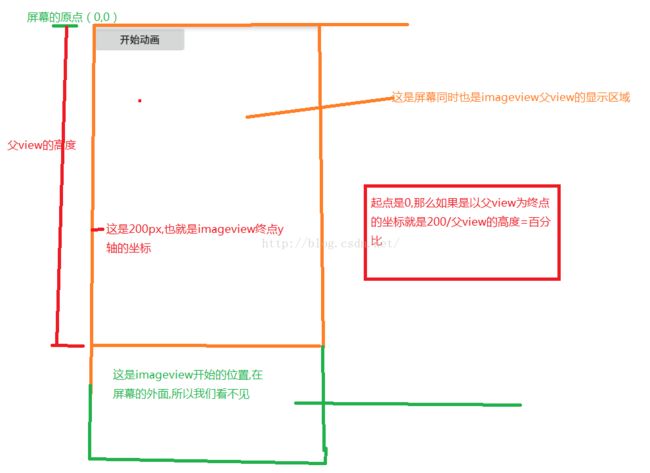
百分比还有一个就是%p,我上面说%p是以它父view的左上角为原点其实是错的,真正%p的意思是说+父view的宽度或者高度的*p%,坐标点还是以view本身为的左上角为参考点,分析图如下:
root.getViewTreeObserver().addOnGlobalLayoutListener(new ViewTreeObserver.OnGlobalLayoutListener() {
    @Override
    public void onGlobalLayout() {
       int h =  root.getHeight();
    }
});
这个是算出父view的高度为680,而view本身的坐标是从(0,0)开始,现在就是一个简单的数学题了,设置百分比为x那么就是0+x%*680=200 那么x=0.29411764705882354,哪就是29%了,这样我们在xml文件中就可以这么写了
<?xml version="1.0" encoding="utf-8"?>
<translate xmlns:android="http://schemas.android.com/apk/res/android"
    android:fromXDelta="0"
    android:toXDelta="0"
    android:fromYDelta="0"
    android:toYDelta="-29%p"
    android:duration="2000"
    android:fillAfter="true"
    >
</translate>
记住一条很重要的就是以view本身的左上角为原点,这个不知道的话,效果肯定出不来或者不正确
@Override
protected void onDraw(Canvas canvas) {
    Paint paint = new Paint();
    paint.setColor(Color.RED);//设置画笔为红色
    paint.setStrokeWidth(6);//设置画笔的宽度
    canvas.drawLine(0,480,800,480,paint);
}
这个是我画的一条线,做对比使用的,效果如下,
完美,
现在把其他动画属性也讲下,
android:duration 动画持续时间,以毫秒为单位
android:fillAfter 如果设置为true,控件动画结束时,将保持动画最后时的状态(上面已经使用了)
android:fillBefore 如果设置为true,控件动画结束时,还原到开始动画前的状态(和fillAfter属性对应起来)
android:fillEnabled 与android:fillBefore 效果相同,都是在动画结束时,将控件还原到初始化状态
android:repeatCount 重复次数
android:repeatMode 重复类型,有reverse和restart两个值,reverse表示倒序回放,restart表示重新放一遍,必须与repeatCount一起使用才能看到效果。因为这里的意义是重复的类型,即回放时的动作。
android:interpolator 设定插值器,这个属性后期会讲,这个涉及到的知识挺多
记得很早之前是腾讯手机管家有一个效果,就是类似一个火箭发射的效果,其实就是用平移动画+动画之前的次数+重复的类型就可以搞定,现在来实现下,
动画:
<?xml version="1.0" encoding="utf-8"?>
<translate xmlns:android="http://schemas.android.com/apk/res/android"
    android:fromXDelta="0"
    android:toXDelta="0"
    android:fromYDelta="0"
    android:toYDelta="-100%p"
    android:duration="500"
    android:repeatCount="100"//重复100次
    android:repeatMode="restart"//每次从开顺序的位置开始
    >
</translate>
代码就不用看了太简单
效果:
scale view尺寸放大缩小效果动画
先看下scale独有的动画属性
android:fromXScale="" 起始的X方向上相对自身的缩放比例,浮点值,比如1.0代表自身无变化,0.5代表起始时缩小一倍,2.0代表放大一倍
android:fromYScale=""起始y方向相对自身的缩放比例
android:toXScale=""//终点x方向与相对自身的缩放比例
android:toYScale="" //终点x方向相对自身的缩放比例
android:pivotX="" 缩放起点X轴坐标(也就是在哪一个点开始缩放),可以是数值、百分数、百分数p 三种样式,这和前面讲平移动画那个是一样的,
android:pivotY="" 同上
备注:如果没有设置andriod:pivotX和pivotY没有设置或者都设置为0,那么缩放就是从view本身的左上角那个点(0,0)开始放大缩小
<?xml version="1.0" encoding="utf-8"?>
<scale xmlns:android="http://schemas.android.com/apk/res/android"
    android:fromXScale="0"
    android:fromYScale="0"
    android:toXScale="1"
    android:toYScale="1"
    android:duration="5000"
    >
</scale>
这个是表示x和y方向是从0放大到正常view的大小,效果:
这就是从view本身(0,0)点开始缩放的
现在 android:pivotX="30" android:pivotY="70" 给这二个属性设置常量值,
<RelativeLayout xmlns:android="http://schemas.android.com/apk/res/android"
android:layout_width="match_parent"
android:layout_height="match_parent"
android:orientation="vertical"
android:background="#ffffff"
android:id="@+id/rl_root"
>
<Button
android:id="@+id/btn_start_anim"
android:layout_width="100px"
android:layout_height="40px"
android:padding="10px"
android:text="开始动画" />
<ImageView
android:id="@+id/iv_anim"
android:layout_width="100px"
android:layout_height="100px"
android:background="@drawable/aa"
android:layout_below="@id/btn_start_anim"
android:layout_marginTop="10px"
android:layout_marginLeft="10px"
/>
<com.example.anim.MyPointView
android:layout_width="wrap_content"
android:layout_height="wrap_content"
></com.example.anim.MyPointView>
</RelativeLayout>
图:
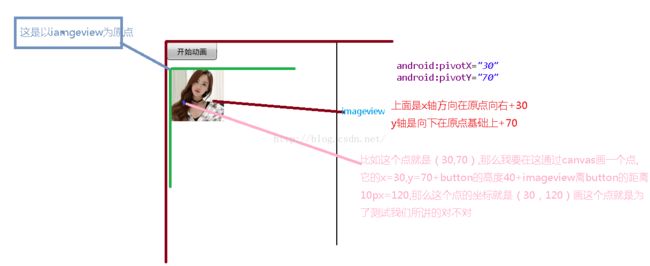
分析图:
画点view的关键代码
@Override
protected void onDraw(Canvas canvas) {
super.onDraw(canvas);
Paint paint = new Paint();
paint.setColor(Color.RED);
paint.setStrokeWidth(5);
canvas.drawPoint(40,120, paint);//因为imageview离左边是10px
}
效果图:
再给 android:pivotX="20%" android:pivotY="20%" 都设置20%
x=imageview宽度(100)*20%=20
y=imageview的高度(100)*20%=20
点的x轴坐标=10(imageview离父view的距离)+上面的20=30
点的y轴坐标=button高度(40)+10(imageview离button的高度)+20=70
那么红色点的坐标为(30,70)
效果图:
现在给android:pivotX="20%p" android:pivotY="20%p" 设置20%p,这个p意思就是parent,那么就必须算出父view的宽和高了,
经计算父view的宽度=320,高度=430 各自*20%,那么动画起始x轴=64+(imageview在父view的x轴坐标我10)=74,y=86+imageview在父view的y轴坐标就是(button的高度为40)+imageview离button的高度(10)=136
那么点的坐标为(74,136),也就是说动画是从这个点开始缩放的,
view点的关键:
@Override
protected void onDraw(Canvas canvas) {
super.onDraw(canvas);
Paint paint = new Paint();
paint.setColor(Color.RED);
paint.setStrokeWidth(5);
canvas.drawPoint(74,136, paint);
}
请看效果图:
rotate view旋转动画
看下它的关键属性如图:
也就 android:fromDegrees="0" android:toDegrees="360"这二个属性是特别的,其他前面都讲过,
fromDegrees 起点是那个角度开始
toDegrees结束是那个角度,我上面是从0到360,现在观察下效果:
从效果上来看没有设置 android:pivotX="" android:pivotY="" 默认就是从view的左上角为旋转点,另外发现从0到360是顺时针旋转,那么如果是-360就逆时帧旋转,不信试试就知道了,
<?xml version="1.0" encoding="utf-8"?>
<rotate xmlns:android="http://schemas.android.com/apk/res/android"
android:fromDegrees="0"
android:toDegrees="-360"
android:duration="8000"
>
</rotate>
效果图:
关于android:pivotX和android:pivotY二个属性和前面一样,在这就不讲了,
最后就是一个属性大杂烩了,也就是set标签
<?xml version="1.0" encoding="utf-8"?>
<set xmlns:android="http://schemas.android.com/apk/res/android"
android:repeatCount="10"
android:repeatMode="restart"
>
<alpha
android:fromAlpha="0.0"
android:toAlpha="1.0"
android:duration="1000"
/>
<scale
android:fromXScale="0.0"
android:toXScale="1.4"
android:fromYScale="0.0"
android:toYScale="1.4"
android:pivotX="50%"
android:duration="1000"
android:pivotY="50%"/>
<rotate
android:fromDegrees="0"
android:toDegrees="720"
android:duration="1000"
android:pivotX="50%"
android:pivotY="50%"/>
<translate
android:fromXDelta="0"
android:toXDelta="30"
android:duration="1000"
android:pivotX="50%"
android:pivotY="50%"
/>
</set>
效果:
这篇博客总算写完了,下篇写插值器

