话不多说,开始。。
step1:首先在eclispe中新建一个maven项目:new->project->Maven Project,artifact选择webapp:
step2:填写项目的group id、artifact id、version、package等信息:
step3:打开pom.xml文件,切换至Dependencies标签页,选择左侧部分的Add按钮,加入webmvc项目最基本的jar包:servlet-api和spring-webmvc,如:

这时再切换至pom.xml标签页,你会发现pom.xml文件多了以下内容:
<dependency>
    	<groupId>javax.servlet</groupId>
    	<artifactId>servlet-api</artifactId>
    	<version>2.5</version>
    </dependency>
    <dependency>
    	<groupId>org.springframework</groupId>
    	<artifactId>spring-webmvc</artifactId>
    	<version>4.1.4.RELEASE</version>
    </dependency>
有了springmvc依赖的两个jar包后,就可以开始进行搭建了。你也可以在<dependencies />节点下手动添加一个dependency,无论哪种方式,都等同于我们传统方式下添加jar包。而maven是首次从中央仓库下载jar包到本地仓库,如果本地仓库有,直接用dependency引用依赖即可~
而spring-webmvc这个jar包又引用了其他jar包,maven可以把它的依赖jar包也加载进来,但并不需要你添加它的依赖,所依赖的jar包一样在本地仓库中。
切换至Dependency Hierarchy标签页,可以看到依赖关系:
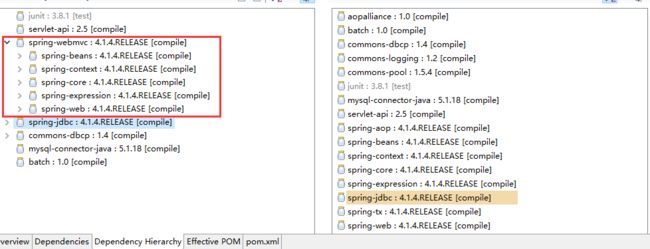
之后缺了什么jar包依赖都可以通过这2种方式加进去。
step4:补充springmvc的配置WEB-INF/web.xml(maven项目中是在src/main/webapp/WEB-INF下):
web.xml:
<?xml version="1.0" encoding="UTF-8"?>
<web-app xmlns:xsi="http://www.w3.org/2001/XMLSchema-instance"
	xmlns="http://java.sun.com/xml/ns/javaee"
	xsi:schemaLocation="http://java.sun.com/xml/ns/javaee http://java.sun.com/xml/ns/javaee/web-app_3_0.xsd"
	id="schedule-console" version="3.0">

	<!-- 配置web.xml,使其具有springmvc特性,主要配置两处,一个是ContextLoaderListener,一个是DispatcherServlet -->

    <!-- spring mvc 配置 -->
    <!-- 1.配置DispatcherServlet表示,该工程将采用springmvc的方式。 -->
    <servlet>
        <servlet-name>webmvc</servlet-name>
        <servlet-class>org.springframework.web.servlet.DispatcherServlet</servlet-class>
        <!-- 启动项目的时候要加载的配置文件 -->
        <init-param>
            <param-name>contextConfigLocation</param-name>
            <param-value>classpath*:/spring-mvc.xml</param-value>
        </init-param>
        <load-on-startup>1</load-on-startup>
    </servlet>
    <servlet-mapping>
        <servlet-name>webmvc</servlet-name>
        <url-pattern>/</url-pattern>
    </servlet-mapping>

    <!-- 2.spring配置 :配置ContextLoaderListener表示,该工程要以spring的方式启动.启动时会默认在/WEB-INF目录下查找applicationContext.xml
作为spring容器的配置文件,该文件里可以初始化一些bean-->
    <listener>
        <listener-class>org.springframework.web.context.ContextLoaderListener</listener-class>
    </listener>

    <!-- 指定Spring Bean的配置文件所在目录。默认配置在WEB-INF目录下 -->
    <context-param>
        <param-name>contextConfigLocation</param-name>
        <param-value>classpath*:applicationContext.xml</param-value>
    </context-param>

    <!-- 字符集过滤器 -->
    <filter>
        <filter-name>encodingFilter</filter-name>
        <filter-class>org.springframework.web.filter.CharacterEncodingFilter</filter-class>
        <init-param>
            <param-name>encoding</param-name>
            <param-value>UTF-8</param-value>
        </init-param>
    </filter>
    <filter-mapping>
        <filter-name>encodingFilter</filter-name>
        <url-pattern>/*</url-pattern>
    </filter-mapping>

</web-app>
step5:在src/main/resources下新建一个applicationContext.xml文件(放置事务管理信息等):
applicationContext.xml:
<?xml version="1.0" encoding="UTF-8"?>
<beans xmlns="http://www.springframework.org/schema/beans"
    xmlns:xsi="http://www.w3.org/2001/XMLSchema-instance" xmlns:context="http://www.springframework.org/schema/context"
    xmlns:p="http://www.springframework.org/schema/p" xmlns:aop="http://www.springframework.org/schema/aop"
    xmlns:tx="http://www.springframework.org/schema/tx"
    xsi:schemaLocation="http://www.springframework.org/schema/beans http://www.springframework.org/schema/beans/spring-beans-4.1.xsd
    http://www.springframework.org/schema/context http://www.springframework.org/schema/context/spring-context-4.1.xsd
    http://www.springframework.org/schema/aop http://www.springframework.org/schema/aop/spring-aop-4.1.xsd
    http://www.springframework.org/schema/tx http://www.springframework.org/schema/tx/spring-tx-4.1.xsd">

   <!-- 启用spring mvc注解 -->
   <context:annotation-config  />

   <!-- 配置读取外部配置文件 -->
   <context:property-placeholder location="classpath:jdbc.properties"  />
   <bean id="dataSource" class="org.apache.commons.dbcp.BasicDataSource" destroy-method="close"
   	p:driverClassName="${jdbc.driverClassName}" p:url="${jdbc.url}"
   	p:username="${jdbc.username}" p:password="${jdbc.password}"
   	p:testOnBorrow="true" p:testWhileIdle="true" p:testOnReturn="true"
   	p:timeBetweenEvictionRunsMillis="1800000" p:numTestsPerEvictionRun="3" p:minEvictableIdleTimeMillis="1800000"/>

   <!-- jdbcTemplate -->
   <bean id="jdbcTemplate" class="org.springframework.jdbc.core.JdbcTemplate"
   	p:dataSource-ref="dataSource"/>

   <!-- 配置事务管理器 -->
   <bean id="txManager" class="org.springframework.jdbc.datasource.DataSourceTransactionManager"
    p:dataSource-ref="dataSource" />

    <!-- 事务扫描开始(开启@Tranctional) -->
    <tx:annotation-driven transaction-manager="txManager" />

</beans>
step6:同理,在src/main/resources下新建一个spring-mvc.xml来配置一些springmvc的基本信息,以及jdbc的属性文件jdbc.properties:
spring-mvc.xml:
<?xml version="1.0" encoding="UTF-8"?>
<beans xmlns="http://www.springframework.org/schema/beans"
    xmlns:xsi="http://www.w3.org/2001/XMLSchema-instance" xmlns:context="http://www.springframework.org/schema/context"
    xmlns:tx="http://www.springframework.org/schema/tx" xmlns:mvc="http://www.springframework.org/schema/mvc"
    xsi:schemaLocation="http://www.springframework.org/schema/beans
       http://www.springframework.org/schema/beans/spring-beans.xsd
       http://www.springframework.org/schema/context
       http://www.springframework.org/schema/context/spring-context.xsd
       http://www.springframework.org/schema/tx
       http://www.springframework.org/schema/tx/spring-tx.xsd
          http://www.springframework.org/schema/mvc
       http://www.springframework.org/schema/mvc/spring-mvc.xsd">

  	 <!-- 基本包扫描 -->
   <context:component-scan base-package="com.spring" />

  	<!-- 注册HandlerMapper、HandlerAdapter两个映射类,负责将请求映射到类和方法中 -->
    <mvc:annotation-driven />

    <!-- 访问静态资源,如js, css文件等 -->
    <mvc:default-servlet-handler />

    <!-- 视图解析器 -->
    <bean
        class="org.springframework.web.servlet.view.InternalResourceViewResolver">
        <property name="prefix" value="/WEB-INF/view/"></property>
        <property name="suffix" value=".jsp"></property>
    </bean>

</beans>
jdbc.properties:
jdbc.driverClassName=com.mysql.jdbc.Driver
jdbc.url=jdbc:mysql://127.0.0.1:3306/xxxx?useUnicode=true&characterEncoding=UTF-8
jdbc.username=*********
jdbc.password=************
step7:在基本扫描包com.spring(spring-mvc.xml里有配置)下新建一个package:controller,并新建一个LoginController.java,里面的一个方法很简单,用于页面跳转~
package com.spring.controller;

import javax.servlet.http.HttpServletRequest;
import javax.servlet.http.HttpServletResponse;

import org.springframework.stereotype.Controller;
import org.springframework.web.bind.annotation.RequestMapping;
import org.springframework.web.servlet.ModelAndView;

@Controller
public class LoginController {

	@RequestMapping("/index")
	public ModelAndView index(HttpServletRequest request, HttpServletResponse response) {
		ModelAndView mav = new ModelAndView("index");
		return mav;
	}
}
或者说这样写:
@RequestMapping("/index")
	public String index(HttpServletRequest request, HttpServletResponse response) {
		return "index";
	}
这意味着,你在页面输入:http://127.0.0.1/springmvc/index会跳转到WEB-INF/view下的index.jsp页面。ModelAndView包含了一个model属性和一个view属性:model:其实是一个ModelMap类型,view:包含了一些视图信息。视图解析器将model中的每个元素都通过request.setAttribute(name, value);添加request请求域中。如果controller上也加了requestMapping:
@Controller
@RequestMapping("/test")
public class LoginController {

	@RequestMapping("/index")
	public String index(HttpServletRequest request, HttpServletResponse response) {
		return "index";
	}
}
则需输入:http://127.0.0.1/springmvc/test/index才会跳转到WEB-INF/view下的index.jsp页面。同理,如果是return "test/index"则是跳转到view/test/index.jsp。
step8:在view下建一个index.jsp:
<html>
<body>
<h2>Hello Springmvc</h2>
</body>
</html>
番外篇之一:如何加入自定义的jar包,如在中央仓库下新建一个mine/batch/${version},放我们自定义的jar包batch-${version}.jar:
同时,同名的pom文件必须要有:
<project>
  <modelVersion>1.0</modelVersion>
  <groupId>mine</groupId>
  <artifactId>batch</artifactId>
  <version>1.0</version>
  <!--<dependencies> 如果此jar包还依赖其它jar包则在这里加依赖
    <dependency>
      <groupId>xerces</groupId>
      <artifactId>xercesImpl</artifactId>
      <version>2.6.0</version>
      <optional>true</optional>
    </dependency>

  </dependencies>-->
</project>
然后我们再在项目的pom文件的<dependencies />节点下加入:
<dependency>
    	<groupId>mine</groupId>
    	<artifactId>batch</artifactId>
    	<version>${batch.version}</version>
</dependency>
其中${batch.version}是引用pom.xml下的属性节点的,这种写法方便我们以后切换版本:
<properties>
    <batch.version>1.0</batch.version>
</properties>
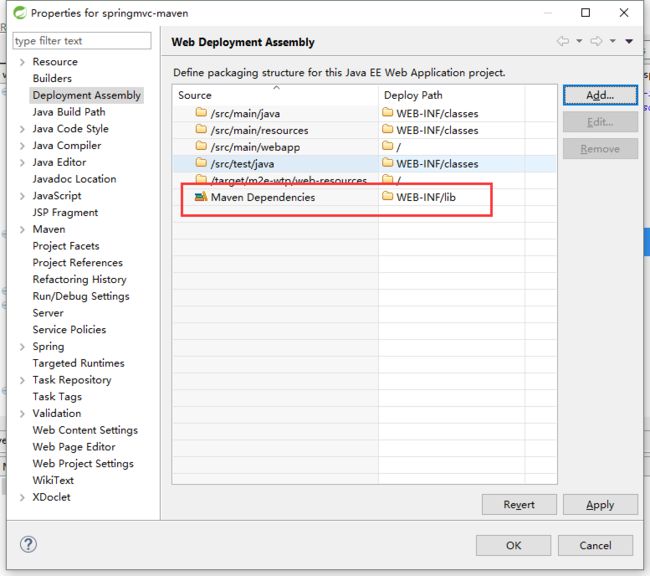
番外篇之二:别忘记右键项目-->properties-->Deployment Assembly-->Add-->Java Build Path Entries-->Maven Dependencies:
step9:启动项目,在浏览器端输入:http://localhost:7004/springmvc/index:

step10:看一下最终最基本的结构吧~
入门完毕~~ 下一章就开始会做登陆模块。