VMWare vSphere如何实现块存储
题记
在云环境下,块存储是经常被用户使用的一种技术,简单理解就是,在云环境下,我们认为虚拟机对象是“不稳定的”,也就是用户的数据不能存储在虚拟机中,而是一种外置的设备(类似我们笔记本+移动硬盘模式,数据存储在移动硬盘上,笔记本OS坏了,数据并不会丢失),这种方式就是块存储,虚拟机崩溃了,块存储对象从该虚拟机卸载,我可以直接讲虚拟机删除掉,然后通过云平台快速启动虚拟机,将块存储对象直接加载在新的虚拟机上,已达到数据持久化的目的。
块存储在各个云平台的应用比较多,我接触最多的是OpenStack的Cinder,但是在VMWare vSphere还没有使用过,接下来我们就看看如何在该环境下应用块存储。
测试环境
VMWare Workstation 12
VMWare vSphere 6.0
1、在Workstation上安装vSphere6.0
2、安装vSphere Client
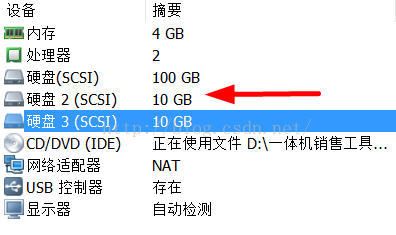
3、为vSphere的虚拟机添加一块新硬盘(当然也可以在原有的存储环境中操作)
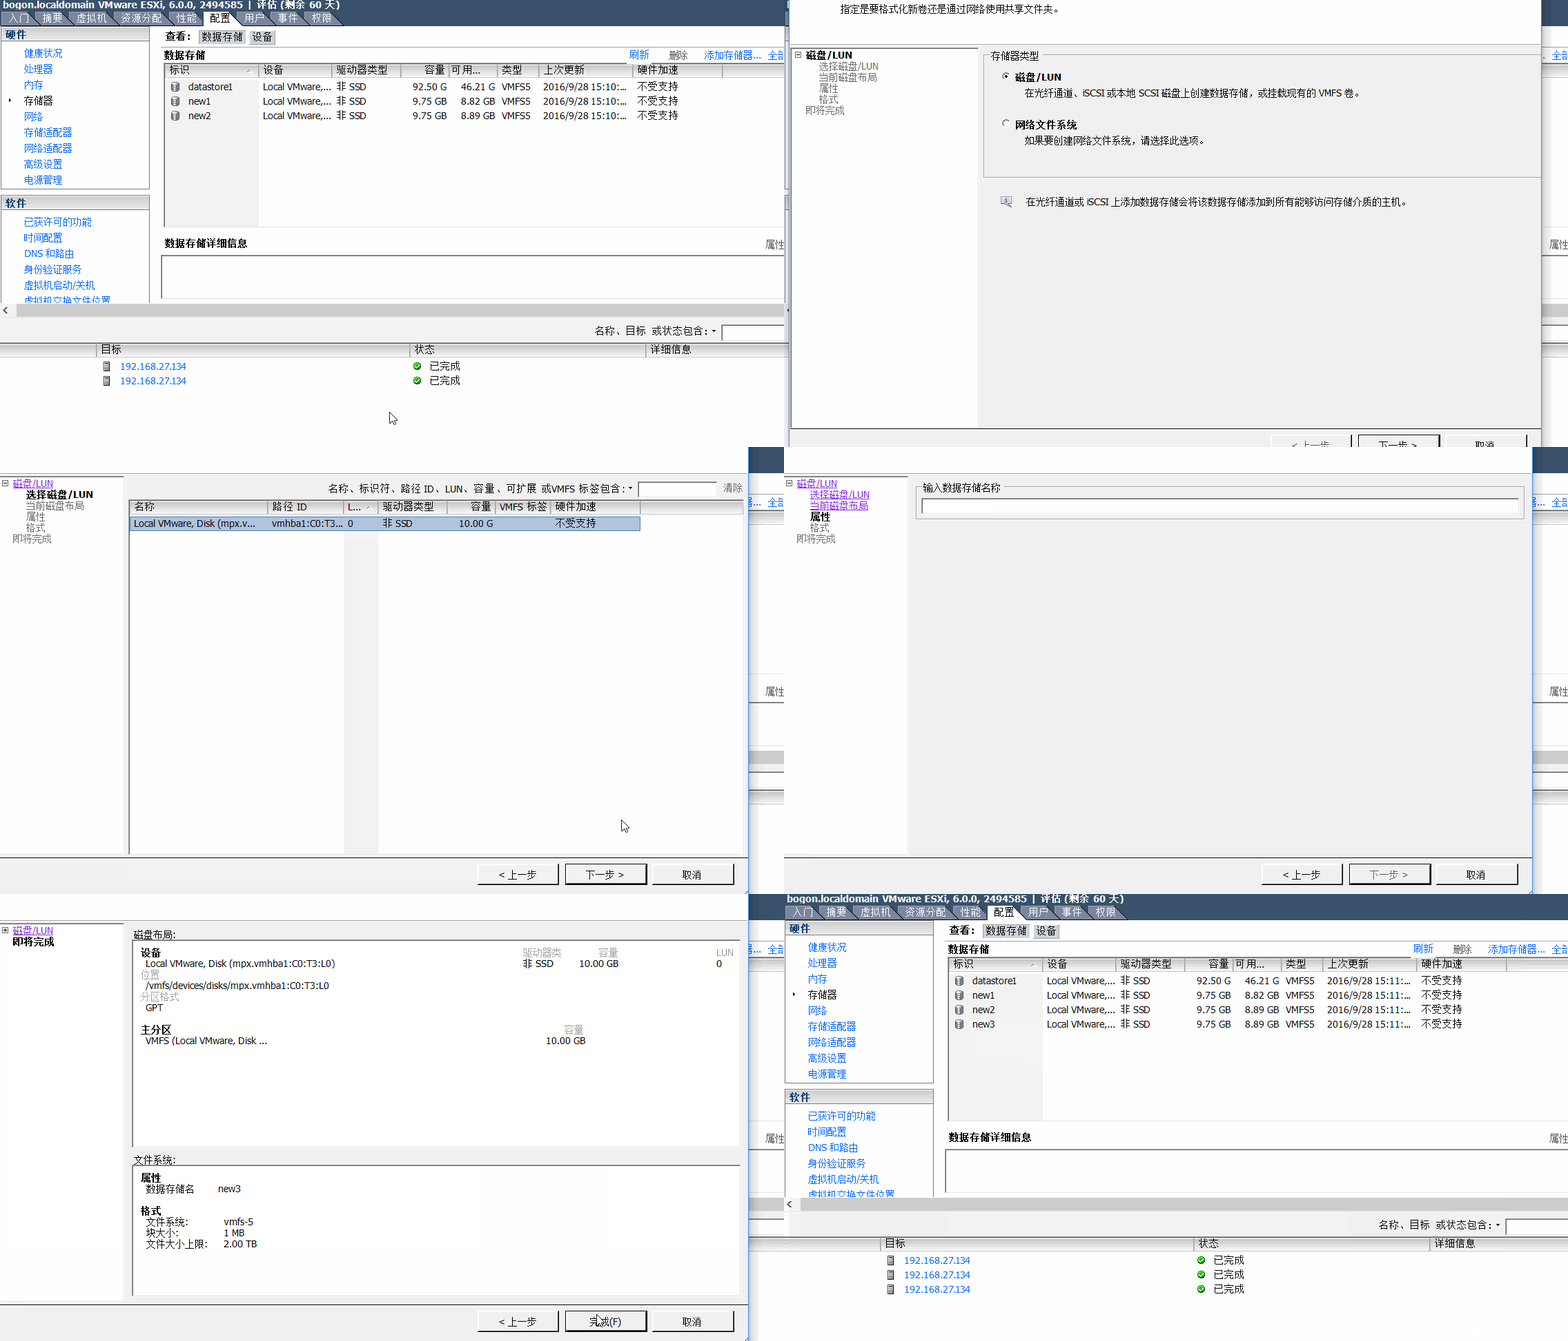
4、将默认添加的磁盘对象转换为Vsphere可以识别的VMFS5类型
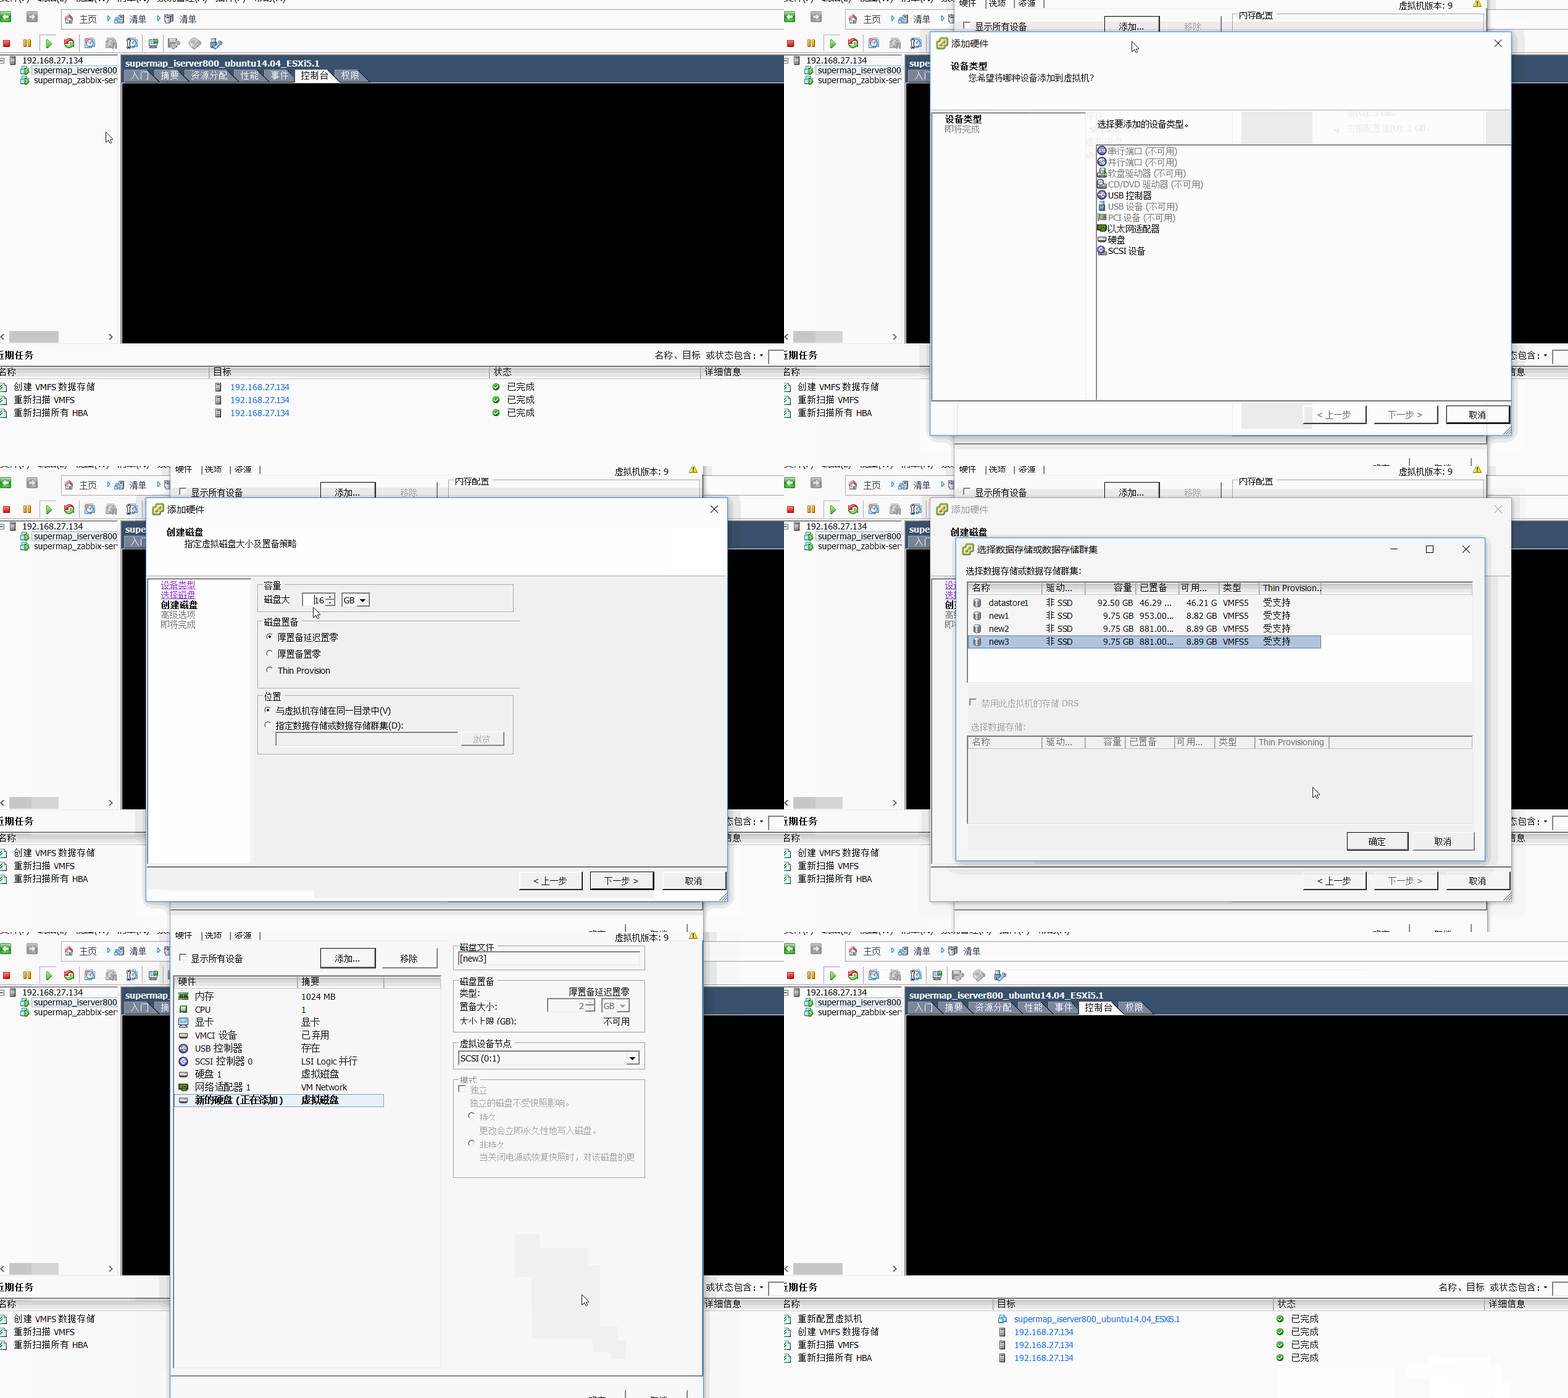
5、我已经在vSphere环境下导入了两个linux虚拟机,我们先为其中一个虚拟机添加新的磁盘
6、我们直接进入第一个虚拟机 192.168.27.135
a、执行fdisk -l查看有新的/dev/sdb盘已经识别到
root@ubuntu:~# fdisk -l

Disk /dev/sda: 21.5 GB, 21474836480 bytes
255 heads, 63 sectors/track, 2610 cylinders, total 41943040 sectors
Units = sectors of 1 * 512 = 512 bytes
Sector size (logical/physical): 512 bytes / 512 bytes
I/O size (minimum/optimal): 512 bytes / 512 bytes
Disk identifier: 0x0004537d

   Device Boot      Start         End      Blocks   Id  System
/dev/sda1   *        2048    39845887    19921920   83  Linux
/dev/sda2        39847934    41940991     1046529    5  Extended
/dev/sda5        39847936    41940991     1046528   82  Linux swap / Solaris

Disk /dev/sdb: 2147 MB, 2147483648 bytes
255 heads, 63 sectors/track, 261 cylinders, total 4194304 sectors
Units = sectors of 1 * 512 = 512 bytes
Sector size (logical/physical): 512 bytes / 512 bytes
I/O size (minimum/optimal): 512 bytes / 512 bytes
Disk identifier: 0x00000000

Disk /dev/sdb doesn't contain a valid partition table
b、执行fdisk /dev/sdb命令,创建分区,具体操作命令不做解释
root@ubuntu:~# fdisk -l /dev/sdb

Disk /dev/sdb: 2147 MB, 2147483648 bytes
255 heads, 63 sectors/track, 261 cylinders, total 4194304 sectors
Units = sectors of 1 * 512 = 512 bytes
Sector size (logical/physical): 512 bytes / 512 bytes
I/O size (minimum/optimal): 512 bytes / 512 bytes
Disk identifier: 0x00000000

Disk /dev/sdb doesn't contain a valid partition table
root@ubuntu:~# fdisk /dev/sdb
Device contains neither a valid DOS partition table, nor Sun, SGI or OSF disklabel
Building a new DOS disklabel with disk identifier 0xfe43626d.
Changes will remain in memory only, until you decide to write them.
After that, of course, the previous content won't be recoverable.

Warning: invalid flag 0x0000 of partition table 4 will be corrected by w(rite)

Command (m for help): n
Partition type:
   p   primary (0 primary, 0 extended, 4 free)
   e   extended
Select (default p):
Using default response p
Partition number (1-4, default 1):
Using default value 1
First sector (2048-4194303, default 2048):
Using default value 2048
Last sector, +sectors or +size{K,M,G} (2048-4194303, default 4194303):
Using default value 4194303

Command (m for help): w
The partition table has been altered!

Calling ioctl() to re-read partition table.
Syncing disks.
c、再次查看命令,可以看到已经创建了/dev/sdb1分区
root@ubuntu:~# fdisk -l

Disk /dev/sda: 21.5 GB, 21474836480 bytes
255 heads, 63 sectors/track, 2610 cylinders, total 41943040 sectors
Units = sectors of 1 * 512 = 512 bytes
Sector size (logical/physical): 512 bytes / 512 bytes
I/O size (minimum/optimal): 512 bytes / 512 bytes
Disk identifier: 0x0004537d

   Device Boot      Start         End      Blocks   Id  System
/dev/sda1   *        2048    39845887    19921920   83  Linux
/dev/sda2        39847934    41940991     1046529    5  Extended
/dev/sda5        39847936    41940991     1046528   82  Linux swap / Solaris

Disk /dev/sdb: 2147 MB, 2147483648 bytes
22 heads, 16 sectors/track, 11915 cylinders, total 4194304 sectors
Units = sectors of 1 * 512 = 512 bytes
Sector size (logical/physical): 512 bytes / 512 bytes
I/O size (minimum/optimal): 512 bytes / 512 bytes
Disk identifier: 0xfe43626d

   Device Boot      Start         End      Blocks   Id  System
/dev/sdb1            2048     4194303     2096128   83  Linux
d、格式化文件系统
root@ubuntu:~# mkfs.ext4 /dev/sdb1
mke2fs 1.42.9 (4-Feb-2014)
Filesystem label=
OS type: Linux
Block size=4096 (log=2)
Fragment size=4096 (log=2)
Stride=0 blocks, Stripe width=0 blocks
131072 inodes, 524032 blocks
26201 blocks (5.00%) reserved for the super user
First data block=0
Maximum filesystem blocks=536870912
16 block groups
32768 blocks per group, 32768 fragments per group
8192 inodes per group
Superblock backups stored on blocks:
        32768, 98304, 163840, 229376, 294912

Allocating group tables: done
Writing inode tables: done
Creating journal (8192 blocks): done
Writing superblocks and filesystem accounting information: done
e、在root下创建aa文件夹,然后将新的分区mount到该目录下,通过mount命令查看
root@ubuntu:~# ls
aa  config_env.sh  sources.list_aliyun_trusty
root@ubuntu:~# cd aa
root@ubuntu:~/aa# ls
root@ubuntu:~/aa# cd
root@ubuntu:~# mount /dev/sdb1 aa/
root@ubuntu:~# mount
/dev/sda1 on / type ext4 (rw,errors=remount-ro)
proc on /proc type proc (rw,noexec,nosuid,nodev)
sysfs on /sys type sysfs (rw,noexec,nosuid,nodev)
none on /sys/fs/cgroup type tmpfs (rw)
none on /sys/fs/fuse/connections type fusectl (rw)
none on /sys/kernel/debug type debugfs (rw)
none on /sys/kernel/security type securityfs (rw)
udev on /dev type devtmpfs (rw,mode=0755)
devpts on /dev/pts type devpts (rw,noexec,nosuid,gid=5,mode=0620)
tmpfs on /run type tmpfs (rw,noexec,nosuid,size=10%,mode=0755)
none on /run/lock type tmpfs (rw,noexec,nosuid,nodev,size=5242880)
none on /run/shm type tmpfs (rw,nosuid,nodev)
none on /run/user type tmpfs (rw,noexec,nosuid,nodev,size=104857600,mode=0755)
none on /sys/fs/pstore type pstore (rw)
/dev/sdb1 on /root/aa type ext4 (rw)
f、接下来,我们既可以将我们的关键数据存储在aa文件夹里面,因为这个存储是外接的,也就是虚拟机崩溃了,我们的数据还在。例如在aa创建一个文本文件。
root@ubuntu:~# cd aa/
root@ubuntu:~/aa# ls
config_env.sh  lost+found
root@ubuntu:~/aa#
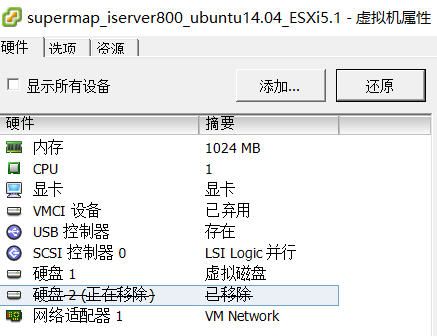
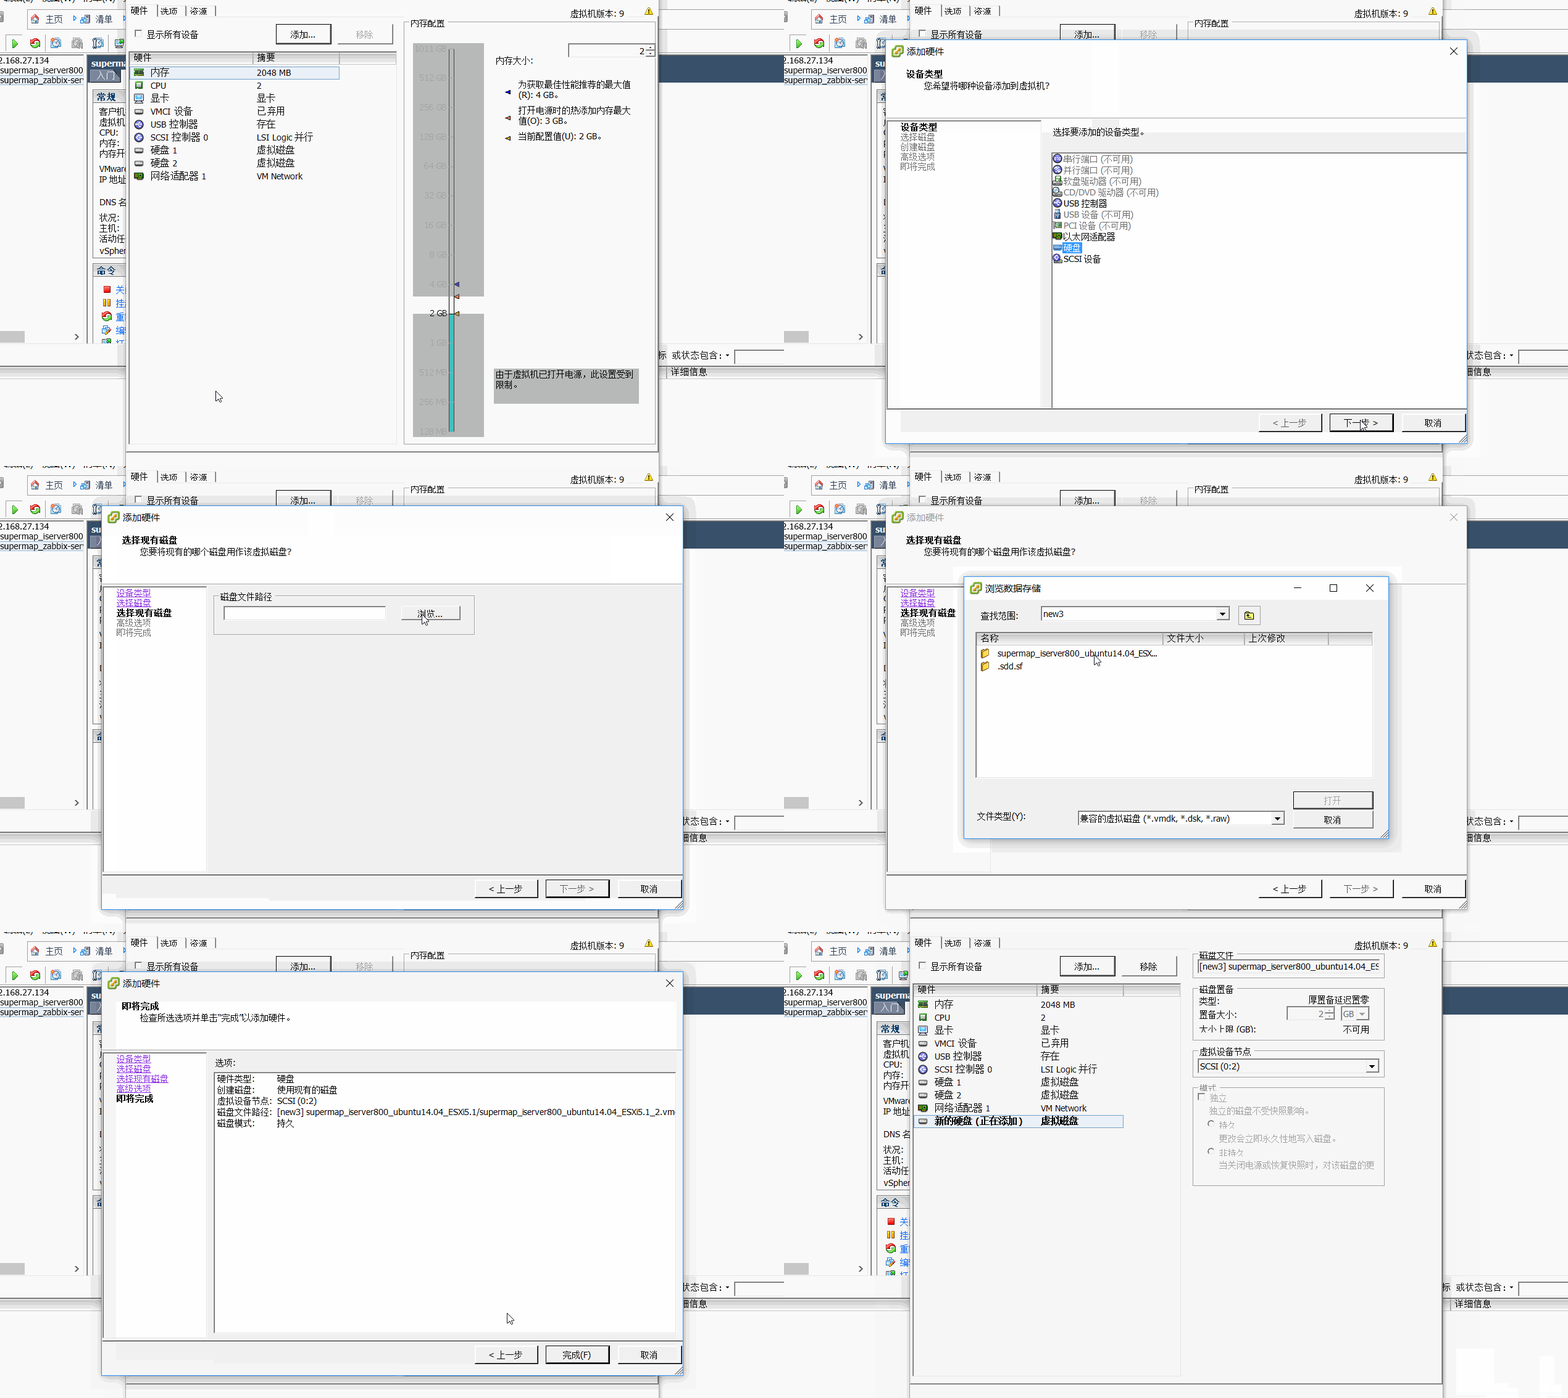
在移除右边有个移除选项,不能选择“移除并从磁盘删除文件”
8、进入第二个虚拟机(192.168.27.136),添加硬盘
在添加过程中,关键是选择已有磁盘,也就是选择创建的块存储文件即可。
9、连接136虚拟机,可以看到已经看到了/dev/sdb1分区
login as: root
[email protected]'s password:
Welcome to Ubuntu 14.04 LTS (GNU/Linux 3.13.0-24-generic x86_64)

 * Documentation:  https://help.ubuntu.com/
Last login: Wed Sep 28 15:45:41 2016 from 192.168.27.1
root@ubuntu:~# fdisk -l

Disk /dev/sdb: 2147 MB, 2147483648 bytes
22 heads, 16 sectors/track, 11915 cylinders, total 4194304 sectors
Units = sectors of 1 * 512 = 512 bytes
Sector size (logical/physical): 512 bytes / 512 bytes
I/O size (minimum/optimal): 512 bytes / 512 bytes
Disk identifier: 0xb49c7e87

   Device Boot      Start         End      Blocks   Id  System
/dev/sdb1            2048     4194303     2096128   83  Linux

Disk /dev/sda: 21.5 GB, 21474836480 bytes
255 heads, 63 sectors/track, 2610 cylinders, total 41943040 sectors
Units = sectors of 1 * 512 = 512 bytes
Sector size (logical/physical): 512 bytes / 512 bytes
I/O size (minimum/optimal): 512 bytes / 512 bytes
Disk identifier: 0x0004537d

   Device Boot      Start         End      Blocks   Id  System
/dev/sda1   *        2048    39845887    19921920   83  Linux
/dev/sda2        39847934    41940991     1046529    5  Extended
/dev/sda5        39847936    41940991     1046528   82  Linux swap / Solaris
10、在136服务器创建文件夹如bb,然后mount过来,可以看到原来的文件信息
root@ubuntu:~# mkdir bb
root@ubuntu:~# mount /dev/sdb1 bb
root@ubuntu:~# cd bb/
root@ubuntu:~/bb# ls
config_env.sh  lost+found
我们通过以上操作,可以实现基于vSphere环境下的数据持久化。
