Android自定义View——仿滴滴出行十大司机评选活动说明
仿滴滴出行十大司机评选活动说明
前言:
最近在使用滴滴出行的时候发现了一个有意思的View界面,看到心动的View就会想着动手去画一遍,本篇只是大概的模仿一下自定义的View的画法,如果有更好的方法,请大神指导留言。
事先说明:
该View涉及到Path类的运用,如果对Path类不熟悉的,可以看http://blog.sina.com.cn/s/blog_4d9c3fec0102vyhs.html,这篇文章通熟易懂
该View画出凹凸边缘的原理和分析请看我前面的文章http://blog.csdn.net/qq_30379689/article/details/52435493,这里就不再分析了
滴滴出行原版图: 仿效果图:
步骤一:分析变量信息
    //圆的半径
    private int radius = 8;
    //圆之间的间距
    private int gap = 8;
    private Paint mPaint;
    //返回字体的高度
    private float textViewHeight = dp2px(55, getContext());
    //三角形的宽度
    private float triAngleWidth = 60;
    public static int dp2px(float dp, Context ctx) {
        float density = ctx.getResources().getDisplayMetrics().density;
        // 4.1->4, 4.9->4
        int px = (int) (dp * density + 0.5f);// 加0.5可以四舍五入
        return px;
    }
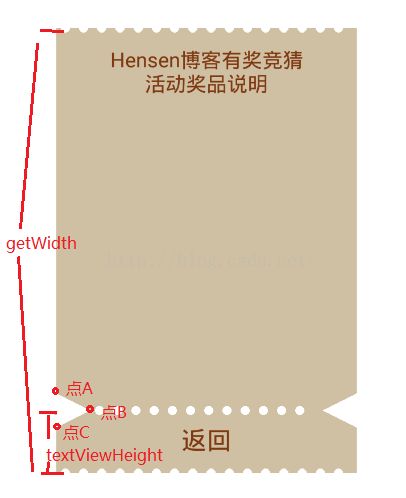
字体的高度:55dp是根据”返回“这个TextView的Padding的15dp(包括上下就等于30)和TextSize的25sp加上起来算出来的,这个高度可以用来画中间一排的圆。
三角形的宽度:以左三角形为例,图中的1、2、3都是这个宽度的值
步骤二:初始化画笔
public MyCardView(Context context) { super(context); init(); } public MyCardView(Context context, AttributeSet attrs) { super(context, attrs); init(); } public MyCardView(Context context, AttributeSet attrs, int defStyleAttr) { super(context, attrs, defStyleAttr); init(); } private void init() { mPaint = new Paint(); mPaint.setColor(Color.WHITE); mPaint.setStyle(Paint.Style.FILL); mPaint.setDither(true); }步骤三:实现onDraw方法,进行我们的绘制@Override protected void onDraw(Canvas canvas) { super.onDraw(canvas); //画上下圆 int roundNum = getWidth() / (radius * 2 + gap * 2); for (int i = 1; i <= roundNum; i++) { canvas.drawCircle((gap + radius) * (2 * i - 1), 0, radius, mPaint); canvas.drawCircle((gap + radius) * (2 * i - 1), getHeight(), radius, mPaint); } //画中间的圆 int roundNum2 = (int) ((getWidth() - (2 * triAngleWidth)) / (radius * 2 + gap * 2)); for (int i = 1; i <= roundNum2; i++) { canvas.drawCircle((gap + radius) * (2 * i - 1) + triAngleWidth, getHeight() - textViewHeight, radius, mPaint); } //画三角形形 Path path = new Path(); path.moveTo(0, getHeight() - textViewHeight - triAngleWidth / 2); path.lineTo(0, getHeight() - textViewHeight + triAngleWidth / 2); path.lineTo(triAngleWidth, getHeight() - textViewHeight); path.close(); canvas.drawPath(path, mPaint); //第二个三角形 path.reset(); path.moveTo(getWidth(), getHeight() - textViewHeight - triAngleWidth / 2); path.lineTo(getWidth(), getHeight() - textViewHeight + triAngleWidth / 2); path.lineTo(getWidth() - triAngleWidth, getHeight() - textViewHeight); path.close(); canvas.drawPath(path, mPaint); }步骤四:在xml中绘制你需要的布局<?xml version="1.0" encoding="utf-8"?> <RelativeLayout xmlns:android="http://schemas.android.com/apk/res/android" android:layout_width="match_parent" android:layout_height="match_parent" android:background="#ffffff" android:padding="60dp"> <com.handsome.app2.View.Custom.MyCardView android:layout_width="match_parent" android:layout_height="match_parent" android:orientation="vertical" android:background="#D0C0A3"> <LinearLayout android:layout_width="match_parent" android:layout_height="wrap_content"> <TextView android:layout_width="match_parent" android:layout_height="wrap_content" android:gravity="center" android:padding="15dp" android:text="Hensen博客有奖竞猜\n活动奖品说明" android:textColor="#7F3912" android:textSize="18sp" /> </LinearLayout> <!--中间的主体内容--> <ScrollView android:layout_weight="1" android:layout_width="match_parent" android:layout_height="match_parent"> </ScrollView> <LinearLayout android:layout_width="match_parent" android:layout_height="wrap_content"> <TextView android:layout_width="match_parent" android:layout_height="wrap_content" android:gravity="center" android:padding="15dp" android:text="返回" android:textColor="#7F3912" android:textSize="22sp" /> </LinearLayout> </com.handsome.app2.View.Custom.MyCardView> </RelativeLayout>步骤五:分析上面代码的绘制过程思路分析:1、画上下圆:可以看我上篇博客有分析,这里就不讲了,文章开头也有说明。2、画中间圆:用原来算上下圆的个数的方法,只需要修改:整个View的宽度 — 两边三角形的宽度,再来计算个数。3、画三角形:左三角形、先将Path移到点A,再lineTo到点B,再lineTo到点C,最后close自动从点C画到点A。同理,右三角形也如此。
最后献上这个类的源码:public class MyCardView extends LinearLayout {

    //圆的半径
    private int radius = 8;
    //圆之间的间距
    private int gap = 8;
    private Paint mPaint;
    //返回字体的高度
    private float textViewHeight = dp2px(55, getContext());
    //三角形的宽度
    private float triAngleWidth = 60;

    public MyCardView(Context context) {
        super(context);
        init();
    }

    public MyCardView(Context context, AttributeSet attrs) {
        super(context, attrs);
        init();
    }

    public MyCardView(Context context, AttributeSet attrs, int defStyleAttr) {
        super(context, attrs, defStyleAttr);
        init();
    }

    private void init() {
        mPaint = new Paint();
        mPaint.setColor(Color.WHITE);
        mPaint.setStyle(Paint.Style.FILL);
        mPaint.setDither(true);
    }

    @Override
    protected void onDraw(Canvas canvas) {
        super.onDraw(canvas);
        //画上下圆
        int roundNum = getWidth() / (radius * 2 + gap * 2);
        for (int i = 1; i <= roundNum; i++) {
            canvas.drawCircle((gap + radius) * (2 * i - 1), 0, radius, mPaint);
            canvas.drawCircle((gap + radius) * (2 * i - 1), getHeight(), radius, mPaint);
        }
        //画中间的圆
        int roundNum2 = (int) ((getWidth() - (2 * triAngleWidth)) / (radius * 2 + gap * 2));
        for (int i = 1; i <= roundNum2; i++) {
            canvas.drawCircle((gap + radius) * (2 * i - 1) + triAngleWidth, getHeight() - textViewHeight, radius, mPaint);
        }
        //画三角形形
        Path path = new Path();
        path.moveTo(0, getHeight() - textViewHeight - triAngleWidth / 2);
        path.lineTo(0, getHeight() - textViewHeight + triAngleWidth / 2);
        path.lineTo(triAngleWidth, getHeight() - textViewHeight);
        path.close();
        canvas.drawPath(path, mPaint);
        //第二个三角形
        path.reset();
        path.moveTo(getWidth(), getHeight() - textViewHeight - triAngleWidth / 2);
        path.lineTo(getWidth(), getHeight() - textViewHeight + triAngleWidth / 2);
        path.lineTo(getWidth() - triAngleWidth, getHeight() - textViewHeight);
        path.close();
        canvas.drawPath(path, mPaint);
    }

    public static int dp2px(float dp, Context ctx) {
        float density = ctx.getResources().getDisplayMetrics().density;
        // 4.1->4, 4.9->4
        int px = (int) (dp * density + 0.5f);// 加0.5可以四舍五入
        return px;
    }
}
