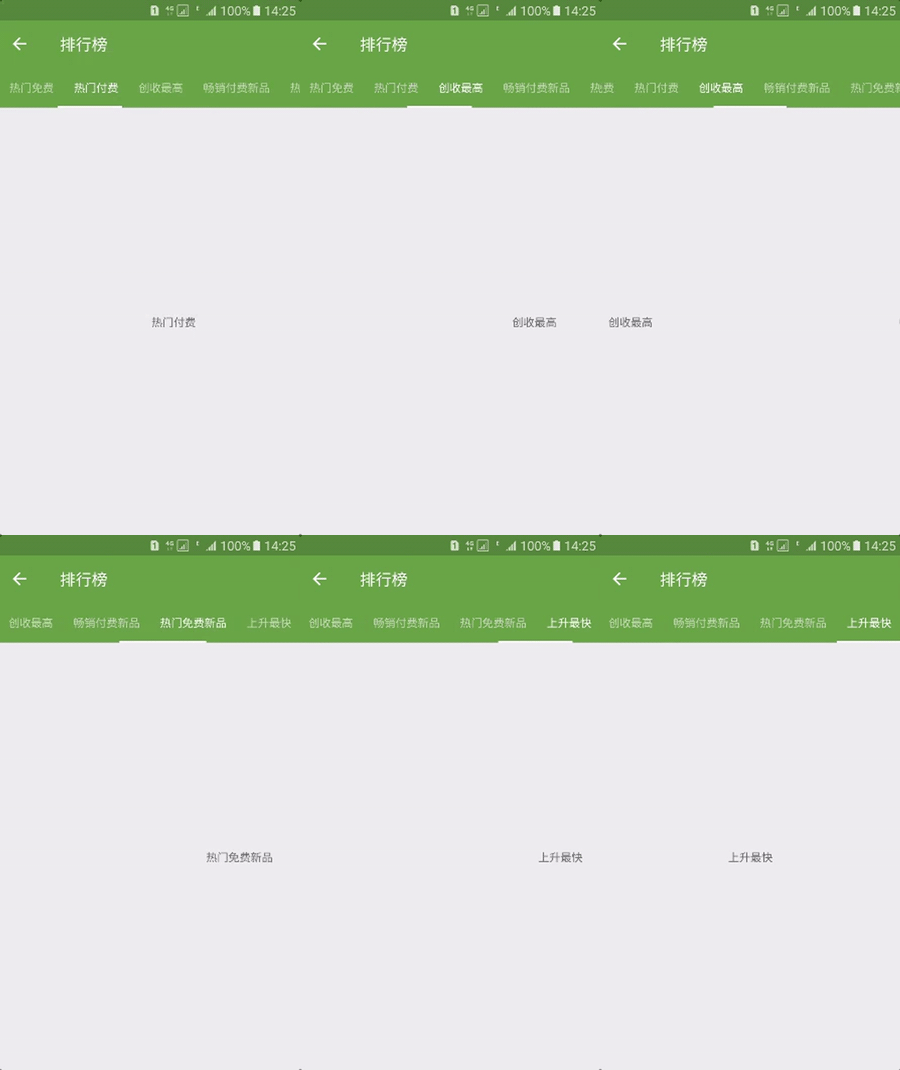
Android Material Design 使用TabLayout优雅的打造指示器
转载请注明出处:http://blog.csdn.net/smartbetter/article/details/52881954
Github项目地址:https://github.com/smartbetter/Android-TabLayout
在移动应用中切换不同场景/功能,在Android中,经常见到左右滑动式设计的。我看到Google Play的排行榜那个页面使用的不是老旧的ViewPagerIndicator,而是Google推荐的TabLayout,效果非常好看,既然是Google推荐,那一定会是大势所趋,如何实现类似Google Play应用商店式的左右滑动呢,这就得靠TabLayout来实现了。TabLayout是Google官方推荐使用的哦!我们来看一下效果图:
下面我们就来实现一下Google Play 排行榜 指示器模块。
1.添加Gradle依赖
'compile 'com.android.support:design:24.2.1''2.添加MainActivity布局文件
顶部是通过Toolbar实现的,而指示器的标签是通过TabLayout实现,下面内容的变化则是ViewPager+Fragment实现的。
<?xml version="1.0" encoding="utf-8"?>
<LinearLayout xmlns:android="http://schemas.android.com/apk/res/android" xmlns:app="http://schemas.android.com/apk/res-auto" xmlns:tools="http://schemas.android.com/tools" android:layout_width="match_parent" android:layout_height="match_parent" android:orientation="vertical" tools:context="com.gc.tablayout.MainActivity">

    <!-- Toolbar -->
    <!-- app:elevation = "0dp" // 去除阴影效果 -->
    <android.support.design.widget.AppBarLayout  android:id="@+id/app_bar" android:layout_width="match_parent" android:layout_height="wrap_content" app:elevation = "0dp" android:theme="@style/AppTheme.AppBarOverlay">

        <android.support.v7.widget.Toolbar  android:id="@+id/toolbar" android:layout_width="match_parent" android:layout_height="?attr/actionBarSize" android:background="?attr/colorPrimary" app:popupTheme="@style/AppTheme.PopupOverlay" />

    </android.support.design.widget.AppBarLayout>

    <!-- TabLayout属性 app:tabIndicatorColor="" // 下方滚动的下划线颜色 app:tabSelectedTextColor="" // Tab被选中后,文字的颜色 app:tabTextColor="" // Tab默认的文字颜色 -->
    <android.support.design.widget.TabLayout  android:id="@+id/tabLayout" android:layout_width="match_parent" android:layout_height="wrap_content" android:background="#659D43" app:tabIndicatorColor="#ffffff" app:tabSelectedTextColor="#ffffff" app:tabTextColor="#C0D6B1" app:tabMode="scrollable" />

    <android.support.v4.view.ViewPager  android:id="@+id/viewPager" android:layout_width="match_parent" android:layout_height="0dp" android:layout_weight="1" android:background="#EEEEEE" />

</LinearLayout>
3.创建Fragment
切换ViewPager,显示不同的Fragment,在这里新建一个TextView作示例,AFragment如下,其余Fragment雷同,这里不再赘述。
public class AFragment extends Fragment{
    @Nullable
    @Override
    public View onCreateView(LayoutInflater inflater, @Nullable ViewGroup container, @Nullable Bundle savedInstanceState) {
        TextView textView = new TextView(getContext());
        textView.setGravity(Gravity.CENTER);
        textView.setText("热门免费");
        return textView;
    }
}
4.创建FragmentPager适配器类
相信Fragment+ViewPager+FragmentPagerAdapter的组合,大家已经用得很熟悉了,在这里直接上代码。
public class MyFragmentPagerAdapter extends FragmentPagerAdapter {
    private List<Fragment> listFragment; // Fragment列表
    private List<String> listTitle; // Tab名的列表
    public MyFragmentPagerAdapter(FragmentManager fm, List<Fragment> listFragment, List<String> listTitle) {
        super(fm);
        this.listFragment = listFragment;
        this.listTitle = listTitle;
    }
    @Override
    public Fragment getItem(int position) {
        return listFragment.get(position);
    }
    @Override
    public int getCount() {
        return listTitle.size();
    }
    // 此方法用来显示Tab上的名字
    @Override
    public CharSequence getPageTitle(int position) {
        return listTitle.get(position % listTitle.size());
    }
}
这里采用了List来直接加载多个fragment。
5.Activity具体实现
这一步我们在Activity中初始化我们的Fragment和各控件
public class MainActivity extends AppCompatActivity {
    private TabLayout tabLayout;
    private ViewPager viewPager;
    private MyFragmentPagerAdapter myFragmentPagerAdapter;
    private List<Fragment> listFragment;
    private List<String> listTitle;
    /** * 此处的众多Fragment由开发者自定义替换 */
    private AFragment aFragment;
    private BFragment bFragment;
    private CFragment cFragment;
    private DFragment dFragment;
    private EFragment eFragment;
    private FFragment fFragment;
    @Override
    protected void onCreate(@Nullable Bundle savedInstanceState) {
        super.onCreate(savedInstanceState);
        setContentView(R.layout.activity_main);

        // Set Toolbar.
        Toolbar toolbar = (Toolbar) findViewById(R.id.toolbar);
        setSupportActionBar(toolbar);
        getSupportActionBar().setDisplayHomeAsUpEnabled(true); // Show toolbar return arrow.
        toolbar.setNavigationOnClickListener(new View.OnClickListener() {
            @Override
            public void onClick(View v) {
            }
        });
        initView();
    }

    /** * 初始化各控件 */
    private void initView() {
        tabLayout = (TabLayout) findViewById(R.id.tabLayout);
        viewPager = (ViewPager) findViewById(R.id.viewPager);

        // 初始化各fragment
        aFragment = new AFragment();
        bFragment = new BFragment();
        cFragment = new CFragment();
        dFragment = new DFragment();
        eFragment = new EFragment();
        fFragment = new FFragment();

        // 将fragment装进列表中
        listFragment = new ArrayList<>();
        listFragment.add(aFragment);
        listFragment.add(bFragment);
        listFragment.add(cFragment);
        listFragment.add(dFragment);
        listFragment.add(eFragment);
        listFragment.add(fFragment);

        // 将名称加载tab名字列表,正常情况下,我们应该在values/arrays.xml中进行定义然后调用
        listTitle = new ArrayList<>();
        listTitle.add("热门免费");
        listTitle.add("热门付费");
        listTitle.add("创收最高");
        listTitle.add("畅销付费新品");
        listTitle.add("热门免费新品");
        listTitle.add("上升最快");

        // tabLayout.setTabGravity(TabLayout.GRAVITY_FILL);
        // 设置TabLayout的模式
        tabLayout.setTabMode(TabLayout.MODE_SCROLLABLE);
        // tabLayout.setTabMode(TabLayout.MODE_FIXED);
        // 为TabLayout添加tab名称
        tabLayout.addTab(tabLayout.newTab().setText(listTitle.get(0)));
        tabLayout.addTab(tabLayout.newTab().setText(listTitle.get(1)));
        tabLayout.addTab(tabLayout.newTab().setText(listTitle.get(2)));
        tabLayout.addTab(tabLayout.newTab().setText(listTitle.get(3)));
        tabLayout.addTab(tabLayout.newTab().setText(listTitle.get(4)));
        tabLayout.addTab(tabLayout.newTab().setText(listTitle.get(5)));

        myFragmentPagerAdapter = new MyFragmentPagerAdapter(getSupportFragmentManager(), listFragment, listTitle);

        viewPager.setAdapter(myFragmentPagerAdapter);
        tabLayout.setupWithViewPager(viewPager);
    }
}
下面就来解释一下TabGravity和TabMode:
TabGravity:放置Tab的Gravity,有GRAVITY_CENTER 和 GRAVITY_FILL两种效果。一个是居中,另一个是尽可能的填充(注意:GRAVITY_FILL需要和MODE_FIXED一起使用才有效果)
TabMode:布局中Tab的行为模式(behavior mode),有两种值:MODE_FIXED 和 MODE_SCROLLABLE。
MODE_FIXED:固定tabs,并同时显示所有的tabs。
MODE_SCROLLABLE:可滚动tabs,显示一部分tabs,在这个模式下能包含长标签和大量的tabs,最好用于用户不需要直接比较tabs。
6.其余相关文件
styles.xml
<resources>
    <!-- Base application theme. -->
    <style name="AppTheme" parent="Theme.AppCompat.Light.DarkActionBar">
        <!-- Customize your theme here. -->
        <item name="colorPrimary">@color/colorPrimary</item>
        <item name="colorPrimaryDark">@color/colorPrimaryDark</item>
        <item name="colorAccent">@color/colorAccent</item>
    </style>
    <style name="AppTheme.NoActionBar">
        <item name="windowActionBar">false</item>
        <item name="windowNoTitle">true</item>
    </style>
    <style name="AppTheme.AppBarOverlay" parent="ThemeOverlay.AppCompat.Dark.ActionBar" />
    <style name="AppTheme.PopupOverlay" parent="ThemeOverlay.AppCompat.Light" />
</resources>
colors.xml
<resources>
    <color name="colorPrimary">#659D43</color>
    <color name="colorPrimaryDark">#528037</color>
    <color name="colorAccent">#FF4081</color>
</resources>
AndroidManifest.xml
<manifest xmlns:android="http://schemas.android.com/apk/res/android" package="com.gc.tablayout">
    <application  android:allowBackup="true" android:icon="@mipmap/ic_launcher" android:label="@string/app_name" android:supportsRtl="true" android:theme="@style/AppTheme">
        <activity android:name=".MainActivity" android:theme="@style/AppTheme.NoActionBar">
            <intent-filter>
                <action android:name="android.intent.action.MAIN" />
                <category android:name="android.intent.category.LAUNCHER" />
            </intent-filter>
        </activity>
    </application>
</manifest>
到此,Google Play 排行榜 指示器模块 基本实现完毕,Android Material Design还有很多其他新特性,需要我们不断的尝试创新。
