Android学习三UI之Layout
Android,有个特点,就是特别漂亮,我们能看到的称之为:UI(User Interface),用户界面
今天一起学习UI的布局Layout,学过几天Java基础的应该对Java里的GUI编程有所了解,里面有一个设计模式:Observer,观察者。对设计模式感兴趣的朋友,本人推荐一本书:《Head First 设计模式》
Android里的 UI开发有所不同,一个最明显的特点就是:android把布局、控件都写着了配置文件文件里,代码简化了。
废话少说,我们开始第一个例子,依然参考文档:http://developer.android.com/guide/topics/ui/declaring-layout.html和
http://developer.android.com/resources/tutorials/views/index.html
Declaring Layout
Hello Views
马士兵老师教育我们:不穿二手鞋
其实学习android有这么一份自带的文档加上Eclipse足以
我们先看一个页面
如何声明(Declaring )布局:
1,Declare UI elements in XML. Android provides a straightforward XML vocabulary that corresponds to the View classes and subclasses, such as those for widgets and layouts.
2,Instantiate layout elements at runtime. Your application can create View and ViewGroup objects (and manipulate their properties) programmatically.
第一步:在xml文件中申明UI元素
第二步:在运行时实例化布局元素
打开Eclipse,新建一个android project :layout01
代开main.xml配置文件,有两种视图:1,图形化 2,文本
图形化的支持拖拽,但是我没用习惯,还是选择箭头所指的的那个视图
<?xml version="1.0" encoding="utf-8"?>
<LinearLayout xmlns:android="http://schemas.android.com/apk/res/android"
    android:orientation="vertical"
    android:layout_width="fill_parent"
    android:layout_height="fill_parent"
    >
<TextView
    android:id="@+id/my_textView"
    android:layout_width="fill_parent"
    android:layout_height="wrap_content"
    android:text="@string/hello"
    />
</LinearLayout>
这里默认声明了一个线性布局:LinearLayout,里面放置了一个TextView文本框,id是“my_textView”
里面标签的含义待会再说,这里反正完成了第一步
开始第二步:实例化
package com.zph;

import android.app.Activity;
import android.os.Bundle;

public class LinearLayoutActivity extends Activity {
    /** Called when the activity is first created. */
    @Override
    public void onCreate(Bundle savedInstanceState) {
        super.onCreate(savedInstanceState);
        setContentView(R.layout.main);
    }
}
在回调方法onCreate()中进行实例化配置好的布局元素
先前main.xml中一些元素(文档中称之为:Attributes)
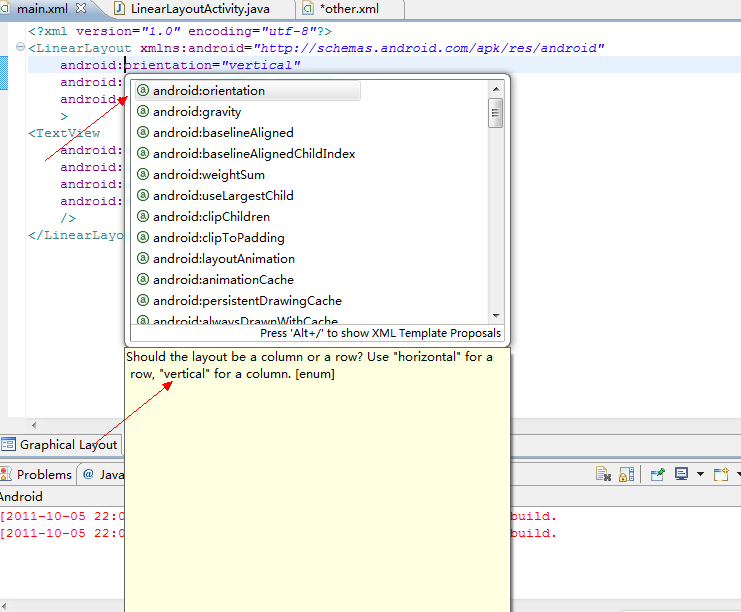
这些元素的含义和用法我不打算说明,也实在是说明不过来。不过有一个办法,用Eclipse的代码提示功能:
把鼠标放到需要了解的地方,按下快捷键:alt+/,就会有提示,按下F2可以让画面停住
就是这么简单,后面的英文自己如果不会问Google
这里就提一点:ID的表示,Android里表示一个ID是用固定表示方法的:@+id/IDNameID
要具有唯一性,为什么要有ID呢?主要是为了后面程序中要去的控件打下基础,没ID就没办法拿到这些控件,。举个例子,我们现在要拿到这个TextView,并写入“good night”,可以这样写:
        TextView myTextView = (TextView)findViewById(R.id.my_textView);
        myTextView.setText("good night");
ID在相对布局RelativeLayout中重要性更为明显。
在android的API文档中对这些标签的描述更为详尽:
前面只是说了LinearLayout,Android的布局有很多种:http://developer.android.com/guide/topics/ui/layout-objects.html
几种重要的视图组
对于每种布局,都有这么几个要点
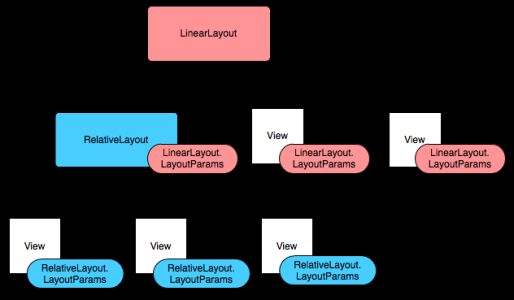
1,Layout parameters 布局参数
文档里给了一个图
我还没完全看明白,直接粘贴过来
Note that every LayoutParams subclass has its own syntax for setting values. Each child element must define LayoutParams that are appropriate for its parent, though it may also define different LayoutParams for its own children所有的视图都要包含:宽度和高度
All view groups include a width and height (layout_width and layout_height), and each view is required to define them. Many LayoutParams also include optional margins and borders.
文档里给出了两个经常用到的参数:
wrap_content :tells your view to size itself to the dimensions required by its content
fill_parent (renamed match_parent in API Level 8): tells your view to become as big as its parent view group will allow.
稍微解释一下:wrap_content,大小能包含住内容就可以了;fill_parent,填满父视图
2,Layout Position 布局位置
3, Size, Padding and Margins 大小、填充和边距
有过B/S开发经验的朋友对此应该不陌生,Android封装了一系列的方法,可以获取我们的Layout的这些参数。
通过查找API,可以发现类View封装了这些方法
这个类里的东西比较多,凡是继承View的类都有这些方法,像我们已经接触的过的TextView、Button都是继承View
我自己这写着写着都不知道自己在写什么了,还是直接通过一个例子来说明Layout吧
我们一起来实现这个例子:
http://developer.android.com/resources/tutorials/views/hello-tabwidget.html
创建一个project 命名为:HelloTabWidget,再新建三个Activity
因为这是Tab Layout ,所以配置文件只要有一个就可以了,不用在layout文件夹为每个Activity创建xml文件,在AndroidManifest文件添加相应的activity 标记就可以了
还要在drawable文件下需要创建三个配置文件
还需要准备六张小图片,这里我从文档中的例子里直接复制下来了,都放到drawable文件夹下面
打开main.xml文件
代码如下:
<?xml version="1.0" encoding="utf-8"?>
<TabHost xmlns:android="http://schemas.android.com/apk/res/android"
    android:id="@android:id/tabhost"
    android:layout_width="fill_parent"
    android:layout_height="fill_parent">
    <LinearLayout
        android:orientation="vertical"
        android:layout_width="fill_parent"
        android:layout_height="fill_parent"
        android:padding="5dp">
        <TabWidget
            android:id="@android:id/tabs"
            android:layout_width="fill_parent"
            android:layout_height="wrap_content" />
        <FrameLayout
            android:id="@android:id/tabcontent"
            android:layout_width="fill_parent"
            android:layout_height="fill_parent"
            android:padding="5dp" />
    </LinearLayout>
</TabHost>
打开AndroidManifest.xml
在activity标签加入一下代码:
android:theme="@android:style/Theme.NoTitleBar"
最后我们打开HelloTabWidgetActivity.java,这个类继承的是TabActivity
加入以下代码:
 Resources res = getResources(); // Resource object to get Drawables
    TabHost tabHost = getTabHost();  // The activity TabHost
    TabHost.TabSpec spec;  // Resusable TabSpec for each tab
    Intent intent;  // Reusable Intent for each tab

    // Create an Intent to launch an Activity for the tab (to be reused)
    intent = new Intent().setClass(this, ArtistsActivity.class);

    // Initialize a TabSpec for each tab and add it to the TabHost
    spec = tabHost.newTabSpec("artists").setIndicator("Artists",
                      res.getDrawable(R.drawable.ic_tab_artists))
                  .setContent(intent);
    tabHost.addTab(spec);

    // Do the same for the other tabs
    intent = new Intent().setClass(this, AlbumsActivity.class);
    spec = tabHost.newTabSpec("albums").setIndicator("Albums",
                      res.getDrawable(R.drawable.ic_tab_albums))
                  .setContent(intent);
    tabHost.addTab(spec);

    intent = new Intent().setClass(this, SongsActivity.class);
    spec = tabHost.newTabSpec("songs").setIndicator("Songs",
                      res.getDrawable(R.drawable.ic_tab_songs))
                  .setContent(intent);
    tabHost.addTab(spec);

    tabHost.setCurrentTab(2);
运行:
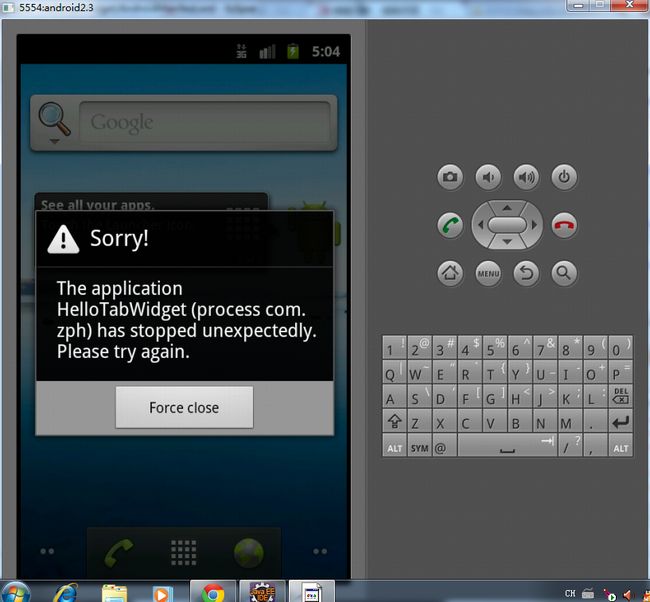
未完:出错了
昨天晚上运行的时候出错了,原来是AndroidManifest.xml文件里的ArtistsActivity配置错了,现在改过来了
代码如下:
<?xml version="1.0" encoding="utf-8"?>
<manifest xmlns:android="http://schemas.android.com/apk/res/android"
      android:versionCode="1"
   	package="com.zph"
      android:versionName="1.0">
    <uses-sdk android:minSdkVersion="10" />

    <application android:icon="@drawable/icon" android:label="@string/app_name">
       <activity android:name="com.zph.HelloTabWidgetActivity" android:label="@string/app_name"
          android:theme="@android:style/Theme.NoTitleBar">
            <intent-filter>
                <action android:name="android.intent.action.MAIN" />
                <category android:name="android.intent.category.LAUNCHER" />
            </intent-filter>
        </activity>
        <activity android:label="@drawable/ic_tab_artists"
        android:theme="@android:style/Theme.Black.NoTitleBar.Fullscreen"
        android:name="com.zph.ArtistsActivity">
        	<intent-filter>
        		<category android:name="android.intent.category.TAB" />
        	</intent-filter>
        </activity>
		<activity android:name="com.zph.AlbumsActivity"
		android:label="@drawable/ic_tab_albums"
		>
		<intent-filter>
        		<category android:name="android.intent.category.TAB" />
        	</intent-filter>
		</activity>
		<activity android:name="com.zph.SongsActivity"
		android:label="@drawable/ic_tab_songs"
			>
			<intent-filter>
        		<category android:name="android.intent.category.TAB" />
        	</intent-filter>
			</activity>
    </application>
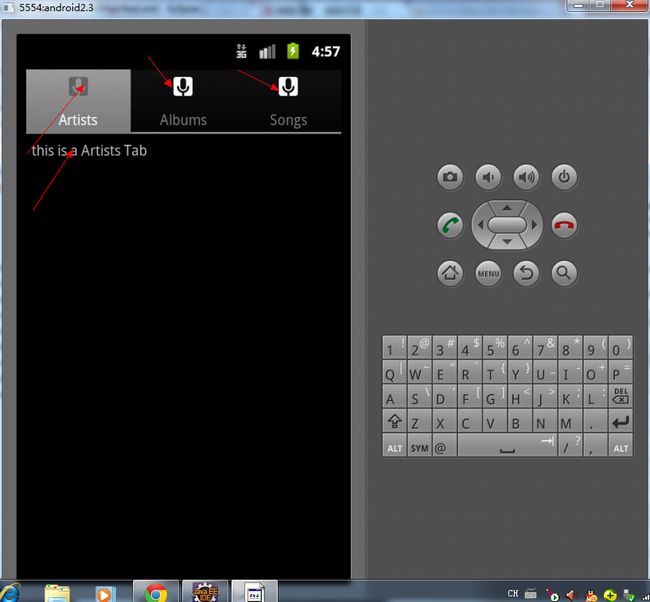
</manifest>
运行结果:


