flink实战—安装与使用
概述
flink分为三种模式运行:local,cluster,基于cloud的运行。
本文描述了flink在local模式下的安装与使用。
环境介绍
- 系统
Centos-7.0 x64
安装
下载并安装
- 首先下载并安装java
$ java -version
java version "1.8.0_92"
Java(TM) SE Runtime Environment (build 1.8.0_92-b14)
Java HotSpot(TM) 64-Bit Server VM (build 25.92-b14, mixed mode)
- 下载flink
从以下链接下载flink相关版本,如下:
http://mirrors.hust.edu.cn/apache/flink/flink-1.7.1/flink-1.7.1-bin-hadoop28-scala_2.11.tgz
- 解压并启动
$ tar xzvf flink-1.7.1-bin-hadoop28-scala_2.11.tgz
$ cd flink-1.7.1/
$ ./bin/start-cluster.sh
Starting cluster.
Starting standalonesession daemon on host firstvm.
Starting taskexecutor daemon on host firstvm.
- 查看启动日志
在flink-1.7.1的log目录下查看启动日志文件:
$ cat flink-*-standalonesession-1-*.log
- 任务执行日志文件
另外要说明的是flink的任务执行文件在以下文件中:
log/flink-*-taskexecutor-1-*.out
查看管理界面
按以上命令启动flink时,可以查看flink自带的管理界面。
- 关闭防火墙
$ sudo systemctl stop firewall
- 查看管理界面
在浏览器中输入以下地址:
http://192.168.1.106:8081/#/overview
即可看到flink的启动界面。
运行测试程序
开启本地服务器
开启一个新的终端,并输入命令:
$ nc -l 9001
提交Flink计划
$ ./bin/flink run examples/streaming/SocketWindowWordCount.jar --port 9001
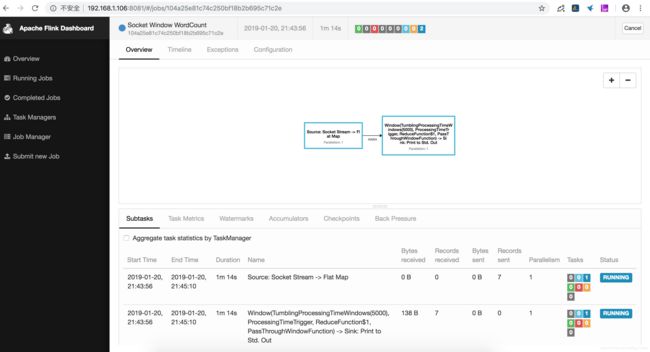
让flink任务程序连接到服务器端口并等待输入。您可以检查Web界面以验证作业是否按预期运行:


输入测试文本
在nc -l 9001的终端中输入一下文字:
this is a test
test is ok
查看计算结果
cd log
$ cat flink-*-taskexecutor-1-*.out
this : 1
ok : 1
test : 2
a : 1
is : 2
可以看到该任务执行成功了。
单词计数的源代码
public class SocketWindowWordCount {

    public static void main(String[] args) throws Exception {

        // the port to connect to
        final int port;
        try {
            final ParameterTool params = ParameterTool.fromArgs(args);
            port = params.getInt("port");
        } catch (Exception e) {
            System.err.println("No port specified. Please run 'SocketWindowWordCount --port '");
            return;
        }

        // get the execution environment
        final StreamExecutionEnvironment env = StreamExecutionEnvironment.getExecutionEnvironment();

        // get input data by connecting to the socket
        DataStream text = env.socketTextStream("localhost", port, "\n");

        // parse the data, group it, window it, and aggregate the counts
        DataStream windowCounts = text
            .flatMap(new FlatMapFunction() {
                @Override
                public void flatMap(String value, Collector out) {
                    for (String word : value.split("\\s")) {
                        out.collect(new WordWithCount(word, 1L));
                    }
                }
            })
            .keyBy("word")
            .timeWindow(Time.seconds(5), Time.seconds(1))
            .reduce(new ReduceFunction() {
                @Override
                public WordWithCount reduce(WordWithCount a, WordWithCount b) {
                    return new WordWithCount(a.word, a.count + b.count);
                }
            });

        // print the results with a single thread, rather than in parallel
        windowCounts.print().setParallelism(1);

        env.execute("Socket Window WordCount");
    }

    // Data type for words with count
    public static class WordWithCount {

        public String word;
        public long count;

        public WordWithCount() {}

        public WordWithCount(String word, long count) {
            this.word = word;
            this.count = count;
        }

        @Override
        public String toString() {
            return word + " : " + count;
        }
    }
}
总结
本文讲述了flink的local模式的安装与使用。可以看到,flink的安装和使用还是相当方便的。