TensorFlow精进之路(四):CIFAR-10图像识别(上)
1、CIFAR-10数据集简介
CIFAR-10数据集包含10个类别的RGB彩色图片。图片尺寸为32×32,这十个类别包括:飞机、汽车、鸟、猫、鹿、狗、蛙、马、船、卡车。一共有50000张训练图片和10000张测试图片。
CIFAR-10数据集有如下文件:
batches.meta.txt data_batch_2.bin data_batch_4.bin readme.html
data_batch_1.bin data_batch_3.bin data_batch_5.bin test_batch.bin
其中,data_batch_1.bin~data_batch_5.bin五个文件是训练数据,每个文件以二进制的格式存储10000张图片和这些图片对于的标签。test_batch.bin存储的是10000张测试图像的测试标签。一张图片和对于的标签组成一个样本,一个样本有3073个字节组成,第一个字节为标签,后面3072个字节是图片数据{1024(R) + 1024(G) + 1024(B)}。
2、下载CIFAR-10数据集
2.1、首先下载tensorflow官方CIFAR-10代码
git clone https://github.com/tensorflow/models.git
模块位于models/tutorials/image/cifar10目录下。
2.2、下载CIFAR-10数据集
#coding:utf-8
#导入官方cifar10模块
import cifar10
import tensorflow as tf

#tf.app.flags.FLAGS是tensorflow的一个内部全局变量存储器
FLAGS = tf.app.flags.FLAGS
#cifar10模块中预定义下载路径的变量data_dir为'/tmp/cifar10_eval',预定义如下:
#tf.app.flags.DEFINE_string('data_dir', './cifar10_data',
#                           """Path to the CIFAR-10 data directory.""")
#为了方便,我们将这个路径改为当前位置
FLAGS.data_dir = './cifar10_data'

#如果不存在数据文件则下载,并且解压
cifar10.maybe_download_and_extract()
下载完数据后提示:

>> Downloading cifar-10-binary.tar.gz 100.0%
Successfully downloaded cifar-10-binary.tar.gz 170052171 bytes
3、tensorflow数据读取机制
3.1、tensorflow数据读取机制简介
目前我们接触的Tensorflow有两种数据读取机制,第一种就是往占位符placeholder传入feed_dict,这种机制比较简单,前面的例子也用过,这里不赘述。现在我们讲第二种机制:
如上图,要训练数据,得分两步,第一步,先将数据从硬盘加载到内存中,第二步,拱给CPU或者GPU运算。如果只用一个线程,那么,运行第一步的时候第二步就得等着,运行第二步的时候,第一步就得等着,这样就浪费时间了。
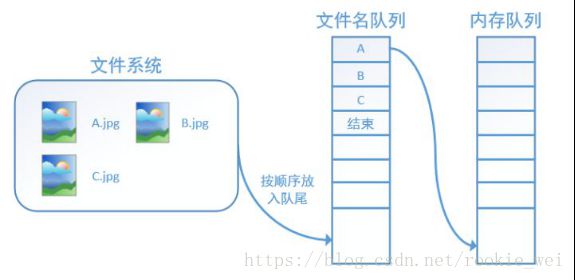
如上图,解决这个问题,就得将第一步和第二步分别放在两个线程中:一个线程不断的把数据读入内存,另一个线程从内存中取出数据进行计算。
为了方便管理,tensorflow在内存队列前又加了一层“文件名队列”。
3.2、数据读取机制对应的函数
对于文件名队列,使用tf.train.string_input_producer函数,该函数有三个比较重要的参数,string_tensor参数向这个函数传入文件名list,系统就自动将它转为一个文件名队列。num_epochs参数传入的是epoch数,即将传入的list全部运算几遍。shuffle参数决定在一个epoch内,文件的顺序是否被打乱,若shuffle=False,则不打乱,否则打乱,默认是打乱的。
在tensorflow中,内存队列不需要我们自己建立,只需要使用reader对象从文件名队列中读取数据即可。
需要注意的是,使用tf.train.string_input_producer函数创建队列后,程序并没有马上将文件名加入队列,而是要运行tf.train.start_queue_runners函数后,才真正开始工作。
3.3、例子
为了便于理解,下面给出一个简单的例子
如上图,有三张图片,分别为1.jpg, 2.jpg,3.jpg,首先来看了当shuffle=False时的读取顺序。
不打乱读取顺序的代码
#encoding:utf-8
import tensorflow as tf

filenames = ['1.jpg', '2.jpg', '3.jpg']
#shuffle=False表示不打乱顺序,num_epochs=3表示整个队列获取三次
queue = tf.train.string_input_producer(filenames, shuffle=False, num_epochs=3)

#读取文件名队列中的数据
reader = tf.WholeFileReader()
key,value = reader.read(queue)


with tf.Session() as sess:
    #初始局部化变量,注意这个函数跟tf.global_variables_initializer.run()是不一样的
    #因为string_input_producer函数的num_epochs=3传入的是局部变量
    tf.local_variables_initializer().run()
    threads = tf.train.start_queue_runners(sess=sess)
    i = 0
    while True:
        i += 1
        data = sess.run(value)
        with open('shuffle_false/image_%d.jpg' % i, 'wb') as fd:
            fd.write(data)
运行结果:
打乱读取顺序的运行结果
4、将CIFAR-10数据集保存为图片
4.1、下载CIFAR-10数据集
# 查看CIFAR-10数据是否存在,如果不存在则下载并解压
def download():
    # tf.app.flags.FLAGS是tensorflow的一个内部全局变量存储器
    FLAGS = tf.app.flags.FLAGS
    # 为了方便,我们将这个路径改为当前位置
    FLAGS.data_dir = './cifar10_data'
    # 如果不存在数据文件则下载,并且解压
    cifar10.maybe_download_and_extract()
4.2、设置图片保存的路径
#将获取的图片保存到这里
image_save_path = './cifar10_image/'
if os.path.exists(image_save_path) == False:
    os.mkdir(image_save_path)
4.3、根据tensorflow读取机制,设置文件名队列,然后调用获取并解析图片函数
#检测CIFAR-10数据是否存在,如果不存在则返回False
def check_cifar10_data_files(filenames):
    for file in filenames:
        if os.path.exists(file) == False:
            print('Not found cifar10 data.')
            return False
    return True

#获取图片前的预处理,检测CIFAR10数据是否存在,如果不存在直接退出
#如果存在,用string_input_producer函数创建文件名队列,
# 并且通过get_record函数获取图片标签和图片数据,并返回
def get_image(data_path):
    filenames = [os.path.join(data_path, "data_batch_%d.bin" % i) for i in range(1, 6)]
    print(filenames)
    if check_cifar10_data_files(filenames) == False:
        exit()
    queue = tf.train.string_input_producer(filenames)
    return get_record(queue)
4.4、读取并解析图片
#获取每个样本数据,样本由一个标签+一张图片数据组成
def get_record(queue):
    print('get_record')
    #定义label大小,图片宽度、高度、深度,图片大小、样本大小
    label_bytes = 1
    image_width = 32
    image_height = 32
    image_depth = 3
    image_bytes = image_width * image_height * image_depth
    record_bytes = label_bytes + image_bytes

    #根据样本大小读取数据
    reader = tf.FixedLengthRecordReader(record_bytes)
    key, value = reader.read(queue)

    #将获取的数据转变成一维数组
    #例如
    # source = 'abcde'
    # record_bytes = tf.decode_raw(source, tf.uint8)
    #运行结果为[ 97  98  99 100 101]
    record_bytes = tf.decode_raw(value, tf.uint8)

    #获取label,label数据在每个样本的第一个字节
    label_data = tf.cast(tf.strided_slice(record_bytes, [0], [label_bytes]), tf.int32)

    #获取图片数据,label后到样本末尾的数据即图片数据,
    # 再用tf.reshape函数将图片数据变成一个三维数组
    depth_major = tf.reshape(
        tf.strided_slice(record_bytes, [label_bytes],[label_bytes + image_bytes]),
        [3, 32, 32])

    #矩阵转置,上面得到的矩阵形式是[depth, height, width],即红、绿、蓝分别属于一个维度的,
    #假设只有3个像素,上面的格式就是RRRGGGBBB
    #但是我们图片数据一般是RGBRGBRGB,所以这里要进行一下转置
    #注:上面注释都是我个人的理解,不知道对不对
    image_data = tf.transpose(depth_major, [1, 2, 0])

    #统一将数据转为float32格式
    image_data = tf.cast(image_data, tf.float32)
    return label_data, image_data
4.5、主函数
if __name__ == '__main__':
    #查看CIFAR-10数据是否存在,如果不存在则下载并解压
    download()

    #将获取的图片保存到这里
    image_save_path = './cifar10_image/'
    if os.path.exists(image_save_path) == False:
        os.mkdir(image_save_path)

    #获取图片数据
    key, value = get_image('./cifar10_data/cifar-10-batches-bin/')

    with tf.Session() as sess:
        #初始化变量
        sess.run(tf.global_variables_initializer())
        coord = tf.train.Coordinator()
        #这里才真的启动队列
        threads = tf.train.start_queue_runners(sess=sess, coord=coord)

        for i in range(50):
            # print("i:%d" % i)
            ####################################
            #这里data和label不能分开run,否则图片和标签就不匹配了,多谢网友ATPY提醒
            #data = sess.run(value)
            #label = sess.run(key)
            #应该这样
            label, data = sess.run([key, value])
            ####################################
            print(label)
            scipy.misc.toimage(data).save(image_save_path + '/%d_%d.jpg' % (label, i))
        coord.request_stop()
        coord.join()
4.6、运行结果:
4.7、完整代码
#encoding:utf-8
import tensorflow as tf
import os
import cifar10
import scipy.misc

# 查看CIFAR-10数据是否存在,如果不存在则下载并解压
def download():
    # tf.app.flags.FLAGS是tensorflow的一个内部全局变量存储器
    FLAGS = tf.app.flags.FLAGS
    # 为了方便,我们将这个路径改为当前位置
    FLAGS.data_dir = './cifar10_data'
    # 如果不存在数据文件则下载,并且解压
    cifar10.maybe_download_and_extract()

#检测CIFAR-10数据是否存在,如果不存在则返回False
def check_cifar10_data_files(filenames):
    for file in filenames:
        if os.path.exists(file) == False:
            print('Not found cifar10 data.')
            return False
    return True

#获取每个样本数据,样本由一个标签+一张图片数据组成
def get_record(queue):
    print('get_record')
    #定义label大小,图片宽度、高度、深度,图片大小、样本大小
    label_bytes = 1
    image_width = 32
    image_height = 32
    image_depth = 3
    image_bytes = image_width * image_height * image_depth
    record_bytes = label_bytes + image_bytes

    #根据样本大小读取数据
    reader = tf.FixedLengthRecordReader(record_bytes)
    key, value = reader.read(queue)

    #将获取的数据转变成一维数组
    #例如
    # source = 'abcde'
    # record_bytes = tf.decode_raw(source, tf.uint8)
    #运行结果为[ 97  98  99 100 101]
    record_bytes = tf.decode_raw(value, tf.uint8)

    #获取label,label数据在每个样本的第一个字节
    label_data = tf.cast(tf.strided_slice(record_bytes, [0], [label_bytes]), tf.int32)

    #获取图片数据,label后到样本末尾的数据即图片数据,
    # 再用tf.reshape函数将图片数据变成一个三维数组
    depth_major = tf.reshape(
        tf.strided_slice(record_bytes, [label_bytes],[label_bytes + image_bytes]),
        [3, 32, 32])

    #矩阵转置,上面得到的矩阵形式是[depth, height, width],即红、绿、蓝分别属于一个维度的,
    #假设只有3个像素,上面的格式就是RRRGGGBBB
    #但是我们图片数据一般是RGBRGBRGB,所以这里要进行一下转置
    #注:上面注释都是我个人的理解,不知道对不对
    image_data = tf.transpose(depth_major, [1, 2, 0])

    return label_data, image_data

#获取图片前的预处理,检测CIFAR10数据是否存在,如果不存在直接退出
#如果存在,用string_input_producer函数创建文件名队列,
# 并且通过get_record函数获取图片标签和图片数据,并返回
def get_image(data_path):
    filenames = [os.path.join(data_path, "data_batch_%d.bin" % i) for i in range(1, 6)]
    print(filenames)
    if check_cifar10_data_files(filenames) == False:
        exit()
    queue = tf.train.string_input_producer(filenames, shuffle=False)
    # return tf.cast((cifar10_input.read_cifar10(queue)).uint8image, tf.float32)
    return get_record(queue)


if __name__ == '__main__':
    #查看CIFAR-10数据是否存在,如果不存在则下载并解压
    download()

    #将获取的图片保存到这里
    image_save_path = './cifar10_image/'
    if os.path.exists(image_save_path) == False:
        os.mkdir(image_save_path)

    #获取图片数据
    key, value = get_image('./cifar10_data/cifar-10-batches-bin/')

    with tf.Session() as sess:
        #初始化变量
        sess.run(tf.global_variables_initializer())
        coord = tf.train.Coordinator()
        #这里才真的启动队列
        threads = tf.train.start_queue_runners(sess=sess, coord=coord)

        for i in range(50):
            # print("i:%d" % i)
            ####################################
            #这里data和label不能分开run,否则图片和标签就不匹配了,多谢网友ATPY提醒
            #data = sess.run(value)
            #label = sess.run(key)
            #应该这样
            label, data = sess.run([key, value])
            ####################################
            print(label)
            scipy.misc.toimage(data).save(image_save_path + '/%d_%d.jpg' % (label, i))
        coord.request_stop()
        coord.join()
4.8、为了更好理解get_record函数怎么将每个样本数据提取并转换的过成,我再给个小例子:
#encoding:utf-8
import tensorflow as tf

# 为了简化过程,假设一个4×4×3的样本数据如下,
# 其中,第一个字符“0”表示图片的标签label
# “1”表示图片颜色值的R通道,“2”表示G通道,“3”表示B通道
source = '0111111111111111122222222222222223333333333333333'
sourcelist = tf.decode_raw(source, tf.uint8)
#上面运行后得到的数据如下:(0的ASCII值是48,同理推出1、2、3的值为49,50,51,这不是重点不用关心)
#[48 49 49 49 49 49 49 49 49 49 49 49 49 49 49 49 49 50 50 50 50 50 50 50
# 50 50 50 50 50 50 50 50 50 51 51 51 51 51 51 51 51 51 51 51 51 51 51 51
# 51]

#获取label
label = tf.strided_slice(sourcelist, [0], [1]);

#获取图片数据,并转为[3, 4, 4]的矩阵形式,其中,
#[1]表示从1下标开始截取,[49]表示截取到49下标,[3, 4, 4]中, 3表示通道数,4分别表示宽度和高度
image = tf.reshape(tf.strided_slice(sourcelist, [1], [49]), [3, 4, 4])
#上面运行后得到数据如下:
# [[[49 49 49 49]
#   [49 49 49 49]
#   [49 49 49 49]
#   [49 49 49 49]]
#
#  [[50 50 50 50]
#   [50 50 50 50]
#   [50 50 50 50]
#   [50 50 50 50]]
#
#  [[51 51 51 51]
#   [51 51 51 51]
#   [51 51 51 51]
#   [51 51 51 51]]]
#可以看到,RGB数据都分别在同一维度

#这里就是对上面得到的矩阵进行转置
image_transpose = tf.transpose(image, [1, 2, 0])
#上面运行后得到的数据如下
# [[[49 50 51]
#   [49 50 51]
#   [49 50 51]
#   [49 50 51]]
#
#  [[49 50 51]
#   [49 50 51]
#   [49 50 51]
#   [49 50 51]]
#
#  [[49 50 51]
#   [49 50 51]
#   [49 50 51]
#   [49 50 51]]
#
#  [[49 50 51]
#   [49 50 51]
#   [49 50 51]
#   [49 50 51]]]


with tf.Session() as sess:
    sess.run(tf.global_variables_initializer())
    result = sess.run(tf.cast(sourcelist, tf.int32))
    print(result)
    result = sess.run(tf.cast(image, tf.int32))
    print(result)
    result = sess.run(tf.cast(image_transpose, tf.int32))
    print(result)
总结:
今天的学习记录到此~


