SpringCloud-拜托!面试请不要再问我Spring Cloud底层原理实战
上一篇我们说到《拜托!面试请不要再问我Spring Cloud底层原理》,我们大概了解了Spring Cloud中各个组件的作用以及其背后实现的原理。但是俗话说得好,实践是检验真理的唯一标准。这一篇我们动手实践一下,即搭建一个包含订单服务、库存服务、仓库服务、积分服务的微服务架构项目。
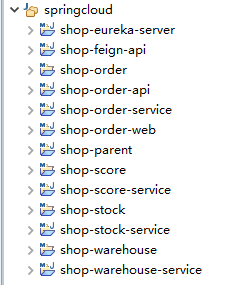
一、项目的工程结构
| 工程名 | 服务名 | 端口号 |
|---|---|---|
| shop-parent | 父工程 | |
| shop-eureka-server | eureka注册服务中心 | 9000 |
| shop-feign-api | feign的接口工程 | |
| shop-order-service | 订单服务 | 9001 |
| shop-order-web | 订单web工程 | 9002 |
| shop-score-server | 积分服务 | 9003 |
| shop-stock-server | 库存服务 | 9004 |
| shop-warehouse-server | 仓库服务 | 9005 |
二、部分工程说明
1、shop-eureka-server
eureka的注册服务中心,各个服务实例都会注册到这里。部署时,我们会先启动该工程。该工程很简单,只有一个启动类,代码如下:
@SpringBootApplication
@EnableEurekaServer
public class EurekaApplication {

  public static void main(String[] args) {
    SpringApplication.run(EurekaApplication.class, args);
  }
}
该工程的application.yml文件如下:
spring:
  application:
    name: shop-eureka-server

server:
  port: 9000

eureka:
  instance:
    hostname: localhost
    prefer-ip-address: true
    instance-id: ${spring.application.name}:${server.port}
  client:
    registerWithEureka: false
    fetchRegistry: false
    serviceUrl:
      defaultZone: http://user:password@localhost:9009/eureka/

security:
  basic:
    enabled: true
  user:
    name: user
    password: password
2、shop-order-web
该工程下有一个OrderController,即暴露出的接口,用于支付成功后回调。所有的服务调用都会从这里发起,相当于我们该项目实战的一个入口,后续我们测试,就是通过postman调用该方法。其代码如下:
@Controller
@RequestMapping("/order/*")
public class OrderController {

  @Autowired
  private OrderFeignClient orderFeignClient;
  @Autowired
  private ScoreFeignClient scoreFeignClient;
  @Autowired
  private StockFeignClient stockFeignClient;
  @Autowired
  private WarehouseFeignClient warehouseFeignClient;

  @RequestMapping(value = "payed", method = RequestMethod.POST)
  @ResponseBody
  public void payed(@RequestBody Order entity) throws Exception {
    System.out.println("订单:" + entity);
    // 修改订单状态
    orderFeignClient.payed(entity);
    // 扣减商品库存
    stockFeignClient.subtractProductStock(entity.getProductId());
    // 仓库发货
    warehouseFeignClient.ship(entity.getProductId());
    // 为用户增加积分
    scoreFeignClient.addUserScore(entity.getUserId());
  }
}
3、shop-feign-api
所有的feign接口都在该工程下,我们以OrderFeignClient举例,其实现方式类似Controller,提供请求地址,请求方法,请求参数等等,然后通过FeignClient注册表明需要请求哪个服务,代码如下:
@FeignClient("shop-order-service")
public interface OrderFeignClient {

  /**
   * 支付订单
   *
   * @param entity
   *          订单
   * @throws Exception
   */
  @RequestMapping(value = "/order/payed", method = RequestMethod.POST)
  @ResponseBody
  void payed(@RequestBody Order entity) throws Exception;
}
4、shop-score-service
我们说一下该工程,为了集成Hystrix,我们在积分服务这里做了发生异常后的fallback处理。
@RestController
@RequestMapping("/score/*")
public class ScoreController {

  @GetMapping("add/{userId}")
  @HystrixCommand(fallbackMethod = "fallback")
  public void addUserScore(@PathVariable("userId") String userId) throws Exception {
    Random random = new Random();
    Integer score = random.nextInt(100);
    System.out.println("shop-score-service:已成功为用户" + userId + "增加" + score + "个积分");
    throw new Exception("shop-score-service:为用户增加积分接口异常");
  }

  /**
   * 这里的方法参数要和addUserScore一致
   *
   * @param userId
   */
  public void fallback(String userId) {
    System.out.println("shop-score-service:为用户增加积分接口报错,降级处理");
  }
}
5、其它说明
该项目只是为了演示spring cloud的各个组件如何运用的,所以没有涉及到数据库这一块,所有的业务,我们都在接口里写死。比如上面的为用户增加响应积分接口,我们就是打印一句话出来表示已经增加成功了。对于扣除库存、通知仓库发货同样的我们就在接口实现里打印一句话即可。
三、测试
1、启动所有的服务实例
2、接口测试
(1)修改订单状态
(2)扣除库存
![]()
(3)通知发货
(4)增加积分(由于我们抛出异常,所以这里会执行fallback方法。)
四、项目代码
地址:https://gitee.com/chengab/SpringCloud


