ubuntu 16.04下搭建fabric 1.4.3环境
目录
一、前置环境安装
1.安装 git、curl、pip
2.安装 go
3.安装 node.js、npm
4.升级 gcc
二、docker 与 docker-compose
1.安装docker
2.安装docker-compose
三、下载 fabric源码、fabric-samples源码、fabric镜像
四、first-network 的创建、first-network 的启动、cli 客户端的操作、first-network 的停止、注意事项
1.first-network 的创建
2. first-network 的启动
3.cli 客户端的操作
4.first-network 的关闭
5.注意事项
一、前置环境安装
1.安装 git、curl、pip
sudo apt-get install git

sudo apt-get install curl

sudo apt-get install python-pip

pip install --upgrade pip
2.安装 go
请参照这篇博客的第一部分
3.安装 node.js、npm
这里推荐安装 8.x 版本
curl -sL https://deb.nodesource.com/setup_8.x | sudo -E bash -

sudo apt-get install nodejs
安装完成后,能使用 node -v 命令查看版本号,则说明安装成功。由于 node.js 自带了 npm,只需安装 nodejs 就行,不放心的可以 npm -v 验证一下。
4.升级 gcc
用 gcc -v 看一下,如果版本是 5.4.0 的,应该是不影响的,可以不用升级,我就是 5.4.0 的版本。低于 5.4.0 的可以自行搜索升级方法,这里就不再列出。
二、docker 与 docker-compose
1.安装docker
请参考这篇博客
2.安装docker-compose
docker-compose 是支持通过模板脚本批量创建 docker 容器的一个组件。在安装 docker-compose 之前,需要安装 python-pip,由于之前已经安装过 python-pip,所以直接执行以下命令安装:
pip install docker-compose验证是否成功:
docker-compose --version三、下载 fabric源码、fabric-samples源码、fabric镜像
创建并进入 hyperledger 目录 :
mkdir -p $GOPATH/src/github.com/hyperledger

cd $GOPATH/src/github.com/hyperledger
下载 fabric 源码:
git clone https://github.com/hyperledger/fabric.git将 fabric 切换至 1.4 版本:
cd fabric

git branch -a

git checkout release-1.4
下载 fabric 镜像:
cd /opt/gopath/src/github.com/hyperledger/fabric/scripts

./bootstrap.sh注意:此过程非常缓慢,主要原因是由于下载二进制文件时特别慢(如下图所示),此过程可能会 stop 几次,stop 后只需继续执行 ./bootstrap.sh 命令并耐心等待即可(本人大概下了8个小时).
最终下载完成后,会列出所下载的 docker 镜像,具体如下图所示:
至此,下载 fabric 源码、fabric-samples 源码、fabric 镜像的工作已经完成。
执行 ls 命令,查看在当前目录下多了 fabric-samples 目录:
![]()
四、first-network 的创建、first-network 的启动、cli 客户端的操作、first-network 的停止、注意事项
1.first-network 的创建
切换到 first-network 目录下
cd fabric-samples

cd first-network
创建第一个 channel(myfirstchannel 为通道名称,不写默认为 mychannel,可以自己定义):
./byfn.sh -m generate -c myfirstchannel自动创建过程如下:
Generating certs and genesis block for channel 'myfirstchannel' with CLI timeout of '10' seconds and CLI delay of '3' seconds
Continue? [Y/n] y
proceeding ...
/home/sunhui/workspace/go/src/github.com/hyperledger/fabric/scripts/fabric-samples/first-network/../bin/cryptogen

##########################################################
##### Generate certificates using cryptogen tool #########
##########################################################
+ cryptogen generate --config=./crypto-config.yaml
org1.example.com
org2.example.com
+ res=0
+ set +x

Generate CCP files for Org1 and Org2
/home/sunhui/workspace/go/src/github.com/hyperledger/fabric/scripts/fabric-samples/first-network/../bin/configtxgen
##########################################################
#########  Generating Orderer Genesis block ##############
##########################################################
CONSENSUS_TYPE=solo
+ '[' solo == solo ']'
+ configtxgen -profile TwoOrgsOrdererGenesis -channelID byfn-sys-channel -outputBlock ./channel-artifacts/genesis.block
2019-09-17 14:01:50.935 CST [common.tools.configtxgen] main -> INFO 001 Loading configuration
2019-09-17 14:01:51.002 CST [common.tools.configtxgen.localconfig] completeInitialization -> INFO 002 orderer type: solo
2019-09-17 14:01:51.002 CST [common.tools.configtxgen.localconfig] Load -> INFO 003 Loaded configuration: /home/sunhui/workspace/go/src/github.com/hyperledger/fabric/scripts/fabric-samples/first-network/configtx.yaml
2019-09-17 14:01:51.065 CST [common.tools.configtxgen.localconfig] completeInitialization -> INFO 004 orderer type: solo
2019-09-17 14:01:51.065 CST [common.tools.configtxgen.localconfig] LoadTopLevel -> INFO 005 Loaded configuration: /home/sunhui/workspace/go/src/github.com/hyperledger/fabric/scripts/fabric-samples/first-network/configtx.yaml
2019-09-17 14:01:51.067 CST [common.tools.configtxgen] doOutputBlock -> INFO 006 Generating genesis block
2019-09-17 14:01:51.067 CST [common.tools.configtxgen] doOutputBlock -> INFO 007 Writing genesis block
+ res=0
+ set +x

#################################################################
### Generating channel configuration transaction 'channel.tx' ###
#################################################################
+ configtxgen -profile TwoOrgsChannel -outputCreateChannelTx ./channel-artifacts/channel.tx -channelID myfirstchannel
2019-09-17 14:01:51.099 CST [common.tools.configtxgen] main -> INFO 001 Loading configuration
2019-09-17 14:01:51.163 CST [common.tools.configtxgen.localconfig] Load -> INFO 002 Loaded configuration: /home/sunhui/workspace/go/src/github.com/hyperledger/fabric/scripts/fabric-samples/first-network/configtx.yaml
2019-09-17 14:01:51.225 CST [common.tools.configtxgen.localconfig] completeInitialization -> INFO 003 orderer type: solo
2019-09-17 14:01:51.225 CST [common.tools.configtxgen.localconfig] LoadTopLevel -> INFO 004 Loaded configuration: /home/sunhui/workspace/go/src/github.com/hyperledger/fabric/scripts/fabric-samples/first-network/configtx.yaml
2019-09-17 14:01:51.225 CST [common.tools.configtxgen] doOutputChannelCreateTx -> INFO 005 Generating new channel configtx
2019-09-17 14:01:51.227 CST [common.tools.configtxgen] doOutputChannelCreateTx -> INFO 006 Writing new channel tx
+ res=0
+ set +x

#################################################################
#######    Generating anchor peer update for Org1MSP   ##########
#################################################################
+ configtxgen -profile TwoOrgsChannel -outputAnchorPeersUpdate ./channel-artifacts/Org1MSPanchors.tx -channelID myfirstchannel -asOrg Org1MSP
2019-09-17 14:01:51.255 CST [common.tools.configtxgen] main -> INFO 001 Loading configuration
2019-09-17 14:01:51.323 CST [common.tools.configtxgen.localconfig] Load -> INFO 002 Loaded configuration: /home/sunhui/workspace/go/src/github.com/hyperledger/fabric/scripts/fabric-samples/first-network/configtx.yaml
2019-09-17 14:01:51.384 CST [common.tools.configtxgen.localconfig] completeInitialization -> INFO 003 orderer type: solo
2019-09-17 14:01:51.384 CST [common.tools.configtxgen.localconfig] LoadTopLevel -> INFO 004 Loaded configuration: /home/sunhui/workspace/go/src/github.com/hyperledger/fabric/scripts/fabric-samples/first-network/configtx.yaml
2019-09-17 14:01:51.384 CST [common.tools.configtxgen] doOutputAnchorPeersUpdate -> INFO 005 Generating anchor peer update
2019-09-17 14:01:51.384 CST [common.tools.configtxgen] doOutputAnchorPeersUpdate -> INFO 006 Writing anchor peer update
+ res=0
+ set +x

#################################################################
#######    Generating anchor peer update for Org2MSP   ##########
#################################################################
+ configtxgen -profile TwoOrgsChannel -outputAnchorPeersUpdate ./channel-artifacts/Org2MSPanchors.tx -channelID myfirstchannel -asOrg Org2MSP
2019-09-17 14:01:51.414 CST [common.tools.configtxgen] main -> INFO 001 Loading configuration
2019-09-17 14:01:51.482 CST [common.tools.configtxgen.localconfig] Load -> INFO 002 Loaded configuration: /home/sunhui/workspace/go/src/github.com/hyperledger/fabric/scripts/fabric-samples/first-network/configtx.yaml
2019-09-17 14:01:51.544 CST [common.tools.configtxgen.localconfig] completeInitialization -> INFO 003 orderer type: solo
2019-09-17 14:01:51.544 CST [common.tools.configtxgen.localconfig] LoadTopLevel -> INFO 004 Loaded configuration: /home/sunhui/workspace/go/src/github.com/hyperledger/fabric/scripts/fabric-samples/first-network/configtx.yaml
2019-09-17 14:01:51.544 CST [common.tools.configtxgen] doOutputAnchorPeersUpdate -> INFO 005 Generating anchor peer update
2019-09-17 14:01:51.544 CST [common.tools.configtxgen] doOutputAnchorPeersUpdate -> INFO 006 Writing anchor peer update
+ res=0
+ set +x
2. first-network 的启动
指定通道名,启动网络:
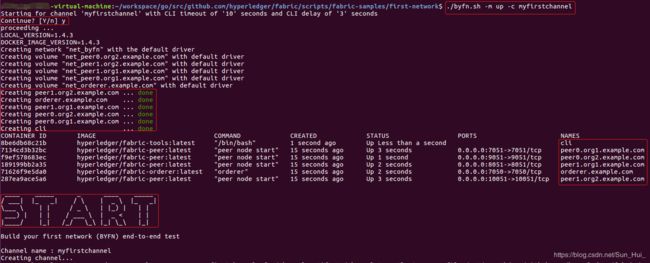
./byfn.sh -m up -c myfirstchannel 根据提示键入 y:
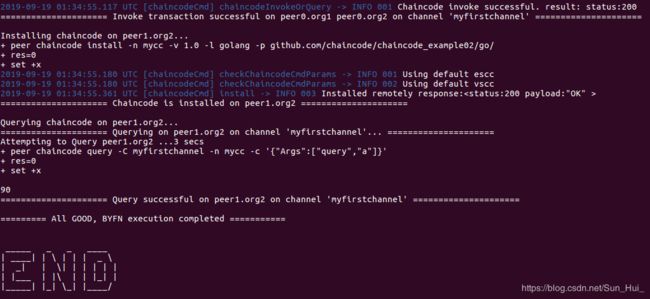
当出现下图所示的信息,说明网络启动成功:
3.cli 客户端的操作
进入 cli 容器:
docker exec -it cli bash结果如下:
![]()
查询 a 的余额:
peer chaincode query -C myfirstchannel -n mycc -c '{"Args":["query","a"]}'![]()
查询 b 的余额:
peer chaincode query -C myfirstchannel -n mycc -c '{"Args":["query","b"]}'![]()
a 向 b 转账 50 并查询各自的余额:
peer chaincode invoke -o orderer.example.com:7050 --tls true --cafile /opt/gopath/src/github.com/hyperledger/fabric/peer/crypto/ordererOrganizations/example.com/orderers/orderer.example.com/msp/tlscacerts/tlsca.example.com-cert.pem -C myfirstchannel -n mycc --peerAddresses peer0.org1.example.com:7051 --tlsRootCertFiles /opt/gopath/src/github.com/hyperledger/fabric/peer/crypto/peerOrganizations/org1.example.com/peers/peer0.org1.example.com/tls/ca.crt --peerAddresses peer0.org2.example.com:9051 --tlsRootCertFiles /opt/gopath/src/github.com/hyperledger/fabric/peer/crypto/peerOrganizations/org2.example.com/peers/peer0.org2.example.com/tls/ca.crt -c '{"Args":["invoke","a","b","50"]}'结果:
注意:此处再补充一下 1.4.3 中关于交易转账的命令构成( 1.1.x 版本和 1.4.x 版本的转账命令有点区别):
$ peer chaincode invoke [flags], 常用参数为:
	`-o, --orderer: orderer节点的地址
	`-C,--channelID:当前命令运行的通道,默认值是“testchainid"
	`-c, --ctor:JSON格式的构造参数,默认值是“{}"
	`-n,--name:Chaincode的名字
	`--tls: 通信时是否使用tls加密
	`--cafile: 当前orderer节点pem格式的tls证书文件, 要使用绝对路径.
	`--peerAddresses: 指定要连接的peer节点的地址
	`--tlsRootCertFiles: 连接的peer节点的TLS根证书
# 连接的peer节点的TLS根证书查找路径参考:
/opt/gopath/src/github.com/hyperledger/fabric/peer/crypto/peerOrganizations/orggo.itcast.com/peers/peer0.orggo.itcast.com/tls/ca.crt
# example
# -c '{"Args":["invoke","a","b","10"]}'
$ peer chaincode invoke -o orderer节点地址:端口 --tls true --cafile orderer节点pem格式的证书文件 -C 通道名称 -n 链码名称 --peerAddresses 背书节点1:端口 --tlsRootCertFiles 背书节点1的TLS根证书    --peerAddresses 背书节点2:端口 --tlsRootCertFiles 背书节点2的TLS根证书 -c 交易链码调用
4.first-network 的关闭
关闭网络:
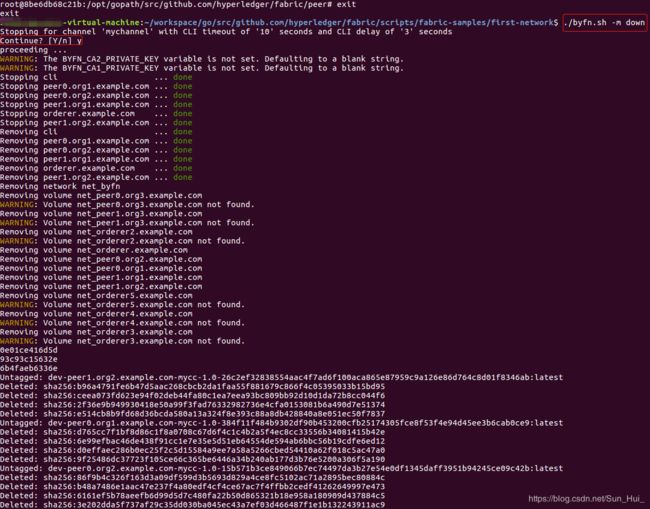
./byfn.sh -m down结果:
执行 docker ps -a 可以看到 容器都已经被移除了:
![]()
5.注意事项
若上次启动网络后没有关闭,下次启动网络之前一定要先执行 ./byfn.sh -m down 命令清理之前的遗留数据和删除已经存在的容器,不然启动网络时会报错!!!
然后再次启动网络,只需执行 ./byfn.sh -m up -c myfirstchannel 即可。
再次,关闭所有 docker 容器的命令(如果用得到的话):
docker rm -f $(docker ps -aq)最后,码字不易,如果这篇文章对你有帮助,请随手点个赞,谢谢。


