基于Hadoop生态体系搭建数据分析平台
基于Hadoop生态体系的数据分析平台
一、项目设计
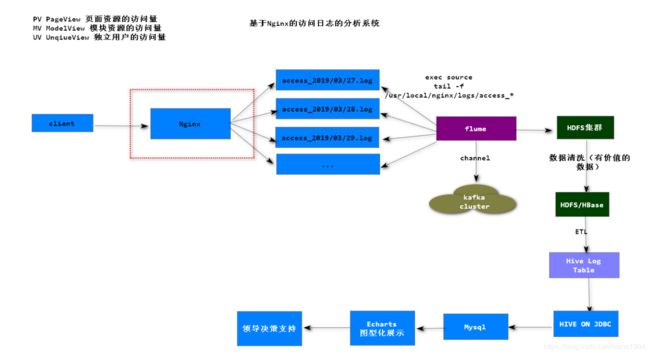
架构图
设计目标
-
分析系统每日访问量PV(Page View)
-
分析系统各个模块访问量MV(Model View)
二、环境搭建
安装Nginx并配置日志切割
#安装gcc基本环境
yum install gcc-c++ perl-devel pcre-devel openssl-devel zlib-devel wget
#解压nginx
tar -zxvf nginx-1.11.1.tar.gz
#配置nginx
./configure  --prefix=/usr/local/nginx
# 编译安装
make && make install
日志分割
[root@hadoop ~]# vi echo.sh
[root@hadoop ~]# chmod 777 echo.sh
#nginx日志切割脚本
#!/bin/bash
#设置日志文件存放目录
logs_path="/usr/local/nginx/logs/"
#设置pid文件
pid_path="/usr/local/nginx/logs/nginx.pid"

#重命名日志文件
mv ${logs_path}access.log /usr/local/nginx/access_log/access_$(date -d "yesterday" +"%Y-%m-%d%I:%M:%S").log

#向nginx主进程发信号重新打开日志
kill -USR1 `cat ${pid_path}`
定义Linux操作系统定时任务
周期性将nginx的
access.log文件移动到日志文件的存放目录,并使用新的access.log文件记录用户新的访问日志。
[root@hadoop ~]# crontab -e
* * * * * /root/echo.sh
Flume采集日志文件的访问日志数据
Agent配置
Source: SpoolDir
Channel:Kafka Channel
Sink: HDFS
[root@hadoop apache-flume-1.7.0-bin]# vi conf/nginxLog.properties
# example.conf: A single-node Flume configuration

# Name the components on this agent
a1.sources = r1
a1.sinks = k2
a1.channels = c2

# Describe/configure the source
a1.sources.r1.type = spooldir
a1.sources.r1.spoolDir = /usr/local/nginx/access_log/
a1.sources.r1.interceptors = i1
a1.sources.r1.interceptors.i1.type = timestamp


# Describe the sink
#a1.sinks.k1.type = logger


a1.sinks.k2.type = hdfs
a1.sinks.k2.hdfs.path = /flume/events/%y-%m-%d/
a1.sinks.k2.hdfs.filePrefix = events-
a1.sinks.k2.hdfs.useLocalTimeStamp = true
#a1.sinks.k2.hdfs.round = true
#a1.sinks.k2.hdfs.roundValue = 10
#a1.sinks.k2.hdfs.roundUnit = minute
a1.sinks.k2.hdfs.fileType=DataStream

a1.channels.c2.type = org.apache.flume.channel.kafka.KafkaChannel
a1.channels.c2.kafka.bootstrap.servers = hadoop:9092
a1.channels.c2.kafka.topic = nginx
a1.channels.c2.kafka.consumer.group.id = flume-consumer

# Bind the source and sink to the channel
a1.sources.r1.channels = c2
a1.sinks.k2.channel = c2
安装Kafaka
使用到了KafkaChannel需要有kafka环境
确保zookeeper正常运行
#解压
[root@hadoop usr]# tar -zxvf kafka_2.11-0.11.0.0.tgz
#修改配置文件
[root@hadoop kafka_2.11-0.11.0.0]# vi config/server.properties
############################# Server Basics #############################

# The id of the broker. This must be set to a unique integer for each broker.
broker.id=0

# Switch to enable topic deletion or not, default value is false
#delete.topic.enable=true

############################# Socket Server Settings #############################

############################# Socket Server Settings #############################

# The address the socket server listens on. It will get the value returned from
# java.net.InetAddress.getCanonicalHostName() if not configured.
#   FORMAT:
#     listeners = listener_name://host_name:port
#   EXAMPLE:
#     listeners = PLAINTEXT://your.host.name:9092
listeners=PLAINTEXT://hadoop:9092

# Hostname and port the broker will advertise to producers and consumers. If not set,
############################# Zookeeper #############################

# Zookeeper connection string (see zookeeper docs for details).
# This is a comma separated host:port pairs, each corresponding to a zk
# server. e.g. "127.0.0.1:3000,127.0.0.1:3001,127.0.0.1:3002".
# You can also append an optional chroot string to the urls to specify the
# root directory for all kafka znodes.
zookeeper.connect=hadoop:2181

# Timeout in ms for connecting to zookeeper
zookeeper.connection.timeout.ms=6000
启动kafka
[root@hadoop kafka_2.11-0.11.0.0]# bin/kafka-server-start.sh -deamon config/server.properties
创建主题
[root@node1 kafka_2.11-0.11.0.0]# bin/kafka-topics.sh --create --zookeeper hadoop:2181 --topic nginx --partitions 1 --replication-factor 1
启动Flume的Agent
[root@hadoop apache-flume-1.7.0-bin]# bin/flume-ng agent --name a1 --conf-file conf/nginxLog.properties
数据存储到hdfs中
数据清洗
测试数据
192.168.11.1 - - [27/Mar/2019:11:04:48 +0800] "GET /user/1 HTTP/1.1" 304 0 "-" "Mozilla/5.0 (Windows NT 6.1; WOW64) AppleWebKit/537.36 (KHTML, like Gecko) Chrome/72.0.3626.121 Safari/537.36"
192.168.11.1 - - [27/Mar/2019:11:04:48 +0800] "GET /order/1 HTTP/1.1" 304 0 "-" "Mozilla/5.0 (Windows NT 6.1; WOW64) AppleWebKit/537.36 (KHTML, like Gecko) Chrome/72.0.3626.121 Safari/537.36"
正则表达式
^(\d{1,3}\.\d{1,3}\.\d{1,3}\.\d{1,3}).*\[(.*)\]\s"\w*\s\/(.*)\/.*\s\w*\/\d\.\d".*$
最终抽取到结果:
IP地址 请求时间 访问模块
数据清洗代码
MyMapper.java
package com.baizhi;

import org.apache.hadoop.io.LongWritable;
import org.apache.hadoop.io.NullWritable;
import org.apache.hadoop.io.Text;
import org.apache.hadoop.mapreduce.Mapper;

import java.io.IOException;
import java.text.ParseException;
import java.text.SimpleDateFormat;
import java.util.Date;
import java.util.Locale;
import java.util.regex.Matcher;
import java.util.regex.Pattern;

public class MyMapper extends Mapper<LongWritable, Text, Text, NullWritable> {

    /**
     * @param key
     * @param value   192.168.206.1 - - [08/Jan/2019:15:29:56 +0800] "GET /index.html HTTP/1.1" 304 0 "-" "Mozilla/5.0 (WindowsNT 6.1; Win64; x64) AppleWebKit/537.36 (KHTML, like Gecko) Chrome/70.0.3538.110 Safari/537.36"
     * @param context
     * @throws IOException
     * @throws InterruptedException
     */
    @Override
    protected void map(LongWritable key, Text value, Context context) throws IOException, InterruptedException {
        final String regex = "^(\\d{1,3}\\.\\d{1,3}\\.\\d{1,3}\\.\\d{1,3}).*\\[(.*)\\]\\s\"\\w*\\s\\/(.*)\\/.*\\s\\w*\\/\\d\\.\\d\".*$";
        final Pattern pattern = Pattern.compile(regex, Pattern.MULTILINE);
        final Matcher matcher = pattern.matcher(value.toString());
        while (matcher.find()) {
            String strDate = matcher.group(2); // 27/Mar/2019:11:04:48 +0800

            SimpleDateFormat dateFormat = new SimpleDateFormat("dd/MMM/yyyy:HH:mm:ss Z", Locale.ENGLISH);
            try {
                Date date = dateFormat.parse(strDate);
                String accessDate = date.toLocaleString();
                String result = matcher.group(1) + " " + accessDate + " " + matcher.group(3);
                context.write(new Text(result), null);
            } catch (ParseException e) {
                e.printStackTrace();
            }
        }
    }
}
InitMR.java
package com.baizhi;

import org.apache.hadoop.conf.Configuration;
import org.apache.hadoop.fs.Path;
import org.apache.hadoop.io.NullWritable;
import org.apache.hadoop.io.Text;
import org.apache.hadoop.mapreduce.Job;
import org.apache.hadoop.mapreduce.lib.input.TextInputFormat;
import org.apache.hadoop.mapreduce.lib.output.TextOutputFormat;

import java.io.IOException;

public class InitMR {

    public static void main(String[] args) throws IOException, ClassNotFoundException, InterruptedException {
        Configuration configuration = new Configuration();
        Job job = Job.getInstance(configuration, "nginx_access_log");
        job.setJarByClass(InitMR.class);

        job.setInputFormatClass(TextInputFormat.class);
        job.setOutputFormatClass(TextOutputFormat.class);
		// 注意:日期可以通过虚拟机参数 动态改变
        TextInputFormat.addInputPath(job, new Path("hdfs://hadoop:9000/flume/events/19-03-27"));
        TextOutputFormat.setOutputPath(job, new Path("hdfs://hadoop:9000/flume/result"));

        job.setMapOutputKeyClass(Text.class);
        job.setMapOutputValueClass(NullWritable.class);

        // 数据清洗时:没有reduce任务
        job.setNumReduceTasks(0);

        job.setMapperClass(MyMapper.class);

        // 提交
        job.waitForCompletion(true);
    }
}
执行数据清洗
- 上传数据清洗的jar包
- [root@hadoop ~]# hadoop jar nginx_mr-1.0-SNAPSHOT.jar com.baizhi.InitMR
- 查看数据清洗的结果
模拟请求
http://192.168.11.131/user/1
HIVE数据分析处理
ETL操作
创建HIVE的table
- 分割符 字段和字段的分割符为空格 行分割符为\n
- 分区表 按照时间将数据清洗后的结果 分区存放
- 外部表或者内部表(管理表)
创建HIVE表
create table t_log(ip varchar(50),access_date varchar(60),access_time varchar(50),resources varchar(50))row format delimited fields terminated by ' ' lines terminated by '\n';
加载数据
修该权限
hdfs dfs -chmod -R 777 /flume
load data inpath 'hdfs://hadoop:9000/flume/result' into table t_log
Hive On JDBC
使用之前的hive-demo进行测试统计
package com.baizhi;

import java.sql.*;

/**
 * 注意:
 *      hive的java api操作符合jdbc的六步骤
 *      只需要修改 驱动类和url地址
 */
public class HiveJDBCDemo {
    public static void main(String[] args) throws ClassNotFoundException, SQLException {
        String driverClassName = "org.apache.hive.jdbc.HiveDriver";
        Class.forName(driverClassName);

        // -u
        Connection connection = DriverManager.getConnection("jdbc:hive2://192.168.11.131:10000/default");

        // pv 系统每日访问量
        //String sql = "select count(ip) from t_log where access_date = ?";
        // mv 系统资源模块的访问量
        String sql = "select resources,count(*) from t_log where access_date = ? group by resources";

        PreparedStatement pstm = connection.prepareStatement(sql);

        pstm.setString(1,"2019-3-27");

        ResultSet resultSet = pstm.executeQuery();

        while (resultSet.next()) {
            double count = resultSet.getDouble(1);
            System.out.println("2019-3-27日用户的访问量:"+count);
        }

        resultSet.close();
        pstm.close();
        connection.close();
    }
}
将计算的结果存放到MYSQL数据库中
2019-3-27日用户的访问量:18.0
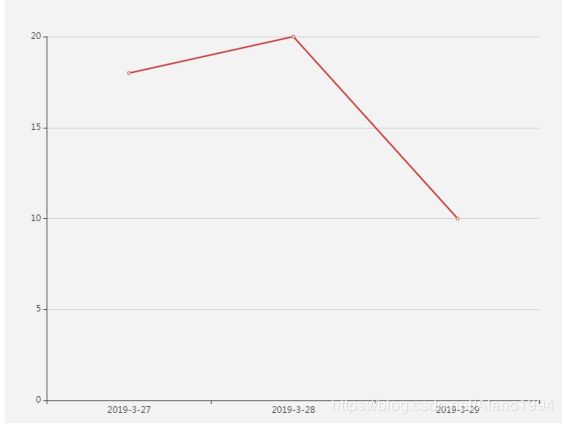
通过Echarts折线图或者柱状图展示计算结果
option = {
    xAxis: {
        type: 'category',
        data: ['2019-3-27','2019-3-28','2019-3-29' ]
    },
    yAxis: {
        type: 'value'
    },
    series: [{
        data: [18, 20,10],
        type: 'line'
    }]
};
决策支持


