tesnsorflow学习-MNIST数据及项目
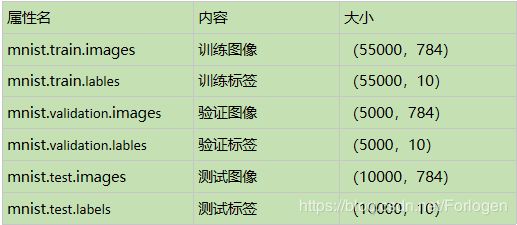
MNIST是一个手写字符的数据集,主要有一些手写数字的图片和相应的标签组成包含如下四个文件:

四个文件中,前两个是训练图像,一共60000张,后两个是测试图像,一共10000张。下载该数据集:
# form tensorflow.examples.tutorials.mnist import a module
from tensorflow.examples.tutorials.mnist import input_data
#Reading datas of MNIST from MNIST_data,if this statement id not exist,it will download bu ifself
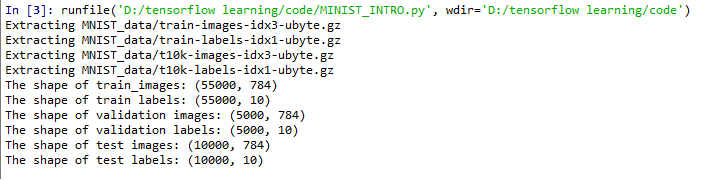
mnist = input_data.read_data_sets("MNIST_data/",one_hot = True)
通过下载数据,我们可以得到一个mnist的对象,它的属性含义如下:
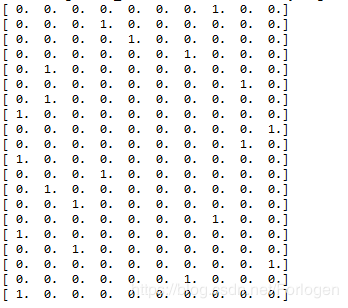
在mnist.train.labels中,大小维(55000,10),每个标签都用一个10维的向量表示0-9,向量中只有一个元素为1,来区分类别,这就是标签的独热(one-hot)表示。输出图像的标签信息:print (mnist.train.labels[i,:])
我们可以输出数据集的相关信息:
    #Reading the shape of train datasets
    	print ("The shape of train_images:",mnist.train.images.shape)
    	print ("The shape of train labels:",mnist.train.labels.shape)

    	#Reading the shape of validation datasets
    	print ("The shape of validation images:",mnist.validation.images.shape)
    	print ("The shape of validation labels:",mnist.validation.labels.shape)

    	#Reading the shape of test datasets
    	print ("The shape of test images:",mnist.test.images.shape)
    	print ("The shape of test labels:",mnist.test.labels.shape)
output:
在原始数据集中,每张图片都是2828维的矩阵表示,在tensorflow中每张图片都由784维的向量表示(784=2828)我们可以将其转换成图片保存:
"""
# -*- coding: utf-8 -*-
Created on Wed Sep 26 19:27:28 2018
@author: dyliang
"""
#导入库
from tensorflow.examples.tutorials.mnist import input_data
import scipy.misc
import os
#加载数据集
mnist = input_data.read_data_sets("MNIST_data/",one_hot = True)
#创建保存图片的路径
save_dir='MNIST_data/raw/'
#如果系统中不存在,则会自动创建
if os.path.exists(save_dir) is False:
os.makedirs(save_dir)
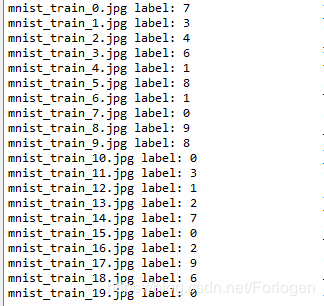
#保存前20张图片
for i in range(20):
#保存第i张图片 mnist.train.images[i,:]
image_array = mnist.train.images[i,:]
#将tensorflow中784维向量的图片还原成28*28维的图像
image_array = image_array.reshape(28,28)
#保存文件,格式为 mnist_train_0.jpg,mnist_train_1.jpg,...,mnist_train_19.jpg
filename = save_dir + 'mnist_train_%d.jpg'%i
#用scipy.misc.toimag转换为图像,调用.save()保存
scipy.misc.toimage(image_array,cmin = 0.0,cmax = 1.0).save(filename)
output:

在tensotflow下使用softmax回归进行分类:
    # -*- coding: utf-8 -*-
    	"""
    	Created on Wed Sep 26 20:23:15 2018
    	@author: dyliang
    	实现利用tensorflow中的softmax回归实现图片的分类
    	"""

    	import tensorflow as tf
    	from tensorflow.examples.tutorials.mnist import input_data

    	mnist = input_data.read_data_sets("MNIST_data/",one_hot = True)

    	"""
    	创建占位符 x ,代表待识别的图片
    	def placeholder(dtype, shape=None, name=None):
    	tf.float32:是tf的类型
    	[None,784]:是shape数据,None表示可以是任意维
    	"""
    	x = tf.placeholder(tf.float32,[None,784])

    	"""
    	tensorflow中变量的参数用tf.Variable表示
    	w:是softmax回归中的参数,将784维的输入转换成10维的输出,初始是784*10的全零矩阵,(784,10)
    	b:偏置项,初始维10维的0向量,(10,)
    	"""
    	w = tf.Variable(tf.zeros([784,10]))
    	b = tf.Variable(tf.zeros([10]))

    	"""
    	y 和 y_ 是两个Tensor
    	y:模型的输出,根据公式 y = wx + b , (N,10)
    	y_ :实际的图像标签,以占位符表示,独热表示
    	"""
    	y = tf.nn.softmax(tf.matmul(x,w) + b)
    	y_ = tf.placeholder(tf.float32,[None,10])

    	"""
    	softmax回归中使用交叉熵衡量数据的相似性
    	根据y和y_来计算交叉熵
    	"""
    	cross_entropy = tf.reduce_mean(-tf.reduce_sum(y_ * tf.log(y)))

    	"""
    	使用梯度下降法针对模型的参数w和b进行优化,默认会对所有的参数计算梯度
    	计算梯更新w和b的值
    	0.01 是learning rate
    	"""
    	train_step = tf.train.GradientDescentOptimizer(0.01).minimize(cross_entropy)

    	"""
    	创建一个Session,进行优化步骤
    	"""
    	sess = tf.InteractiveSession()

    	"""
    	运行前必须要初始化所有的变量,分配内存
    	在session中保存计算过程中的变量值
    	"""
    	tf.global_variables_initializer().run()

    	"""
    	利用梯度下降进行优化
    	1000步
    	"""
    	for _ in range(1000):
    		"""
    		取1000个训练数据
    		batch_xs:(100,784)的图像数据
    		batch_yes:(100,10)的实际标签
    		对应两个占位符 x 和 y_
    		"""
    		batch_xs,batch_yes = mnist.train.next_batch(100)
    		sess.run(train_step,feed_dict = {x : batch_xs,y_ : batch_yes})

    	"""
    	correct_prediction:正确的预测结果
    	accuracy:准确度,都是Tensor
    	tf.argmax:提取向量中最大值的下标,将其转换为数字标签
    	"""
    	correct_prediction = tf.equal(tf.argmax(y,1),tf.argmax(y_,1))
    	accuracy = tf.reduce_mean(tf.cast(correct_prediction,tf.float32))
    	print (sess.run(accuracy,feed_dict={x:mnist.test.images,y_:mnist.test.labels}))
结果为:
使用数据集构建一个简单的神经网络模型
    # -*- coding: utf-8 -*-
    """
    Created on Mon Oct  8 09:07:03 2018

    @author: dyliang
    """

    #输入数据,导入MNIST数据集
    from tensorflow import keras
    #from keras.datasets import mnist

    #加载训练数据和测试数据
    (train_images,train_labels),(test_images,test_labels) = keras.datasets.mnist.load_data()

    #打印一些信息
    print (train_images.shape)
    print (len(train_labels))
    print (test_labels)
    print (test_labels.dtype)
    print (train_images.ndim)

    #打印某一个数据,这里是一张图片
    digit = train_images[4]
    import matplotlib.pyplot as plt
    plt.imshow(digit,cmap=plt.cm.binary)
    plt.show()

    #构建网络
    #from keras import models
    #from keras import layers

    #包含两个Dense层
    model = keras.Sequential([
        keras.layers.Dense(512, activation='relu', input_shape=(28 * 28,)),
        keras.layers.Dense(10, activation='softmax')
    ])


    #网络的编译,指定优化器、损失函数和监控的指标
    model.compile(optimizer='rmsprop',
                  loss='categorical_crossentropy',
                  metrics=['accuracy'])

    #准备图像数据,将其变换成网络要求的形状,。并缩放到所有值都在【0,1】之间
    train_images = train_images.reshape((60000, 28 * 28))
    train_images = train_images.astype('float32') / 255

    test_images = test_images.reshape((10000, 28 * 28))
    test_images = test_images.astype('float32') / 255


    #循环训练网络
    from tensorflow.python.keras.utils import to_categorical

    train_labels = to_categorical(train_labels)
    test_labels = to_categorical(test_labels)

    #利用fit方法训练,迭代5次,批量大小为128
    model.fit(train_images, train_labels, epochs=5, batch_size=128)

    #检查在测试集上的性能
    test_loss,test_acc = model.evaluate(test_images,test_labels)
    print ('test_loss:', test_loss)
    print ('test_acc:' ,test_acc)
输出结果
