Python爬取CSDN,获取个人博客信息
最近自己空余时间在学习CPDA相关的知识,不过不打算考证,毕竟报名费用要8800(此处吐血三升)。不过相关资料倒是挺多的,感觉很有意思,也很适合自己,就拿来学学了。
但是作为数据分析师,前提肯定是需要能得到大量数据。现在获取数据的最快方法就是在网络上爬取,所以自己就学习了下如何使用Python在网络上爬取数据。既然常常在CSDN上混,那就先从爬取CSDN的数据开始吧。
代码和思路上参考了:https://blog.csdn.net/xingjiarong/article/details/50659381。特表示感谢!
Python爬取信息的基本原理就是访问相关网址,将获取到的信息(主要是html源码)的内容进行筛选整理。所以爬取信息首先是要看所要访问网页的源码。比如下图是我的博客主页:
邮件点击空白地方,选择查看源代码,就可以看到该页面的html源码。如下所示:
接下来我就思考我要来爬取一些什么内容。首先就是我的总体信息,包括总的访问量,粉丝,排名等等。于是我们在源代码里找到相关的代码:
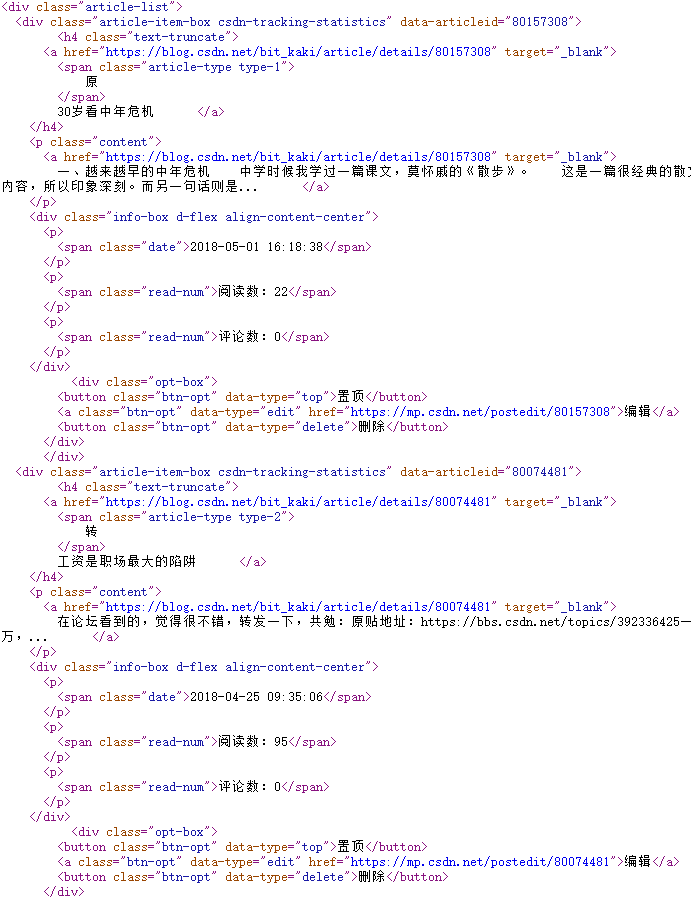
以及我每篇博客的访问量,评论数等情况,源码如下:
除了爬取的数据以外,其他还需要注意的有以下几点:
1.需要伪装成浏览器访问,直接访问的话csdn会拒绝;
2.在页面中查找最后一页,这里我没想到更好的方法,用了我博客的最后一页的一个标签。
附上源代码:
#!usr/bin/python
# coding: utf-8
'''
Created on 2018年10月20日
@author: Harrytsz
在 bit_kaki 源码基础上针对 python3.6 作了写修改,本版本仍然存在一些 Bug,但是可以初步运行。
'''
import urllib.request
import re
import sys
# 当前的博客列表页号
page_num = 1
# 不是最后列表的一页
notLast = []
account = str(input('print csdn id:'))
# 首页地址
baseUrl = 'http://blog.csdn.net/' + account
# 连接页号,组成爬取的页面网址
myUrl = baseUrl + '/article/list/' + str(page_num)
# 伪装成浏览器访问,直接访问的话csdn会拒绝
user_agent = 'Mozilla/4.0 (compatible; MSIE 5.5; Windows NT)'
headers = {'User-Agent': user_agent}
# 构造请求
req = urllib.request.Request(myUrl, headers=headers)
# 访问页面
myResponse = urllib.request.urlopen(req)
myPage = myResponse.read()
type = sys.getfilesystemencoding()
myPage = myPage.decode("UTF-8").encode(type)
# 获取总体信息
# 利用正则表达式来获取博客的标题
title = re.findall('(.*?) ', myPage.decode('utf-8'), re.S)
titleList = []
for items in title:
titleList.append(str(items).lstrip().rstrip())
print('%s %s' % ('标题', titleList[0]))
# 利用正则表达式来获取博客的数量
num = re.findall('(.*?)', myPage.decode('utf-8'), re.S)
numList = []
for items in num:
numList.append(str(items).lstrip().rstrip())
# 利用正则表达式来获取粉丝的数量
fan = re.findall('(.*?) ', myPage.decode('utf-8'), re.S)
fanList = []
for items in fan:
fanList.append(str(items).lstrip().rstrip())
# 输出原创、粉丝、喜欢、评论数
print('%s %s %s %s %s %s %s %s' % ('原创',numList[0],'粉丝',fanList[0],
'喜欢',numList[1],'评论',numList[2]))
# 利用正则表达式来获取访问量
fangwen = re.findall('' , myPage.decode('utf-8'), re.S)
fangwenList = []
for items in fangwen:
fangwenList.append(str(items).lstrip().rstrip())
# 利用正则表达式来获取排名
paiming = re.findall(''
, myPage.decode('utf-8'), re.S)
paimingList = []
for items in paiming:
paimingList.append(str(items).lstrip().rstrip())
# 输出总访问量、积分、排名
print('%s %s %s %s %s %s' % ('总访问量',fangwenList[0],
'积分',fangwenList[1],
'排名',paimingList[0]))
#不是最后列表的一页
notLast = []
# 获取每一页的信息
while not notLast:
# 首页地址
baseUrl = 'http://blog.csdn.net/' + account
# 连接页号,组成爬取的页面网址
myUrl = baseUrl + '/article/list/' + str(page_num)
# 伪装成浏览器访问,直接访问的话csdn会拒绝
user_agent = 'Mozilla/4.0 (compatible; MSIE 5.5; Windows NT)'
headers = {'User-Agent': user_agent}
# 构造请求
req = urllib.request.Request(myUrl, headers=headers)
# 访问页面
myResponse = urllib.request.urlopen(req)
myPage = myResponse.read()
type = sys.getfilesystemencoding()
myPage = myPage.decode("UTF-8").encode(type)
# 在页面中查找最后一页,这里我用了我博客的最后一页的一个标签
notLast = re.findall('android.media.projection', myPage.decode('utf8'), re.S)
print('-----------------------------the %d page---------------------------------' % (page_num,))
# 利用正则表达式来获取博客的标题
title = re.findall('(.*?)', myPage.decode('utf8'), re.S)
titleList = []
for items in title:
titleList.append(str(items)[32:].lstrip().rstrip())
# 利用正则表达式获取博客的访问地址
url = re.findall('', myPage.decode('utf8'), re.S)
urlList = []
for items in url:
urlList.append(str(items).lstrip().rstrip())
# 将结果输出
for n in range(len(titleList)):
print('%s %s' % (titleList[n], urlList[n * 2 + 1]))
# 页号加1
page_num = page_num + 1
# 每篇博客地址
try:
baseUrl = urlList[n * 2 + 1]
except IndexError:
print('溢出1')
break
# 伪装成浏览器访问,直接访问的话csdn会拒绝
user_agent = 'Mozilla/4.0 (compatible; MSIE 5.5; Windows NT)'
headers = {'User-Agent': user_agent}
# 构造请求
req = urllib.request.Request(baseUrl, headers=headers)
# 访问页面
try:
myResponse = urllib.request.urlopen(req)
myPage = myResponse.read()
type = sys.getfilesystemencoding()
myPage = myPage.decode("UTF-8").encode(type)
except urllib.error.HTTPError as reason:
print(reason)
# 利用正则表达式来获取博客的内容
content = re.findall('(.*?) ', myPage.decode('utf8'), re.S)
contentList = []
for items in content:
contentList.append(str(items).lstrip().rstrip())
try:
fh = open('F:\\study\\article\\' + titleList[n] + '.txt', 'a')
fh.write('%s' % (contentList[0].encode('utf-8')))
fh.write('\n')
fh.close()
except IOError:
print('发生了错误')
except IndexError:
print('溢出了')
附上部分结果图:
总结:
Question1 Python3.X 中的 raw_input() 和 input()
Python3.X 将 raw_input() 和 input()进行了整合,只保留了input()函数:
print("How old are you?")
age = input()
print("so %s old" %age)
Question2 Python3.X 中 urllib 使用
Python2.X系列中:
- urllib 库
- urllib2 库
Python3.X 系列中: - urllib 库
相应的变化有:
在 Pytho2.x 中使用 import urllib2 —— 对应的,在 Python3.x 中会使用 import urllib.request,urllib.error。
在 Pytho2.x 中使用 import urllib —— 对应的,在 Python3.x 中会使用 import urllib.request,urllib.error,urllib.parse。
在 Pytho2.x 中使用 import urlparse —— 对应的,在 Python3.x 中会使用 import urllib.parse。
在 Pytho2.x 中使用 import urlopen —— 对应的,在 Python3.x 中会使用 import urllib.request.urlopen。
在 Pytho2.x 中使用 import urlencode —— 对应的,在 Python3.x 中会使用 import urllib.parse.urlencode。
在 Pytho2.x 中使用 import urllib.quote —— 对应的,在 Python3.x 中会使用 import urllib.request.quote。
在 Pytho2.x 中使用 cookielib.CookieJar —— 对应的,在 Python3.x 中会使用 http.CookieJar。
在 Pytho2.x 中使用 urllib2.Request —— 对应的,在 Python3.x 中会使用 urllib.request.Request。
快速爬取一个网页:
import urllib.request
file = urllib.request.urlopen('http://www.baidu.com')
data = file.read()                    #读取全部
dataline = file.readline()            #读取一行内容
fhandle = open("./1.html","wb")       #将爬取到的网页保存到本地
fhandle.write(data)
fhandle.close()
浏览器的模拟:
应用场景:有些网页为了防止别人恶意采集信息所以进行了一些反爬虫的设置,为了跳过反爬虫的限制;
解决方法:设置一些 H e a d e r s Headers Headers 信息( U s e r − A g e n t User-Agent User−Agent),模拟成浏览器去访问这些网站。
代码如下:
import urllib.request
import urllib.parse
url = 'http://www.baidu.com'
header = {
'User-Agent': 'Mozilla/5.0 (Windows NT 6.1; WOW64) AppleWebKit/537.36
(KHTML, like Gecko) Chrome/58.0.3029.96 Safari/537.36'
}

request = urllib.request.Request(url, headers=header)
reponse = urllib.request.urlopen(request).read()

fhandle = open("./baidu.html", "wb")
fhandle.write(reponse)
fhandle.close()
代理服务器的设置:
应用场景:长时间使用同一个 IP 去爬取同一个网站上的网页,可能会被网站服务器屏蔽。
解决方法:使用代理服务器(使用地阿里服务器去爬取某个网站的内容的时候,在对方的网站上,显示的不是我们真是的IP地址,而是代理服务器的 IP 地址)
代码如下:
def use_proxy(proxy_addr,url):
    import urllib.request
    proxy=urllib.request.ProxyHandler({'http':proxy_addr})
    opener=urllib.request.build_opener(proxy,urllib.request.HTTPHandler)
    urllib.request.install_opener(opener)
    data=urllib.request.urlopen(url).read().decode('utf8')
    return data

proxy_addr='61.163.39.70:9999'
data=use_proxy(proxy_addr,'http://www.baidu.com')
print(len(data))
Cookie 的使用:
应用场景:在爬取网页是通常会涉及到用户登录。访问每一个互联网页面,都是通过 HTTP 协议进行的。而 HTTP 协议是一个无状态协议,所谓的无状态协议即无法维持会话之间的状态。
import urllib.request
import urllib.parse
import urllib.error
import http.cookiejar

url='http://bbs.chinaunix.net/member.php?mod=logging&action=login&loginsubmit=yes&loginhash=La2A2'
data={
    'username':'zhanghao',
    'password':'mima',
}
postdata=urllib.parse.urlencode(data).encode('utf8')
header={
    'User-Agent':'Mozilla/5.0 (X11; Fedora; Linux x86_64)
    \ AppleWebKit/537.36 (KHTML, like Gecko) Chrome/58.0.3029.110 Safari/537.36'
}

request=urllib.request.Request(url,postdata,headers=header)
#使用http.cookiejar.CookieJar()创建CookieJar对象
cjar=http.cookiejar.CookieJar()
#使用HTTPCookieProcessor创建cookie处理器,并以其为参数构建opener对象
cookie=urllib.request.HTTPCookieProcessor(cjar)
opener=urllib.request.build_opener(cookie)
#将opener安装为全局
urllib.request.install_opener(opener)

try:
    reponse=urllib.request.urlopen(request)
except urllib.error.HTTPError as e:
    print(e.code)
    print(e.reason)

fhandle=open('./test1.html','wb')
fhandle.write(reponse.read())
fhandle.close()
#打开test2.html文件,会发现此时会保持我们的登录信息,为已登录状态。也就是说,对应的登录状态已经通过Cookie保存。
url2='http://bbs.chinaunix.net/forum-327-1.html'
reponse2=urllib.request.urlopen(url)
fhandle2=open('./test2.html','wb')
fhandle2.write(reponse2.read())
fhandle2.close()
Question3学习爬虫时遇到的问题TypeError: cannot use a string pattern on a bytes-like object 与解决办法


