干货|Angular单元测试
点击上方“中兴开发者社区”,关注我们
▍作者简介
作者刘赛是名软件开发爱好者,致力于开发易用、友好、健壮的网管软件。近年来主要从事于前端UI的开发。本文主要讲述了angular单元测试入门需要的一些基本知识,希望大家能够从中获得启发,相互探讨,共同进步。
【摘要】
在前端Angular开发中,随着项目规模的越来越大,为了保证前端代码的质量需要编写单元测试代码,对代码的逻辑进行校验。本文旨在介绍在使用Angular(2.0以上版本)进行前端开发时,如何进行单元测试以及在日常单元测试用例中编写中遇到的误区和小技巧,方便大家能够更好的写出用例。
【关建词】
Angular 单元测试
1 单元测试框架
使用Angular CLI创建新项目的时候,项目已经自动集成了Karma和Jasmine框架,我们基本不需要修改任何配置即可以进行单元测试。
1.1 Karma介绍
Karma是一个单元测试的运行器,负责在浏览器中调度对应的测试用例,并输出相应的测试报告,相关的配置项在karma.conf.js文件中进行配置,具体的配置含义可以参见官网:https://karma-runner.github.io/1.0/index.html
1.2 Jasmine介绍
Jasmine提供了一套语法用于编写单元测试用例,其核心概念如下:
▶分组
语法一:
declare function describe(description: string, specDefinitions: () => void): void;
表示分组类似测试套,也就是一组测试用例,支持description嵌套。在采用MFQ进行测试设计的时候,其中的每一个M可以对应一个description。
例子:
escribe('测试显示/隐藏筛选条件', ()=>{
})
语法二:declare function fdescribe(description: string, specDefinitions: () => void): void;
与语法一类似,也表示一个测试套,差别在于运行整个项目用例时如果包含fdescribe函数,Karma框架只运行fdescribe测试套内的用例。在调试某个组件或者服务的用例是可以使用该测试套以缩短用例的运行时间,但是需要注意提交到版本机的时候需要修改为describe。
例子:
fdescribe('测试显示/隐藏筛选条件', ()=>{
})
语法三:
declare function xdescribe(description: string, specDefinitions: () => void): void;
表示排除执行的测试套,对于未编写完成或者是未调试通过的用例可以采用xdescription。
例子:
xdescribe('测试显示/隐藏筛选条件', ()=>{
})
▶ 用例
语法一:declare function it(expectation: string, assertion?: (done: DoneFn) => void, timeout?: number): void;
表示单个测试用例,对应对MFQ中某个具体的用例,支持description嵌套和非嵌套两种方式。
例子:
describe('测试显示/隐藏筛选条件', ()=>{
it('初始隐藏筛选条件', ()=> {
});
})
it('显示筛选条件当点击更多筛选的时候', ()=> {
})
语法二:
declare function fit(expectation: string, assertion?: (done: DoneFn) => void, timeout?: number): void;
与测试套类似,标示仅执行的测试用例。
语法三:
declare function xit(expectation: string, assertion?: (done: DoneFn) => void, timeout?: number): void;
与测试套类似,标示排除的测试用例
▶期望
语法:declare function expect
表示期望actual这个表达式具有某个值或者具有某种行为,在用例断言的时候使用。
▶匹配
语法:to****(arg):表示匹配,在断言的时候使用。当前默认提供了下面的对比方法。
toEqual(expected: Expected
toMatch(expected: string | RegExp, expectationFailOutput?: any): boolean;
toBeDefined(expectationFailOutput?: any): boolean;
toBeUndefined(expectationFailOutput?: any): boolean;
toBeNull(expectationFailOutput?: any): boolean;
toBeNaN(): boolean;
toBeTruthy(expectationFailOutput?: any): boolean;
toBeFalsy(expectationFailOutput?: any): boolean;
toHaveBeenCalled(): boolean;
toHaveBeenCalledWith(...params: any[]): boolean;
toHaveBeenCalledTimes(expected: number): boolean;
toContain(expected: any, expectationFailOutput?: any): boolean;
toBeLessThan(expected: number, expectationFailOutput?: any): boolean;
toBeLessThanOrEqual(expected: number, expectationFailOutput?: any): boolean;
toBeGreaterThan(expected: number, expectationFailOutput?: any): boolean;
toBeGreaterThanOrEqual(expected: number, expectationFailOutput?: any): boolean;
toBeCloseTo(expected: number, precision?: any, expectationFailOutput?: any): boolean;
toThrow(expected?: any): boolean;
toThrowError(message?: string | RegExp): boolean;
toThrowError(expected?: new (...args: any[]) => Error, message?: string | RegExp): boolean;
附官网地址:
http://jasmine.github.io/2.4/introduction.html
2. Component测试
Angular的测试工具模块提供了TestBed测试台,用于创建angular测试模块(类似于一个NgModule),我们可以提供调用它的configureTestingModule方法来创建单独的测试环境,这样方便我们将测试的组件从原有的应用模块中剥离出来,在我们自己创建的测试环境中对组件的特性行测试。
下面以5G项目前端代码为例,介绍如何进行组件的测试(基于信息安全考虑对方法进行了删减)
task-detail.component.ts
@Component({
selector: 'app-task-detail',
templateUrl: './task-detail.component.html',
styleUrls: ['./task-detail.component.css']
})
export class TaskDetailComponent implements OnChanges {
@Input() taskInfo: TaskInfo;
@Output() backMainPage: EventEmitter
public showDetailName: string;
public detailItem = new DetailInfo();
constructor(private translate: TranslateService,
private taskMonitorService: TaskMonitorService,
private chartUtil: ChartUtil) {
}
ngOnChanges(): void {
if (this.taskInfo) {
this.pieData = this.chartUtil.getChartData(this.taskInfo);
this.detailItem = JSON.parse(this.taskInfo.detail);
} else {
console.log('error: task has not value --> ', this.taskInfo);
this.errorInfo = 'TASK-MONITOR.TASK-INFO-EXCEPTION';
}
}
}
该组件主要实现输入一个taskInfo然后在界面显示对应的任务信息,我们可以编写一个对应的用例测试,当任务变化的时候界面是否正确的显示了对应的任务信息。
2.1 组件创建
beforeEach(async(() => {
TestBed.configureTestingModule({
//导入组件的依赖
imports: [
TaskMonitorModule,
HttpModule
],
//组件依赖的服务
providers: [
HttpClient,
HttpInterceptorBackend,
HttpInterceptor,
{
provide: Http,
useFactory: httpFactory,
deps: [HttpInterceptorBackend, RequestOptions]
},
I18nService,
TranslateService
]
})
.compileComponents().then(()=>{
fixture = TestBed.createComponent(TaskDetailComponent);
component = fixture.componentInstance;
component.taskInfo = taskInfo;
fixture.detectChanges();
});
}));
每个用例运行之前,都会在beforeEach中调用configureTestingModule,以便TestBed可以在运行每个测试之前都把自己重置回它的基础状态。当TestBed调用
createComponent即创建好需要测试的组件,我们可以通过fixture 获取到组件的实例。
2.2组件元素定位
createComponent方法返回ComponentFixture,用来控制和访问已创建的组件所在的测试环境。 这个fixture提供了对组件实例自身的访问,同时还提供了用来访问组件的DOM元素的DebugElement对象。
query方法接受predicate函数,并搜索fixture的整个DOM树,试图寻找第一个满足predicate函数的元素。
queryAll方法返回一列数组,包含所有DebugElement中满足predicate的元素。
By类是Angular测试工具之一,它生成有用的predicate。 它的By.css静态方法产生标准CSS选择器 predicate,与JQuery选择器相同的方式过滤。
2.3组件输入输出
组件的输入可以在创建完组件后获取组件的实例,通过设置组件实例的输入来控制组件的输入。当组件的输入变化后需要调用detectChanges来通知Angular执行变更检测。
组件的输出,可以通过订阅输出然后断言输出是否与预期的一致。
2.4组件生命周期钩子
大家都知道,当组件输入的引用变化时Angular会自动调用ngOnChanges生命周期钩子,但是在单元测试中修改对应的输入后,即使调用了detectChanges也无法调用ngOnChanges。如果需要测试ngOnChanges,需要直接通过方法调用进行测试。
3 Service测试
在实际的组件测试中发现组件往往依赖于服务。而服务又依赖于外部资源如http交互、本地资源等。为了屏蔽外部依赖方便组件的测试,可以对服务进行mock。对于服务的mock方式有两种:伪造服务实例(提供服务复制品)、刺探真实服务。这两种方式都能够达到mock的效果,我们可以挑选一种最适合自己当前测试文件的测试方式来进行测试。
3.1 Mock服务实例
第一步:编写服务的mock类
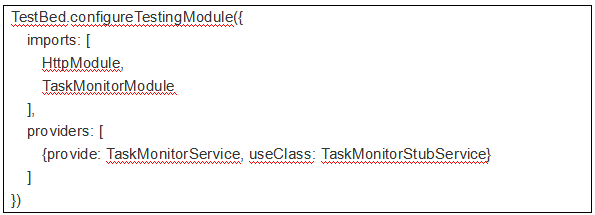
第二步:在configureTestingModule用Mock的服务替换真实的服务
3.2刺探真实服务
Angular的服务都是通过注入器注入到系统中的,同样我们可以从根TestBed获取到注入服务的实例,然后结合刺探(Spy)对真实的服务的方法进行替换。
4.推广建议:
在使用Angular(2.0)以上版本进行前端开发的项目可以借鉴,通过单元测试来进行功能特性的自动化防护。


