SiameseFC-TensorFlow 代码详细注解(一):预训练模型下载转换测试以及结果可视化
说明:该系列博客源码链接为:https://github.com/bilylee/SiamFC-TensorFlow,是实验室同小组的师兄用TensorFlow实现SiameseFC算法的最终公开版本,经过了长时间的打磨,各个模块功能明确,整体可读性和可移植性极好,我相信这对做Tracking的小伙伴来说,是个入门SiameseFC Tracker的特别好的选择。哈哈,觉得代码很棒的小伙伴们可以点个Star哦,也欢迎交流学习和指教。
这篇博客主要的目的就是简单地跑一下实验,让下载的代码能用预训练的模型去测试单个视频,并对结果可视化,从视觉上感受一下这个跟踪算法的效果,至于如果要自己训练自己的模型该如何准备训练数据,如何设计自己的模型,如何训练自己的模型,以及如何评估自己的模型等,这些问题都将在后面的系列博客中慢慢道来。
1: SiameseFC-TensorFlow环境配置
可参考源码中的说明,这里将截图放在这里,大家自行准备可运行的环境。
2:预训练模型下载转换和测试
可参考源代码中的说明,这里也给个截图,然后主要对一些文件做一些详细一点的注解。内容主要有预训练模型和测试视频的下载,模型转换以及转换前后的模型对比检验,视频的测试和结果的可视化。
2.1 预训练模型和测试视频下载
核心文件:scripts/download_assets.py
核心功能:下载SiameseFC的matlab版本预训练模型,同时下载用于测试的单个视频。
#! /usr/bin/env python
# -*- coding: utf-8 -*-
#
# Copyright © 2017 bily     Huazhong University of Science and Technology
#
# Distributed under terms of the MIT license.

import os.path as osp
import sys
import zipfile

import six.moves.urllib as urllib                      # 数据下载相关库 , urllib

CURRENT_DIR = osp.dirname(__file__)                    # 返回当前.py脚本文件的路径
ROOT_DIR = osp.join(CURRENT_DIR, '..')
sys.path.append(ROOT_DIR)                              # 增加模块的搜索路径

from utils.misc_utils import mkdir_p                   # 自己编写的makir_p函数,生成路径


def download_or_skip(download_url, save_path):          # 数据下载函数
  if not osp.exists(save_path):                         # 判断数据是否已经下载,避免重复下载
    print('Downloading: {}'.format(download_url))
    opener = urllib.request.URLopener()
    opener.retrieve(download_url, save_path)
  else:
    print('File {} exists, skip downloading.'.format(save_path))


if __name__ == '__main__':                                   # 数据下载准备 主函数
  assets_dir = osp.join(ROOT_DIR, 'assets')                  # 添加数据资源保存的路径assets_dir

  # Make assets directory
  mkdir_p(assets_dir)                                        # 生成路径,存储数据资源

  # Download the pretrained color model                      # 下载SiameseFC-color pretrained 模型
  download_base = 'https://www.robots.ox.ac.uk/~luca/stuff/siam-fc_nets/'
  model_name = '2016-08-17.net.mat'
  download_or_skip(download_base + model_name, osp.join(assets_dir, model_name))

  # Download the pretrained gray model                       # 下载SiameseFC-color-gray  pretrained 模型
  download_base = 'https://www.robots.ox.ac.uk/~luca/stuff/siam-fc_nets/'
  model_name = '2016-08-17_gray025.net.mat'
  download_or_skip(download_base + model_name, osp.join(assets_dir, model_name))

  # Download one test sequence                               # 下载一个测试视频,供测试和显示
  download_base = "http://cvlab.hanyang.ac.kr/tracker_benchmark/seq_new/"
  seq_name = 'KiteSurf.zip'
  download_or_skip(download_base + seq_name, osp.join(assets_dir, seq_name))

  # Unzip the test sequence                                  # 将下载的视频.zip文件解压缩
  with zipfile.ZipFile(osp.join(assets_dir, seq_name), 'r') as zip_ref:
    zip_ref.extractall(assets_dir)
2.2 模型转换
核心文件:experiments/SiamFC-3s-color-pretrained.py、SiamFC-3s-gray-pretrained.py
相关文件:scripts/convert_pretrained_model.py,utils/train_utils.py
核心功能:将siameseFC的color和gray模型由matlab格式转换成tensorflow方便读取的格式。
就从最外边的实验封装文件慢慢往里看吧:experiments/SiamFC-3s-color-pretrained.py
#! /usr/bin/env python
# -*- coding: utf-8 -*-
#
# Copyright © 2017 bily     Huazhong University of Science and Technology
#
# Distributed under terms of the MIT license.

"""Load pretrained color model in the SiamFC paper and save it in the TensorFlow format"""
from __future__ import absolute_import
from __future__ import division
from __future__ import print_function

import os.path as osp
import sys

CURRENT_DIR = osp.dirname(__file__)
sys.path.append(osp.join(CURRENT_DIR, '..'))
print( osp.join(CURRENT_DIR, '..'))   # 添加搜索路径

from configuration import LOG_DIR    # 从配置文件中导入log存储的路径
from scripts.convert_pretrained_model import ex  # 导入对应的experiment
# 这里只是实验的表皮,具体实验还得看scripts.convert_pretrained_model详细内容
if __name__ == '__main__':
  RUN_NAME = 'SiamFC-3s-color-pretrained'
  ex.run(config_updates={'model_config': {'embed_config': {'embedding_checkpoint_file': '/workspace/czx/Projects/SiamFC-TensorFlow/assets/2016-08-17.net.mat',
                                                           'train_embedding': False, },
                                          },
                         'train_config': {'train_dir': osp.join(LOG_DIR, 'track_model_checkpoints', RUN_NAME), },
                         'track_config': {'log_dir': osp.join(LOG_DIR, 'track_model_inference', RUN_NAME), }
                         },    # 实验运行管理,这里的话就是根据需要更新一些配置文件中的参数
         options={'--name': RUN_NAME,
                  '--force': True,
                  '--enforce_clean': False,
                  })
模型转换实验文件:scripts/convert_pretrained_model.py
#! /usr/bin/env python
# -*- coding: utf-8 -*-
#
# Copyright © 2017 bily     Huazhong University of Science and Technology
#
# Distributed under terms of the MIT license.

"""Convert the matlab-pretrained model into TensorFlow format"""

from __future__ import absolute_import
from __future__ import division
from __future__ import print_function

import logging
import os
import os.path as osp
import sys

import numpy as np
import tensorflow as tf

CURRENT_DIR = osp.dirname(__file__)
sys.path.append(osp.join(CURRENT_DIR, '..'))   # 添加搜索路径

import configuration
import siamese_model
from utils.misc_utils import auto_select_gpu, save_cfgs

# Set GPU
os.environ['CUDA_VISIBLE_DEVICES'] = auto_select_gpu()  # 自动选择GPU
tf.logging.set_verbosity(tf.logging.DEBUG)

from sacred import Experiment  # 更好地进行实验管理

ex = Experiment(configuration.RUN_NAME)


@ex.config   # 加载参数配置
def configurations():
  # Add configurations for current script, for more details please see the documentation of `sacred`.
  model_config = configuration.MODEL_CONFIG
  train_config = configuration.TRAIN_CONFIG
  track_config = configuration.TRACK_CONFIG


@ex.automain   # 主函数
def main(model_config, train_config, track_config):
  # Create training directory
  train_dir = train_config['train_dir']   # 创建训练路径
  if not tf.gfile.IsDirectory(train_dir):
    tf.logging.info('Creating training directory: %s', train_dir)
    tf.gfile.MakeDirs(train_dir)

  # Build the Tensorflow graph
  g = tf.Graph()
  with g.as_default():  # 默认graph
    # Set fixed seed
    np.random.seed(train_config['seed'])
    tf.set_random_seed(train_config['seed'])
    # 实际上单纯地转换这样的一个预训练模型格式是不需要在这里调用siameseFC构建的,但是整份代码,将这样的
    # 一种预训练模型加载看成是模型训练的一个初始化,而模型转换根据配置参数进行的一个初始化方式。
    model = siamese_model.SiameseModel(model_config, train_config, mode='inference')
    model.build()

    # Save configurations for future reference
    save_cfgs(train_dir, model_config, train_config, track_config)

    saver = tf.train.Saver(tf.global_variables(),
                           max_to_keep=train_config['max_checkpoints_to_keep'])

    # Dynamically allocate GPU memory
    gpu_options = tf.GPUOptions(allow_growth=True)
    sess_config = tf.ConfigProto(gpu_options=gpu_options)

    sess = tf.Session(config=sess_config)
    model_path = tf.train.latest_checkpoint(train_config['train_dir'])

    if not model_path:
      # Initialize all variables
      sess.run(tf.global_variables_initializer())
      sess.run(tf.local_variables_initializer())
      start_step = 0
      # 因为在这里我们转换预训练模型的格式的话只需要设置if后面的参数即可
      # Load pretrained embedding model if needed
      if model_config['embed_config']['embedding_checkpoint_file']:
        model.init_fn(sess)   # 这是模型初始化的一个方法,后面的给出具体调用了啥函数

    else:
      logging.info('Restore from last checkpoint: {}'.format(model_path))
      sess.run(tf.local_variables_initializer())
      saver.restore(sess, model_path)
      start_step = tf.train.global_step(sess, model.global_step.name) + 1

    checkpoint_path = osp.join(train_config['train_dir'], 'model.ckpt')
    saver.save(sess, checkpoint_path, global_step=start_step)    # 保存为.ckpt
这里贴出model.init_fn的内容吧,且先不要深究siamese_model.py里面的其他内容
  def setup_embedding_initializer(self):
    """Sets up the function to restore embedding variables from checkpoint."""
    embed_config = self.model_config['embed_config']
    if embed_config['embedding_checkpoint_file']: # 上面说过模型转换的时候是有设置matlab文件路径的
      # Restore Siamese FC models from .mat model files  # 这才是加载.mat model的函数
      initialize = load_mat_model(embed_config['embedding_checkpoint_file'],
                                  'convolutional_alexnet/', 'detection/')

      def restore_fn(sess):   # 初始化方式,下面赋值给self.init_fn了
        tf.logging.info("Restoring embedding variables from checkpoint file %s",
                        embed_config['embedding_checkpoint_file'])
        sess.run([initialize])

      self.init_fn = restore_fn
所以到这里,我们就真正进入到如何转换.mat为.ckpt文件了:
load_mat_model函数在utils/train_utils.py文件里,这里还是贴一下这个文件里的内容吧。
#! /usr/bin/env python
# -*- coding: utf-8 -*-
#
# Copyright © 2017 bily     Huazhong University of Science and Technology
#
# Distributed under terms of the MIT license.

"""Utilities for model construction"""
from __future__ import absolute_import
from __future__ import division
from __future__ import print_function

import re

import numpy as np
import tensorflow as tf
from scipy import io as sio

from utils.misc_utils import get_center

# 在训练过程中构建groudtruth用到,用返回的结果和siamese网络得到的score map计算loss
def construct_gt_score_maps(response_size, batch_size, stride, gt_config=None):
  """Construct a batch of groundtruth score maps

  Args:
    response_size: A list or tuple with two elements [ho, wo]
    batch_size: An integer e.g., 16
    stride: Embedding stride e.g., 8
    gt_config: Configurations for groundtruth generation

  Return:
    A float tensor of shape [batch_size] + response_size
  """
  with tf.name_scope('construct_gt'):
    ho = response_size[0]
    wo = response_size[1]
    y = tf.cast(tf.range(0, ho), dtype=tf.float32) - get_center(ho)
    x = tf.cast(tf.range(0, wo), dtype=tf.float32) - get_center(wo)
    [Y, X] = tf.meshgrid(y, x)

    def _logistic_label(X, Y, rPos, rNeg):  # 构建一个高斯的二值groundtruth响应图
      # dist_to_center = tf.sqrt(tf.square(X) + tf.square(Y))  # L2 metric
      dist_to_center = tf.abs(X) + tf.abs(Y)  # Block metric
      Z = tf.where(dist_to_center <= rPos,
                   tf.ones_like(X),
                   tf.where(dist_to_center < rNeg,
                            0.5 * tf.ones_like(X),
                            tf.zeros_like(X)))
      return Z
    # 且先留意这里构建的groundtruth和siamese网络的stride有关
    rPos = gt_config['rPos'] / stride
    rNeg = gt_config['rNeg'] / stride
    gt = _logistic_label(X, Y, rPos, rNeg)

    # Duplicate a batch of maps
    gt_expand = tf.reshape(gt, [1] + response_size)
    gt = tf.tile(gt_expand, [batch_size, 1, 1])
    return gt
# 从matlab模型文件存储路径读取模型参数
def get_params_from_mat(matpath):
  """Get parameter from .mat file into parms(dict)"""

  def squeeze(vars_):
    # Matlab save some params with shape (*, 1)
    # However, we don't need the trailing dimension in TensorFlow.
    if isinstance(vars_, (list, tuple)):
      return [np.squeeze(v, 1) for v in vars_]
    else:
      return np.squeeze(vars_, 1)

  netparams = sio.loadmat(matpath)["net"]["params"][0][0]
  params = dict()   # 将模型数据以dict形式存储起来
  # 既然看到了这里,自己也不防单独将matlab模型加载起来,看看里面都是什么样的形式
  for i in range(netparams.size):
    param = netparams[0][i]
    name = param["name"][0]
    value = param["value"]
    value_size = param["value"].shape[0]

    match = re.match(r"([a-z]+)([0-9]+)([a-z]+)", name, re.I)
    if match:
      items = match.groups()
    elif name == 'adjust_f':
      params['detection/weights'] = squeeze(value)
      continue
    elif name == 'adjust_b':
      params['detection/biases'] = squeeze(value)
      continue
    else:
      raise Exception('unrecognized layer params')

    op, layer, types = items
    layer = int(layer)
    if layer in [1, 3]:
      if op == 'conv':  # convolution
        if types == 'f':
          params['conv%d/weights' % layer] = value
        elif types == 'b':
          value = squeeze(value)
          params['conv%d/biases' % layer] = value
      elif op == 'bn':  # batch normalization
        if types == 'x':
          m, v = squeeze(np.split(value, 2, 1))
          params['conv%d/BatchNorm/moving_mean' % layer] = m
          params['conv%d/BatchNorm/moving_variance' % layer] = np.square(v)
        elif types == 'm':
          value = squeeze(value)
          params['conv%d/BatchNorm/gamma' % layer] = value
        elif types == 'b':
          value = squeeze(value)
          params['conv%d/BatchNorm/beta' % layer] = value
      else:
        raise Exception
    elif layer in [2, 4]:
      if op == 'conv' and types == 'f':
        b1, b2 = np.split(value, 2, 3)
      else:
        b1, b2 = np.split(value, 2, 0)
      if op == 'conv':
        if types == 'f':
          params['conv%d/b1/weights' % layer] = b1
          params['conv%d/b2/weights' % layer] = b2
        elif types == 'b':
          b1, b2 = squeeze(np.split(value, 2, 0))
          params['conv%d/b1/biases' % layer] = b1
          params['conv%d/b2/biases' % layer] = b2
      elif op == 'bn':
        if types == 'x':
          m1, v1 = squeeze(np.split(b1, 2, 1))
          m2, v2 = squeeze(np.split(b2, 2, 1))
          params['conv%d/b1/BatchNorm/moving_mean' % layer] = m1
          params['conv%d/b2/BatchNorm/moving_mean' % layer] = m2
          params['conv%d/b1/BatchNorm/moving_variance' % layer] = np.square(v1)
          params['conv%d/b2/BatchNorm/moving_variance' % layer] = np.square(v2)
        elif types == 'm':
          params['conv%d/b1/BatchNorm/gamma' % layer] = squeeze(b1)
          params['conv%d/b2/BatchNorm/gamma' % layer] = squeeze(b2)
        elif types == 'b':
          params['conv%d/b1/BatchNorm/beta' % layer] = squeeze(b1)
          params['conv%d/b2/BatchNorm/beta' % layer] = squeeze(b2)
      else:
        raise Exception

    elif layer in [5]:
      if op == 'conv' and types == 'f':
        b1, b2 = np.split(value, 2, 3)
      else:
        b1, b2 = squeeze(np.split(value, 2, 0))
      assert op == 'conv', 'layer5 contains only convolution'
      if types == 'f':
        params['conv%d/b1/weights' % layer] = b1
        params['conv%d/b2/weights' % layer] = b2
      elif types == 'b':
        params['conv%d/b1/biases' % layer] = b1
        params['conv%d/b2/biases' % layer] = b2

  return params
 # .mat模型数据加载转换为.ckpt格式进行存储
def load_mat_model(matpath, embed_scope, detection_scope=None):
  """Restore SiameseFC models from .mat model files"""
  params = get_params_from_mat(matpath)

  assign_ops = []

  def _assign(ref_name, params, scope=embed_scope):
    var_in_model = tf.get_collection(tf.GraphKeys.GLOBAL_VARIABLES,
                                     scope + ref_name)[0]
    var_in_mat = params[ref_name]
    op = tf.assign(var_in_model, var_in_mat)
    assign_ops.append(op)

  for l in range(1, 6):
    if l in [1, 3]:
      _assign('conv%d/weights' % l, params)
      # _assign('conv%d/biases' % l, params)
      _assign('conv%d/BatchNorm/beta' % l, params)
      _assign('conv%d/BatchNorm/gamma' % l, params)
      _assign('conv%d/BatchNorm/moving_mean' % l, params)
      _assign('conv%d/BatchNorm/moving_variance' % l, params)
    elif l in [2, 4]:
      # Branch 1
      _assign('conv%d/b1/weights' % l, params)
      # _assign('conv%d/b1/biases' % l, params)
      _assign('conv%d/b1/BatchNorm/beta' % l, params)
      _assign('conv%d/b1/BatchNorm/gamma' % l, params)
      _assign('conv%d/b1/BatchNorm/moving_mean' % l, params)
      _assign('conv%d/b1/BatchNorm/moving_variance' % l, params)
      # Branch 2
      _assign('conv%d/b2/weights' % l, params)
      # _assign('conv%d/b2/biases' % l, params)
      _assign('conv%d/b2/BatchNorm/beta' % l, params)
      _assign('conv%d/b2/BatchNorm/gamma' % l, params)
      _assign('conv%d/b2/BatchNorm/moving_mean' % l, params)
      _assign('conv%d/b2/BatchNorm/moving_variance' % l, params)
    elif l in [5]:
      # Branch 1
      _assign('conv%d/b1/weights' % l, params)
      _assign('conv%d/b1/biases' % l, params)
      # Branch 2
      _assign('conv%d/b2/weights' % l, params)
      _assign('conv%d/b2/biases' % l, params)
    else:
      raise Exception('layer number must below 5')

  if detection_scope:
    _assign(detection_scope + 'biases', params, scope='')

  initialize = tf.group(*assign_ops)
  return initialize
上面代码中的一些语句的具体含义可以自己利用.mat数据慢慢体会,琢磨一会应该就ok了。
到此为止,我们的模型算是已经转换为.ckpt格式的了,按理说就可以用着个模型直接进行测试评估了,但在此之前,我们往往还需要做的一件事就是确定我们转换得到的.ckpt是没有问题的,进入下一节验证.ckpt没有问题之前把.mat格式的模型截个图看看长什么样,更具体的细节这里就不展开了。
2.3 模型转换验证
核心文件:tests/test_converted_model.py
核心功能:输入同一张图片01.jpg,SiameseFC-TensorFlow代码加载.mat和转换后的.ckpt模型时运算得到01.jpg的feature map均和原作者matlab版本代码计算得到的feature map相同(差异及其的微小),如此一来既验证了网络设计没问题,同时也验证了.mat模型转换为.ckpt模型时没有问题。
#! /usr/bin/env python
# -*- coding: utf-8 -*-
#
# Copyright © 2017 bily     Huazhong University of Science and Technology
#
# Distributed under terms of the MIT license.

"""Tests for track model"""

from __future__ import absolute_import
from __future__ import division
from __future__ import print_function

import os.path as osp
import sys

import numpy as np
import scipy.io as sio
import tensorflow as tf
from scipy.misc import imread  # Only pillow 2.x is compatible with matlab 2016R

CURRENT_DIR = osp.dirname(__file__)
PARENT_DIR = osp.join(CURRENT_DIR, '..')
sys.path.append(PARENT_DIR)

import siamese_model
import configuration
from utils.misc_utils import load_cfgs
# 直接通过model.init_fn加载.mat格式的模型数据计算01.jpg的feature map
# 用这个feature map和作者matlab的结果
def test_load_embedding_from_mat():
  """Test if the embedding model loaded from .mat
     produces the same features as the original MATLAB implementation"""
  matpath = osp.join(PARENT_DIR, 'assets/2016-08-17.net.mat')
  test_im = osp.join(CURRENT_DIR, '01.jpg')
  gt_feat = osp.join(CURRENT_DIR, 'result.mat')

  model_config = configuration.MODEL_CONFIG
  model_config['embed_config']['embedding_name'] = 'convolutional_alexnet'
  model_config['embed_config']['embedding_checkpoint_file'] = matpath  # For SiameseFC
  model_config['embed_config']['train_embedding'] = False

  g = tf.Graph()
  with g.as_default():
    model = siamese_model.SiameseModel(model_config, configuration.TRAIN_CONFIG, mode='inference')
    model.build()  # 模型的构建,这里不用深究,后续博客会细说
    with tf.Session() as sess:
      # Initialize models
      init = tf.global_variables_initializer()
      sess.run(init)

      # Load model here
      model.init_fn(sess)

      # Load image
      im = imread(test_im)
      im_batch = np.expand_dims(im, 0)

      # Feed image
      feature = sess.run([model.exemplar_embeds], feed_dict={model.examplar_feed: im_batch})

      # Compare with features computed from original source code
      ideal_feature = sio.loadmat(gt_feat)['r']['z_features'][0][0]
      diff = feature - ideal_feature
      diff = np.sqrt(np.mean(np.square(diff)))
      print('Feature computation difference: {}'.format(diff))
      print('You should get something like: 0.00892720464617')

def test_load_embedding_from_converted_TF_model():
  """Test if the embedding model loaded from converted TensorFlow checkpoint
     produces the same features as the original implementation"""
  checkpoint = osp.join(PARENT_DIR, 'Logs/SiamFC/track_model_checkpoints/SiamFC-3s-color-pretrained')
  test_im = osp.join(CURRENT_DIR, '01.jpg')
  gt_feat = osp.join(CURRENT_DIR, 'result.mat')

  if not osp.exists(checkpoint):
    raise Exception('SiamFC-3s-color-pretrained is not generated yet.')
  model_config, train_config, track_config = load_cfgs(checkpoint)

  # Build the model
  g = tf.Graph()
  with g.as_default():
    model = siamese_model.SiameseModel(model_config, train_config, mode='inference')
    model.build()

    with tf.Session() as sess:
      # Load model here
      saver = tf.train.Saver(tf.global_variables())
      if osp.isdir(checkpoint):
        model_path = tf.train.latest_checkpoint(checkpoint)
      else:
        model_path = checkpoint

      saver.restore(sess, model_path)

      # Load image
      im = imread(test_im)
      im_batch = np.expand_dims(im, 0)

      # Feed image
      feature = sess.run([model.exemplar_embeds], feed_dict={model.examplar_feed: im_batch})

      # Compare with features computed from original source code
      ideal_feature = sio.loadmat(gt_feat)['r']['z_features'][0][0]
      diff = feature - ideal_feature
      diff = np.sqrt(np.mean(np.square(diff)))
      print('Feature computation difference: {}'.format(diff))
      print('You should get something like: 0.00892720464617')


def test():
  test_load_embedding_from_mat()
  test_load_embedding_from_converted_TF_model()


if __name__ == '__main__':
  test()
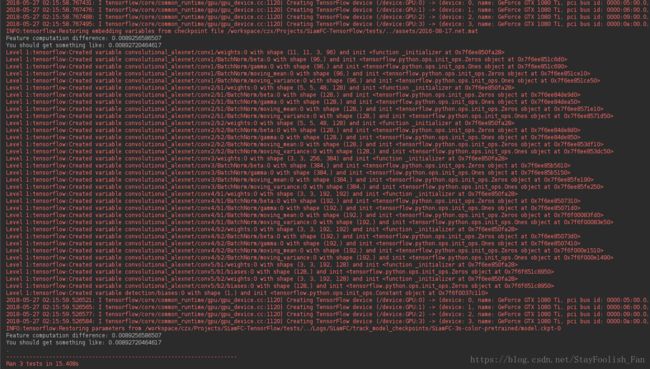
上面验证代码大体逻辑很清晰,至于模型构建的内容在此可以先跳过,后面再详细讲讲,下面是运行该测试脚本的结果截图,上面是.mat结果,下面是.ckpt结果,可以看到这两个结果是一样的:
2.4 用预训练模型在视频上进行测试
核心文件:scripts/run_tracking.py
核心功能:用预训练模型在新的视频上进行测试,视频是上面下载过测KiteSurf。
这份代码涉及到后面的视频测试,这里先只需要会用该脚本就好,你只要会到对应的log 路径下找到你对应视频测试的一些保存结果就好,因为这些结果都是后面可视化的数据,至于保存的数据是什么,保存数据的这个代码在哪个文件里后面自然会涉及到。
#! /usr/bin/env python
# -*- coding: utf-8 -*-
#
# Copyright © 2017 bily     Huazhong University of Science and Technology
#
# Distributed under terms of the MIT license.

r"""Generate tracking results for videos using Siamese Model"""

from __future__ import absolute_import
from __future__ import division
from __future__ import print_function

import logging
import os
import os.path as osp
import sys
from glob import glob

import tensorflow as tf
from sacred import Experiment

CURRENT_DIR = osp.dirname(__file__)
sys.path.append(osp.join(CURRENT_DIR, '..'))

from inference import inference_wrapper
from inference.tracker import Tracker
from utils.infer_utils import Rectangle
from utils.misc_utils import auto_select_gpu, mkdir_p, sort_nicely, load_cfgs

ex = Experiment()


@ex.config  # 模型和测试视频
def configs():
  checkpoint = '/workspace/czx/Projects/SiamFC-TensorFlow/Logs/SiamFC/track_model_checkpoints/SiamFC-3s-color-pretrained'
  input_files = '/workspace/czx/Projects/SiamFC-TensorFlow/assets/KiteSurf'


@ex.automain
def main(checkpoint, input_files):
  os.environ['CUDA_VISIBLE_DEVICES'] = auto_select_gpu()

  model_config, _, track_config = load_cfgs(checkpoint)
  track_config['log_level'] = 1

  g = tf.Graph()
  with g.as_default():   # 模型测试时候需要构建的,且先不要深究
    model = inference_wrapper.InferenceWrapper()
    restore_fn = model.build_graph_from_config(model_config, track_config, checkpoint)
  g.finalize()
  # 这一块就是你存储测试视频结果数据的路径,记得去看看都有哪些数据。
  if not osp.isdir(track_config['log_dir']):
    logging.info('Creating inference directory: %s', track_config['log_dir'])
    mkdir_p(track_config['log_dir'])

  video_dirs = []
  for file_pattern in input_files.split(","):
    video_dirs.extend(glob(file_pattern))
  logging.info("Running tracking on %d videos matching %s", len(video_dirs), input_files)

  gpu_options = tf.GPUOptions(allow_growth=True)
  sess_config = tf.ConfigProto(gpu_options=gpu_options)

  with tf.Session(graph=g, config=sess_config) as sess:
    restore_fn(sess)

    tracker = Tracker(model, model_config=model_config, track_config=track_config)

    for video_dir in video_dirs:
      if not osp.isdir(video_dir):
        logging.warning('{} is not a directory, skipping...'.format(video_dir))
        continue

      video_name = osp.basename(video_dir)
      video_log_dir = osp.join(track_config['log_dir'], video_name)
      mkdir_p(video_log_dir)

      filenames = sort_nicely(glob(video_dir + '/img/*.jpg'))
      first_line = open(video_dir + '/groundtruth_rect.txt').readline()
      bb = [int(v) for v in first_line.strip().split(',')]
      init_bb = Rectangle(bb[0] - 1, bb[1] - 1, bb[2], bb[3])  # 0-index in python
      # 返回的跟踪结果
      trajectory = tracker.track(sess, init_bb, filenames, video_log_dir)
      with open(osp.join(video_log_dir, 'track_rect.txt'), 'w') as f:
        for region in trajectory:
          rect_str = '{},{},{},{}\n'.format(region.x + 1, region.y + 1,
                                            region.width, region.height)
          f.write(rect_str)
好了,你现在已经可以用预训练模型测试你想测试的视频了,接下来为了能更好地分析问题,将你测试的一些结果都进行可视化,在此之前还是瞧瞧咱们测试前后都有哪些数据输入和输出:
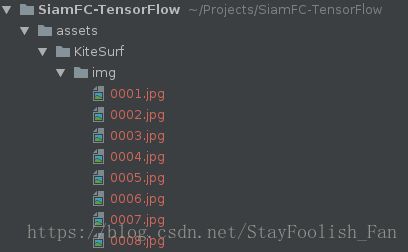
输入:解压缩之后的KiteSurf,包括了存在img文件夹中的图像数据和配置文件.cfg和groudtruth_rect.txt文件。
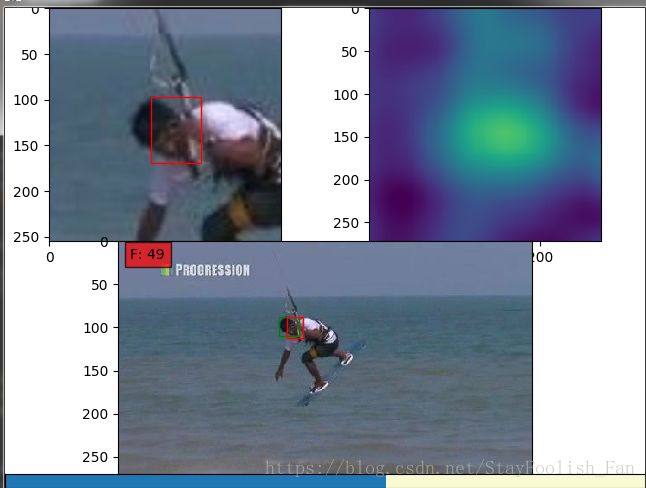
输出:每张图片跟踪到的目标的bbox和scale,以及每张图片的respones响应,还有crop出来的图片,最后呢就是像groundth_rect.txt一样的一个跟踪结果文件track_rect.txt。
2.5 视频测试结果可视化
核心文件:scripts/show_tracking.py
核心功能:模型测试跟踪,这里也先只贴出文件内容,且先不深究。
#! /usr/bin/env python
# -*- coding: utf-8 -*-
#
# Copyright © 2017 bily     Huazhong University of Science and Technology
#
# Distributed under terms of the MIT license.

import os.path as osp
import sys

from sacred import Experiment

ex = Experiment()

import numpy as np
from matplotlib.pyplot import imread, Rectangle

CURRENT_DIR = osp.abspath(osp.dirname(__file__))
sys.path.append(osp.join(CURRENT_DIR, ".."))

from utils.videofig import videofig


def readbbox(file):
  with open(file, 'r') as f:
    lines = f.readlines()
    bboxs = [[float(val) for val in line.strip().replace(' ', ',').replace('\t', ',').split(',')] for line in lines]
  return bboxs


def create_bbox(bbox, color):
  return Rectangle((bbox[0], bbox[1]), bbox[2], bbox[3],
                   fill=False,  # remove background\n",
                   edgecolor=color)


def set_bbox(artist, bbox):
  artist.set_xy((bbox[0], bbox[1]))
  artist.set_width(bbox[2])
  artist.set_height(bbox[3])


@ex.config
def configs():
  videoname = 'KiteSurf'
  runname = 'SiamFC-3s-color-pretrained'
  data_dir = '/workspace/czx/Projects/SiamFC-TensorFlow/assets/'
  track_log_dir = '/workspace/czx/Projects/SiamFC-TensorFlow/Logs/SiamFC/track_model_inference/{}/{}'.format(runname, videoname)


@ex.automain
def main(videoname, data_dir, track_log_dir):
  track_log_dir = osp.join(track_log_dir)
  video_data_dir = osp.join(data_dir, videoname)
  te_bboxs = readbbox(osp.join(track_log_dir, 'track_rect.txt'))
  gt_bboxs = readbbox(osp.join(video_data_dir, 'groundtruth_rect.txt'))
  num_frames = len(gt_bboxs)

  def redraw_fn(ind, axes):
    ind += 1
    input_ = imread(osp.join(track_log_dir, 'image_cropped{}.jpg'.format(ind)))
    response = np.load(osp.join(track_log_dir, 'response{}.npy'.format(ind)))
    org_img = imread(osp.join(data_dir, videoname, 'img', '{:04d}.jpg'.format(ind + 1)))
    gt_bbox = gt_bboxs[ind]
    te_bbox = te_bboxs[ind]

    bbox = np.load(osp.join(track_log_dir, 'bbox{}.npy'.format(ind)))

    if not redraw_fn.initialized:
      ax1, ax2, ax3 = axes
      redraw_fn.im1 = ax1.imshow(input_)
      redraw_fn.im2 = ax2.imshow(response)
      redraw_fn.im3 = ax3.imshow(org_img)

      redraw_fn.bb1 = create_bbox(bbox, color='red')
      redraw_fn.bb2 = create_bbox(gt_bbox, color='green')
      redraw_fn.bb3 = create_bbox(te_bbox, color='red')

      ax1.add_patch(redraw_fn.bb1)
      ax3.add_patch(redraw_fn.bb2)
      ax3.add_patch(redraw_fn.bb3)

      redraw_fn.text = ax3.text(0.03, 0.97, 'F:{}'.format(ind), fontdict={'size': 10, },
                                ha='left', va='top',
                                bbox={'facecolor': 'red', 'alpha': 0.7},
                                transform=ax3.transAxes)

      redraw_fn.initialized = True
    else:
      redraw_fn.im1.set_array(input_)
      redraw_fn.im2.set_array(response)
      redraw_fn.im3.set_array(org_img)
      set_bbox(redraw_fn.bb1, bbox)
      set_bbox(redraw_fn.bb2, gt_bbox)
      set_bbox(redraw_fn.bb3, te_bbox)
      redraw_fn.text.set_text('F: {}'.format(ind))

  redraw_fn.initialized = False

  videofig(int(num_frames) - 1, redraw_fn,
           grid_specs={'nrows': 2, 'ncols': 2, 'wspace': 0, 'hspace': 0},
           layout_specs=['[0, 0]', '[0, 1]', '[1, :]'])
有了上面的一些可视化结果你就很方便进行下一步的分析了,比如上面两个图片中第一个中的响应比第二个要小很多,从crop的图片来看,很容易分析出人的侧脸且低头并有一定的运动模糊导致最后的响应偏低,对于其他视频也是可以如此分析的。如果你想测试其他的视频分析跟踪效果,可以去下载OTB100,VOT等数据集上的视频进行评估。
3:小结
1:这篇博客看到这里,你可以了解的有:
(1)预训练模型有哪些,如何下载;
(2)如何将.mat格式模型转换为.ckpt格式模型并大致知道模型里面都有哪些参数,如何验证转换是否正确;
(3)在不需要深入了解模型设计、训练、测试和评估的基础上 能够利用已有脚本对单个视频进行测试和可视化分析。
2:这篇博客只谈到了预训练模型的测试问题,那么接下来还会进一步介绍的有:
(1)数据预处理:如果要自己重新训练模型,用什么数据,又该如何进行预处理?
(2)模型设计:SiameseFC模型具体是什么样的?比如说网络结构是怎样的,Loss怎么构建等。
(3)模型训练:如何训练自己的模型?比如说数据怎么加载,怎么设置参数训练等。
(4)模型评估:单个视频测试的具体实现以及如何在OTB数据集上进行评估等。
3:好了,到这了呢基本上第一篇就写完了,代码贴的可能有点多,当然可能有很多疏漏的地方,欢迎指教和交流,我是认为这份代码是相当棒的,尤其是对于做跟踪的小伙伴而言,大家要是也这么觉得,那就点个Star吧,哈哈。


