计算机视觉caffe之路第五篇:ImageNet数据集训练及预测实例
-
-
- 数据集下载
- 生成lmdb文件
- 计算图像均值
- 配置网络结构文件
- 修改训练参数
- 开始训练
- 训练结果
- 使用模型预测
-
1.数据集下载
使用参考文献2作者的数据集:http://pan.baidu.com/s/1o60802I,数据集图片分10个类,每个类有100个train图片(train文件夹下,一共1000),20个test图片(val文件夹下,一共200)。
其中包含:
1 文件夹train:里面放训练的图片

2 文件夹val:里面放val的图片

3 train.txt :训练图片的文件名和对应的类别

4 val.txt:测试图片的文件名和对应的类别我们将此文件夹命名为INTest,放到自定义目录下,如/ssda/working/INTest($INTest)
2.生成lmdb文件
修改$CAFFE/examples/imagenet/create_imagenet.sh文件路径:
#!/usr/bin/env sh
# Create the imagenet lmdb inputs
# N.B. set the path to the imagenet train + val data dirs

EXAMPLE=examples/imagenet
DATA=data/ilsvrc12
TOOLS=build/tools

TRAIN_DATA_ROOT=/path/to/imagenet/train/
#改为自己的:/ssda/working/INTest/train
VAL_DATA_ROOT=/path/to/imagenet/val/
#改为自己的:/ssda/working/INTest/val

# Set RESIZE=true to resize the images to 256x256. Leave as false if images have
# already been resized using another tool.
RESIZE=false
#改为true
if $RESIZE; then
  RESIZE_HEIGHT=256
  RESIZE_WIDTH=256
else
  RESIZE_HEIGHT=0
  RESIZE_WIDTH=0
fi

if [ ! -d "$TRAIN_DATA_ROOT" ]; then
  echo "Error: TRAIN_DATA_ROOT is not a path to a directory: $TRAIN_DATA_ROOT"
  echo "Set the TRAIN_DATA_ROOT variable in create_imagenet.sh to the path" \
       "where the ImageNet training data is stored."
  exit 1
fi

if [ ! -d "$VAL_DATA_ROOT" ]; then
  echo "Error: VAL_DATA_ROOT is not a path to a directory: $VAL_DATA_ROOT"
  echo "Set the VAL_DATA_ROOT variable in create_imagenet.sh to the path" \
       "where the ImageNet validation data is stored."
  exit 1
fi

echo "Creating train lmdb..."

GLOG_logtostderr=1 $TOOLS/convert_imageset \    #这里会调用作者已经写好的 convert_imageset 函数
    --resize_height=$RESIZE_HEIGHT \    #通过该函数可以产生lmdb的数据
    --resize_width=$RESIZE_WIDTH \
    --shuffle \
    $TRAIN_DATA_ROOT \  #训练图片的路径
    $DATA/train.txt \   #输入train.txt的路径
    #改为/ssda/working/INTest/train.txt
    $EXAMPLE/ilsvrc12_train_lmdb #输出train_lmdb的路径

echo "Creating val lmdb..."

GLOG_logtostderr=1 $TOOLS/convert_imageset \
    --resize_height=$RESIZE_HEIGHT \
    --resize_width=$RESIZE_WIDTH \
    --shuffle \
    $VAL_DATA_ROOT \  #测试图片的路径
    $DATA/val.txt \   #输入val.txt的路径
    #改为/ssda/working/INTest/val.txt
    $EXAMPLE/ilsvrc12_val_lmdb #输出val_lmdb的路径

echo "Done."
运行文件:
cd /home/ubuntu/caffe #caffe根路径,自己修改
./examples/imagenet/create_imagenet.sh
3.计算图像均值
文件在examples/imagenet/make_imagenet_mean.sh
#!/usr/bin/env sh
# Compute the mean image from the imagenet training lmdb
# N.B. this is available in data/ilsvrc12

EXAMPLE=examples/imagenet
DATA=data/ilsvrc12
TOOLS=build/tools

$TOOLS/compute_image_mean $EXAMPLE/ilsvrc12_train_lmdb \
  $DATA/imagenet_mean.binaryproto

echo "Done."
如果上面文件路径自定义修改过,则根据情况修改,完成后执行:
cd /home/ubuntu/caffe #caffe根路径,自己修改
./examples/imagenet/make_imagenet_mean.sh
4.配置网络结构文件
文件在 $CAFFE/models/bvlc_reference_caffenet/train_val.prototxt,如果文件内部使用路径自定义修改过,这根据情况修改,主要是lmdb文件的路径。
主要修改的地方是batch_size:
·
·
·
  data_param {
    source: "examples/imagenet/ilsvrc12_train_lmdb"
    batch_size: 16  #越大越好,但如果显存不够,则训练是会Killed,再适当调小,Jetson TX1适合16
    backend: LMDB
  }
·
·
·
  data_param {
    source: "examples/imagenet/ilsvrc12_val_lmdb"
    batch_size: 4   #越大越好,但如果显存不够,则训练是会Killed,再适当调小,测试不需要太大,否则容易killed,小点也可以
    backend: LMDB
  }
·
·
·
layer {
  name: "conv1"
  type: "Convolution"
  bottom: "data"
  top: "conv1"
  param {
    lr_mult: 1
    decay_mult: 0 #改为1
  }
  param {
    lr_mult: 2
    decay_mult: 1
  }
·
·
·
  inner_product_param {
    num_output: 2  #自定义数据集种类数量
    weight_filler {
      type: "gaussian"
      std: 0.01
    }
    bias_filler {
      type: "constant"
      value: 0
    }
  }
·
·
·
num_output: 2 #特别注意,自定义数据集种类数量一定要匹配。
5.修改训练参数
文件在$CAFFE/models/bvlc_reference_caffenet/solver.prototxt中:
net: "models/bvlc_reference_caffenet/train_val.prototxt"
test_iter: 60  #上面的train_val.prototxt中val的batch_size为4,则test_iter=valNumber/batch_size = 50,适当取大点
test_interval: 1000  # 每迭代1000次,测试一次
base_lr: 0.00005 #初始的学习率
lr_policy: "step"
gamma: 0.1
stepsize: 20000 #每3000次迭代更改学习率base_lr*gamma
display: 10 #log显示周期
max_iter: 80000 #最大迭代次数
momentum: 0.9
weight_decay: 0.0005
snapshot: 10000 #每5000次迭代存储一次快照,便于resume train
snapshot_prefix: "models/bvlc_reference_caffenet/caffenet_train"
solver_mode: GPU  #训练模式,CPU or GPU
6.开始训练
直接训练
cd /home/ubuntu/caffe #caffe根路径,自己修改
./build/tools/caffe train --solver=models/bvlc_reference_caffenet/solver.prototxt
继续训练
cd /home/ubuntu/caffe #caffe根路径,自己修改
./build/tools/caffe train --solver=models/bvlc_reference_caffenet/solver.prototxt --snapshot=models/bvlc_reference_caffenet/caffenet_train_iter_10000.solverstate
生成绘图log训练
在models/bvlc_reference_caffenet/路径下新建一个log文件夹,也可以在其他地方建:
cd /home/ubuntu/caffe #caffe根路径,自己修改
./build/tools/caffe train --solver=models/bvlc_reference_caffenet/solver.prototxt 2>&1 | tee models/bvlc_reference_caffenet/log/logname.log
logname自定义,必须以.log结束,具体绘图步骤请参考文章:caffe绘制训练过程的loss和accuracy曲线。
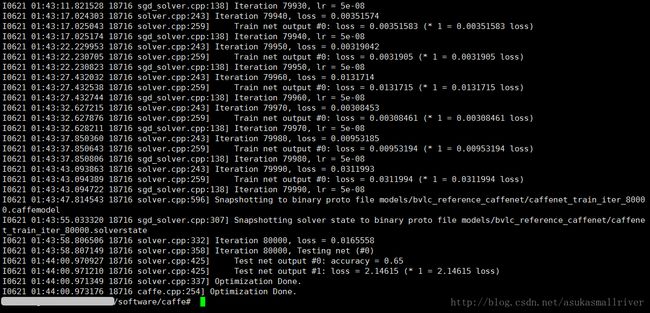
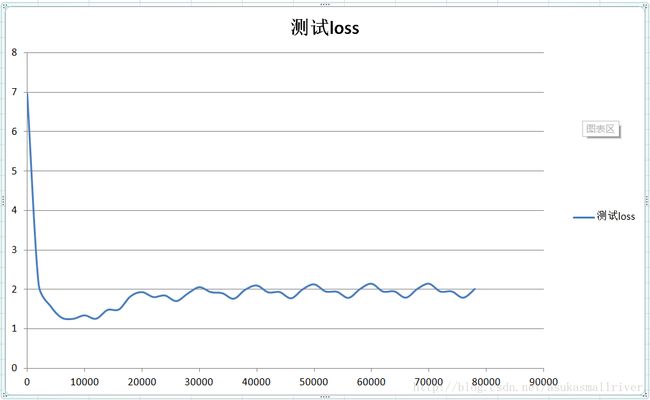
7.训练结果


8.使用模型预测
首先需要生成mean.npy文件,见: 计算机视觉caffe之路附3: Caffe均值文件mean.binaryproto转mean.npy
编写测试代码:
1).使用classfy.py
在$cafferoot/python/classify.py,修改:
    if args.mean_file:
        mean = np.load(args.mean_file)
        mean=mean.mean(1).mean(1) #添加此行代码
在$cafferoot路径下执行:
python python/classify.py --model_def models/mymodel/deploy.prototxt \
--pretrained_model models/mymodel/caffenet_train_iter_10000.caffemodel  \
--center_only  /home/ubuntu/000002.jpg foo
2).使用classification.bin
在$cafferoot路径下执行:
./build/examples/cpp_classification/classification.bin \
  models/mymodel/deploy.prototxt \
  models/mymodel/caffenet_train_iter_10000.caffemodel \
  models/mymodel/imagenet_mean.binaryproto \
  models/mymodel/synset_words.txt \
  /home/ubuntu/target/100152.jpg
参考文献:
Brewing ImageNet
caffe 练习2 用自己的数据集在ImageNet 测试——by 香蕉麦乐迪