从 SpringBoot 单元测试到 Junit 监听器
从 SpringBoot 单元测试到 Junit 监听器
Junit 是怎么启动的
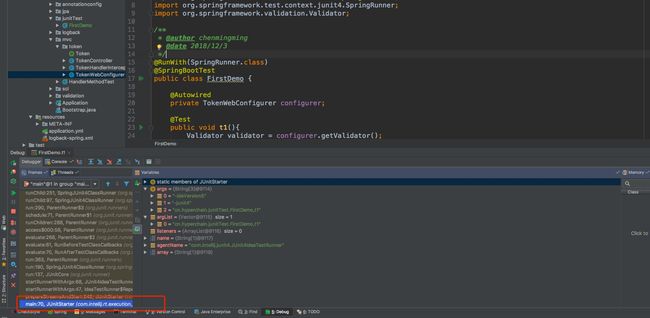
首先我们来Debug看看跑单测时线程栈的入口是什么
下面是 Idea 编译器copy的调用信息 (我认为应该就是线程栈信息)
t1:25, FirstDemo (cn.hyperchain.junitTest)
invoke0:-1, NativeMethodAccessorImpl (jdk.internal.reflect)
invoke:62, NativeMethodAccessorImpl (jdk.internal.reflect)
invoke:43, DelegatingMethodAccessorImpl (jdk.internal.reflect)
invoke:564, Method (java.lang.reflect)
runReflectiveCall:50, FrameworkMethod$1 (org.junit.runners.model)
run:12, ReflectiveCallable (org.junit.internal.runners.model)
invokeExplosively:47, FrameworkMethod (org.junit.runners.model)
evaluate:17, InvokeMethod (org.junit.internal.runners.statements)
evaluate:73, RunBeforeTestExecutionCallbacks (org.springframework.test.context.junit4.statements)
evaluate:83, RunAfterTestExecutionCallbacks (org.springframework.test.context.junit4.statements)
evaluate:75, RunBeforeTestMethodCallbacks (org.springframework.test.context.junit4.statements)
evaluate:86, RunAfterTestMethodCallbacks (org.springframework.test.context.junit4.statements)
evaluate:84, SpringRepeat (org.springframework.test.context.junit4.statements)
runLeaf:325, ParentRunner (org.junit.runners)
runChild:251, SpringJUnit4ClassRunner (org.springframework.test.context.junit4)
runChild:97, SpringJUnit4ClassRunner (org.springframework.test.context.junit4)
run:290, ParentRunner$3 (org.junit.runners)
schedule:71, ParentRunner$1 (org.junit.runners)
runChildren:288, ParentRunner (org.junit.runners)
access$000:58, ParentRunner (org.junit.runners)
evaluate:268, ParentRunner$2 (org.junit.runners)
evaluate:61, RunBeforeTestClassCallbacks (org.springframework.test.context.junit4.statements)
evaluate:70, RunAfterTestClassCallbacks (org.springframework.test.context.junit4.statements)
run:363, ParentRunner (org.junit.runners)
run:190, SpringJUnit4ClassRunner (org.springframework.test.context.junit4)
run:137, JUnitCore (org.junit.runner)
startRunnerWithArgs:68, JUnit4IdeaTestRunner (com.intellij.junit4)
startRunnerWithArgs:47, IdeaTestRunner$Repeater (com.intellij.rt.execution.junit)
prepareStreamsAndStart:242, JUnitStarter (com.intellij.rt.execution.junit)
main:70, JUnitStarter (com.intellij.rt.execution.junit)
图片中线程栈最底层的入口是 JUnitStarter``com.intellij.rt.execution.junit main方法作为入口。不过我想这一点也是应该的,应该说是任何Java程序的入口都应该是一个类的mian方法。
上文中的JUnitStarter``com.intellij.rt.execution.junit 其实是 类/包名 的体系。
关于JUnitStarter可以前往GitHub看看实现
下面截取一部分代码,就看看main方法的实现方式
public static void main(String[] args) throws IOException {
    Vector argList = new Vector();
    for (int i = 0; i < args.length; i++) {
      String arg = args[i];
      argList.addElement(arg);
    }

    final ArrayList listeners = new ArrayList();
    final String[] name = new String[1];

    String agentName = processParameters(argList, listeners, name);

    if (!JUNIT5_RUNNER_NAME.equals(agentName) && !canWorkWithJUnitVersion(System.err, agentName)) {
      System.exit(-3);
    }
    if (!checkVersion(args, System.err)) {
      System.exit(-3);
    }

    String[] array = new String[argList.size()];
    argList.copyInto(array);
    int exitCode = prepareStreamsAndStart(array, agentName, listeners, name[0]);
    System.exit(exitCode);
}
...

private static int prepareStreamsAndStart(String[] args,
                                            final String agentName,
                                            ArrayList listeners,
                                            String name) {
    try {
      IdeaTestRunner testRunner = (IdeaTestRunner)getAgentClass(agentName).newInstance();
      if (ourCommandFileName != null) {
        if (!"none".equals(ourForkMode) || ourWorkingDirs != null && new File(ourWorkingDirs).length() > 0) {
          final List newArgs = new ArrayList();
          newArgs.add(agentName);
          newArgs.addAll(listeners);
          return new JUnitForkedSplitter(ourWorkingDirs, ourForkMode, newArgs)
            .startSplitting(args, name, ourCommandFileName, ourRepeatCount);
        }
      }
      return IdeaTestRunner.Repeater.startRunnerWithArgs(testRunner, args, listeners, name, ourCount, true);
    }
    catch (Exception e) {
      e.printStackTrace(System.err);
      return -2;
    }

  }
结合上面的main方法可以看出应该还是走的反射+invoke的方式,给了idea相关的版本,junit的版本,test的类信息已经的执行方法名称
第三步
IdeaTestRunner. Repeater 详见GitHub
class Repeater {
    public static int startRunnerWithArgs(IdeaTestRunner testRunner,
                                          String[] args,
                                          ArrayList listeners,
                                          String name,
                                          int count,
                                          boolean sendTree) {

      testRunner.createListeners(listeners, count);
      if (count == 1) {
        return testRunner.startRunnerWithArgs(args, name, count, sendTree);
      }
      else {
        if (count > 0) {
          boolean success = true;
          int i = 0;
          while (i++ < count) {
            //核心代码
            final int result = testRunner.startRunnerWithArgs(args, name, count, sendTree);
            if (result == -2) {
              return result;
            }
            success &= result == 0;
            sendTree = false;
          }

          return success ? 0 : -1;
        }
        else {
          boolean success = true;
          while (true) {
            //核心代码
            int result = testRunner.startRunnerWithArgs(args, name, count, sendTree);
            if (result == -2) {
              return -1;
            }
            success &= result == 0;
            if (count == -2 && !success) {
              return -1;
            }
          }
        }
      }
    }
 }
感觉有点太慢了我们直接一点 进入 org.junit.runner.JUnitCore 这个类是可以在IDE上看到源码的,之前两个类是不能的所以附上了GitHub的链接地址。
org.junit.runner.JUnitCore#run 方法如下
public Result run(Runner runner) {
    Result result = new Result();
    RunListener listener = result.createListener();
    notifier.addFirstListener(listener);
    try {
        notifier.fireTestRunStarted(runner.getDescription());
        //目测应该是核心方法
        runner.run(notifier);
        notifier.fireTestRunFinished(result);
    } finally {
        removeListener(listener);
    }
    return result;
}
Junit Test 对象反射获取
当然这里还是太慢了,要论证反射获取对象,我们快进到 BlockJUnit4ClassRunner#createTest 以及 TestClass#getOnlyConstructor
BlockJUnit4ClassRunner#createTest
/**
 * Returns a new fixture for running a test. Default implementation executes
 * the test class's no-argument constructor (validation should have ensured
 * one exists).
 */
 /**
  *返回运行测试的新夹具。 默认实现执行
  *测试类的无参数构造函数(验证应该已经确保
  *一个存在)。
  */
protected Object createTest() throws Exception {
    //因为这里是直接 Constructor.newInstance() 所以是间接的说明了构造函数必须是无参的!
    return getTestClass().getOnlyConstructor().newInstance();
}
TestClass#getOnlyConstructor
/**
 * Returns the only public constructor in the class, or throws an {@code
 * AssertionError} if there are more or less than one.
 */
/**
 *返回类中唯一的公共构造函数,或抛出{@code
 * AssertionError}如果有多于或少于一个。
 */
public Constructor<?> getOnlyConstructor() {
    Constructor<?>[] constructors = clazz.getConstructors();
    //顺带从源码层面说明了一个单测类的构造函数是只能有一个!
    Assert.assertEquals(1, constructors.length);
    return constructors[0];
}
综上所述,一个单测类必须是只有一个无参构造函数的。 写到这里顺带再带上debug源码的另外一个成果
FrameworkMethod#validatePublicVoidNoArg
public void validatePublicVoidNoArg(boolean isStatic, List<Throwable> errors) {
    validatePublicVoid(isStatic, errors);
    if (method.getParameterTypes().length != 0) {
        errors.add(new Exception("Method " + method.getName() + " should have no parameters"));
    }
}
所以在Junit的反射执行方法时会进行一系列的类信息,方法信息的校验,例如上述的执行方法必须是一个无参的执行方法。
对象反射获取于Spring容器顺序
如下是我的测试代码
@RunWith(SpringRunner.class)
@SpringBootTest
@Slf4j
public class FirstDemo  {

    @Autowired
    private TokenWebConfigurer configurer;

    static {
        log.info("类加载时期");
    }

    {
        log.info("反射获取对象时期");
    }

    @Test
    public void t1(){
        Validator validator = configurer.getValidator();
        System.out.println(validator);
    }
}
在我们看到结果截图之前,我们应该也可以想到,应该是先打印出两端语句在启动容器的
看到这里,对Junit的启动过程应该有一点简单的了解,先是IDE在获取鼠标点击事件后,获取我们要执行的方法,类型和一些启动参数,交由IDE内嵌的一个Junit插件启动执行一个main方法,所以应该是另外启动了一个java进程
下面是我再执行Junit过程执行jps命令的情况,其中 JUnitStarter 就是一个新的java 进程 Junit启动的。(诚不欺我)
➜  ~ jps
40178 Jps
31863 RemoteMavenServer
343
33162 Launcher
40173 Launcher
40174 JUnitStarter
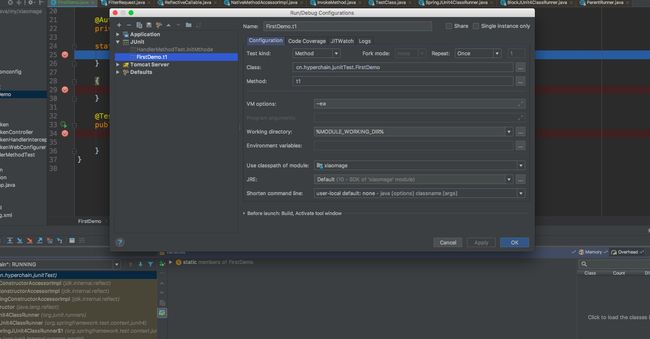
至于 IDE 获取获取点击方法事件获取参数,可以看看如下截图,其实我们所有操作都是启动一个java进程的,里面就启动java进程的参数,看到这里我不禁感慨自己在这方面的基础还是太菜了,很多还是不太懂。如果修改了类信息,和方法名称就会报错咯。
Junit 的监听器 结合Spring的使用方式
首先我们可以看看 如何实现RunListener一个JUnit Listener示例老外写的,可以翻译一波。
我们也可以模仿一下就是首先编写我们的Junit监听器。
public class MyJunitListener extends RunListener {

    @Override
    public void testRunStarted(Description description) throws Exception {
        System.out.println("Number of tests to execute: " + description.testCount());
    }

    @Override
    public void testRunFinished(Result result) throws Exception {
        System.out.println("Number of tests executed: " + result.getRunCount());
    }

    @Override
    public void testStarted(Description description) throws Exception {
        System.out.println("Starting: " + description.getMethodName());
    }

    @Override
    public void testFinished(Description description) throws Exception {
        System.out.println("Finished: " + description.getMethodName());
    }

    @Override
    public void testFailure(Failure failure) throws Exception {
        System.out.println("Failed: " + failure.getDescription().getMethodName());
    }

    @Override
    public void testAssumptionFailure(Failure failure) {
        System.out.println("Failed: " + failure.getDescription().getMethodName());
    }

    @Override
    public void testIgnored(Description description) throws Exception {
        System.out.println("Ignored: " + description.getMethodName());
    }
}
介绍的文章中提及到的是继承于BlockJUnit4ClassRunner,但是集成了SpringBoot体系,我们就使用Spring提供的运行容器SpringJUnit4ClassRunner
public class MyJunitRunnerContiner extends SpringJUnit4ClassRunner {

    public MyJunitRunnerContiner(Class<?> clazz) throws InitializationError {
        super(clazz);
    }

    @Override
    public void run(RunNotifier notifier){
        notifier.addListener(new MyJunitListener());
        notifier.fireTestRunStarted(getDescription());
        super.run(notifier);
    }
}
最后将单测中的@RunWith(SpringRunner.class)替换为目标启动容器@RunWith(MyJunitRunnerContiner.class)
@RunWith(MyJunitRunnerContiner.class)
@SpringBootTest
@Slf4j
public class FirstDemo  {

    @Autowired
    private TokenWebConfigurer configurer;

    static {
        log.info("类加载时期");
    }

    {
        log.info("反射获取对象时期");
    }

    @Test
    public void t1(){
        Validator validator = configurer.getValidator();
        System.out.println(validator);
    }
}
但是好像运用场景比较少,这也是同事之前问的一个相关问题,我上网找到的一个解决方案。处理了单元测试前后想做一些增强,例如单测失败不通过发邮件什么的,执行成功就打包。。。 大家就单丰富知识面看个开心好了


