一、前言
为什么要在本地开发机器上安装nexus?首先声明公司内部是有自己的nexus仓库,但是对上传jar包做了限制,不能畅快的上传自己测试包依赖。于是就自己在本地搭建了一个nexus私服,即可以使用公司nexus私服仓库中的依赖,也可以上传和使用自己的测试包依赖。
二、nexus下载
Download Nexus Repository OSS
三、解压
将下载的nexus-3.14.0-04-win64.zip解压到自定义目录即可。
四、配置nexus的端口和上下文路径
打开zip解压文件下的 ../nexus-3.14.0-04-win64/nexus-3.14.0-04/etc/nexus-default.properties。
如下属性可以自定义修改。
- application-host : Nexus服务监听的主机
- application-port: Nexus服务监听的端口,
- nexus-context-path : Nexus服务的上下文路径
通常可以不做任何修改,但个人习惯于修改 application-host 为127.0.0.1(关于0.0.0.0与127.0.0.1的区别自行检索),我这里只修改了端口。
五、运行环境配置
六、nexus安装
在.../nexus-3.14.0-04-win64/nexus-3.14.0-04/bin 目录下,以管理员身份运行cmd
1. nexus.exe /run 命令可以启动nexus服务(参考官方文档)
2. 安装nexus本地服务来启动(推荐使用这种方式,参考官方文档),命令如下所示。
nexus.exe /install//安装nexus服务 nexus.exe /install //安装nexus服务
七、启动/关闭nexus服务
nexus.exe /start//启动nexus服务 nexus.exe /stop //停止nexus服务
八、登录
默认的用户名和密码分别是:admin/amdin123
如果没有做任何端口和上下文路径的修改,直接访问 http://localhost:8081即可。
九、nexus仓库类型介绍
|
仓库名
|
作用
|
|
hosted(宿主仓库库)
|
存放本公司开发的jar包(正式版本、测试版本)
|
|
proxy(代理仓库)
|
代理中央仓库、Apache下测试版本的jar包
|
|
group(组仓库)
|
使用时连接组仓库,包含Hosted(宿主仓库)和Proxy(代理仓库)
|
|
virtual (虚拟仓库)
|
基本用不到,重点关注上面三个仓库的使用
|
十、分组仓库的使用
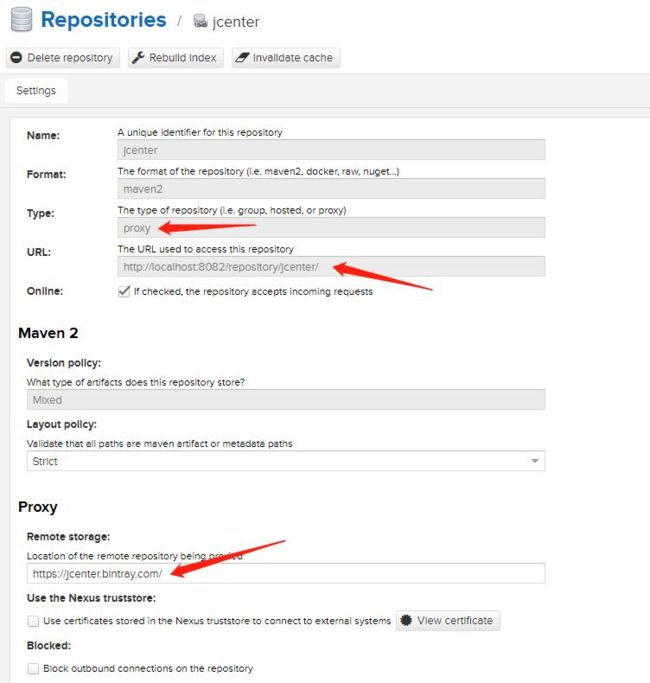
如上图所示,maven-public就我创建的组仓库。以及还创建了3个代理仓库,如下。
1、jcenter仓库:https://jcenter.bintray.com/
2、maven中央仓库:https://repo1.maven.org/maven2/
3、公司内部nexus仓库,这里就不给出了
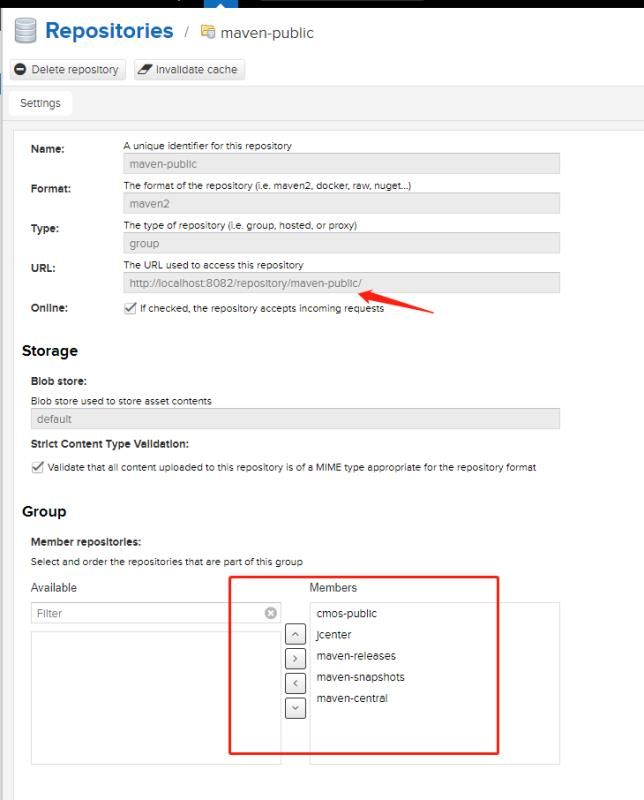
最后建立组仓库maven-public,如下。
组仓库中包含了公司私服、jcenter、maven-central、本地maven-releases,本地maven-snapshots。
创建好组仓库之后,修改setting.xml文件,添加maven仓库镜像,如下。
<server>
  <id>localid>
  <username>hjzggusername>
  <password>hjzggpassword>
server>

<mirror>
  <id>localid>
  <mirrorOf>centralmirrorOf>
  <name>localhost nexusname>
  <url>http://localhost:8082/repository/maven-public/url>
mirror>
接着修改maven项目中的pom.xml,如下。
<distributionManagement>
    <repository>
        <id>maven-releasesid>
        <name>Nexus Release Repositoryname>
        <url>http://localhost:8082/repository/maven-releases/url>
    repository>
    <snapshotRepository>
        <id>maven-snapshotsid>
        <name>Nexus Snapshot Repositoryname>
        <url>http://localhost:8082/repository/maven-snapshots/url>
    snapshotRepository>
distributionManagement>
如果是gradle项目,修改init.gradle文件,如下。
uploadArchives {
    def nexus_credentials = [userName: "hjzgg", password: "hjzgg"]
    repositories.mavenDeployer {
        snapshotRepository(url: "http://127.0.0.1:8082/repository/maven-snapshots/") {
            authentication(nexus_credentials)
        }
        repository(url: "http://127.0.0.1:8082/repository/maven-releases/") {
            authentication(nexus_credentials)
        }
    }
}
十一、nexus权限配置
请参考:订阅号文章nexus安装和配置


