梯度分类激活法检测物体
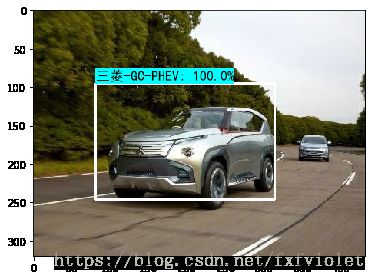
对于没有标定边框的图片数据集,无法用SSD或Fast RCNN等方法进行目标检测,可以用分类激活图(class activation maps,CAM)方法检测和识别物体。这方面的论文有《Learning Deep Features for Discriminative Localization》,《Visual Explanations from Deep Networks via Gradient-based Localization》等。实现方法是卷积网络的最后一层用全局平均池化(global average pooling,GAP)代替全连接层。一般的网络在多次卷积层之后通常用全连接层进行分类预测,但是全连接层会导致特征图损失空间位置信息。如果在卷积之后,将网络的全连接层替换为GAP,网络还是能够保存物体的位置信息,进而识别出图片中容易区分的图像区域。本文介绍了基于VGG卷积神经网络对图片中的车辆进行检测和识别的主要过程。
1 生成热图
首先导入一张图片。
使用的分类模型是vgg,加载预训练vgg模型。
sess = tf.Session()
imgs = tf.placeholder(tf.float32,[None,224,224,3])
vgg_load = vgg.vgg16(imgs, 'vgg16_weights.npz', sess)
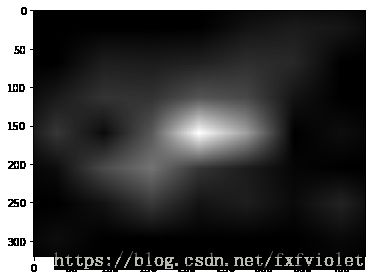
在卷积网络之后,一方面用全连接层得到分类类别。另一方面保留卷积结构,在第5层池化后,抽取特征图,然后对特征图进行反向梯度计算,生成输出层。将输出层的权重投影到之前的卷积特征图上,特征权重累加求和,可视化特征图,即生成分类激活图。
# 分类
prob = sess.run(vgg_load.probs, feed_dict={vgg_load.imgs: x})[0]
preds = (np.argsort(prob)[::-1])[0:5]
prediction = preds[0]

# 提取特征图
class_num = 1000
conv_layer = vgg_load.layers['pool5']
one_hot = tf.sparse_to_dense(prediction, [class_num], 1.0)

# 反向梯度计算
signal = tf.multiply(vgg_load.layers['fc3'], one_hot)
loss = tf.reduce_mean(signal)
grads = tf.gradients(loss, conv_layer)[0]
norm_grads = tf.div(grads, tf.sqrt(tf.reduce_mean(tf.square(grads))) + tf.constant(1e-5))

# 生成输出层
output, grads_val = sess.run([conv_layer, norm_grads], feed_dict={vgg_load.imgs: x})
output = output[0]
grads_val = grads_val[0]

# 特征权重累加求和
weights = np.mean(grads_val, axis = (0, 1))
cam = np.ones(output.shape[0 : 2], dtype = np.float32)
for i, w in enumerate(weights):
    cam += w * output[:, :, i]
上采样分类激活图到原图尺寸,识别出特定物体的图形区域,即生成图片中的热图。
cam_max = np.maximum(cam, 0)
cam_normal = cam_max / np.max(cam_max)
cam3 = resize(cam_normal,(img_height,img_width))
io.imshow(cam3)
2 检测热图位置
分割热图,设置热图的25%作为阈值(threshold),画出边界框(bounding box)。
threshhold = 0.25
cam3_max = np.max(cam3)
cam3_min = cam3_max * threshhold

position = np.where(cam3 > cam3_min)
min_row,max_row = np.min(position[0]),np.max(position[0])
min_col,max_col = np.min(position[1]),np.max(position[1])

left = min_col
top =  min_row
right = max_col
bottom = max_row

cam3_image = Image.fromarray(cam3)
draw = ImageDraw.Draw(cam3_image)
draw.line([(left, top), (left, bottom), (right, bottom),(right, top),(left,top)], width=3)

cam_image = np.array(cam3_image)
io.imshow(cam_image)
3 分类
根据热图的边框,在原图中对检测到的车辆画出边框,并标注车辆的型号和分类准确率,完成检测和分类。
image_with_box = Image.fromarray(imresize(test_image,(img_height,img_width)))
draw = ImageDraw.Draw(image_with_box)
draw.line([(left, top), (left, bottom), (right, bottom),(right, top),(left,top)], width=3)

font = ImageFont.load_default()
text_width, text_height = font.getsize(vehicle_predict_name)
text_bottom = top

margin = np.ceil(0.05 * text_height)
draw.rectangle([(left, text_bottom - text_height - 2 * margin), (left + text_width,text_bottom)],fill='cyan')
draw.text( (left + margin, text_bottom - text_height - margin),
            vehicle_predict_name,
            fill='black',
            font=font)

img_box_name = np.array(image_with_box)
io.imshow(img_box_name)
版权声明:本文为博主原创文章,转载请注明出处。https://blog.csdn.net/fxfviolet/article/details/82428310


