android MVP设计模式实践
android MVP设计模式实践
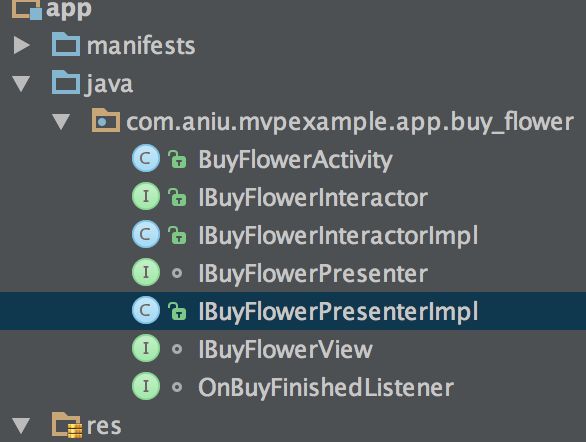
用MVP模式实现一个买花的example,MVP对应(Model-View-Presenter),先写下一个接口用与Presenter->View沟通。
package com.aniu.mvpexample.app.buy_flower;

interface IBuyFlowerView {
    //负责ui 进度 、提示、跳转提供操作接口
    public void showProgress();
    public void hideProgress();
    public void nevigateToHome();
    public void buyError();
    public void buySuccess();

}
从方法名上可以看得出来,Presenter<->View之间的交互主要就是Presenter<->Model之间操作结果的一些回调,把操作的结果告诉activity,然后activity就负责ui 的显示和跳转就好了。
package com.aniu.mvpexample.app.buy_flower;

import android.app.Activity;
import android.os.Bundle;
import android.view.View;
import android.widget.EditText;
import android.widget.ProgressBar;
import android.widget.TextView;

import com.aniu.mvpexample.app.R;

public class BuyFlowerActivity extends Activity implements IBuyFlowerView, View.OnClickListener{

    private  EditText buy_et_num;
    private  ProgressBar buy_progress;
    private  TextView buy_tv;
    @Override
    protected void onCreate(Bundle savedInstanceState) {
        super.onCreate(savedInstanceState);
        setContentView(R.layout.activity_buy_flower);
        findViewById(R.id.buy_btn).setOnClickListener(this);
        buy_et_num = (EditText) findViewById(R.id.buy_et_num);
        buy_progress = (ProgressBar) findViewById(R.id.buy_progress);
        buy_tv = (TextView)findViewById(R.id.buy_tv);


    }

    @Override
    public void showProgress() {
        buy_progress.setVisibility(View.VISIBLE);
    }

    @Override
    public void hideProgress() {
        buy_progress.setVisibility(View.GONE);

    }

    @Override
    public void nevigateToHome() {

    }

    @Override
    public void buyError() {

    }

    @Override
    public void buySuccess() {

    }
    @Override
    public void onClick(View v) {

    }
}
OK,activity就去实现上面的接口,看到ProgressBar是否显示是由Presenter来回调控制的。顺便给button设置一下点击事件。
activity_buy_flower.xml布局示图:
<FrameLayout xmlns:android="http://schemas.android.com/apk/res/android"
    android:layout_width="match_parent"
    android:layout_height="match_parent"
    >

    <LinearLayout
        android:layout_width="match_parent"
        android:layout_height="match_parent"
        android:orientation="vertical">
        <EditText
            android:id="@+id/buy_et_num"
            android:layout_width="match_parent"
            android:layout_height="wrap_content" />
        <Button
            android:id="@+id/buy_btn"
            android:layout_width="wrap_content"
            android:layout_height="wrap_content"
            android:text="buy"/>
        <TextView
            android:id="@+id/buy_tv"
            android:layout_width="wrap_content"
            android:layout_height="wrap_content"
            />
    LinearLayout>

    <ProgressBar
        android:id="@+id/buy_progress"
        android:layout_width="wrap_content"
        android:layout_height="wrap_content"
        android:layout_gravity="center"
        android:visibility="gone"
        />

FrameLayout>
接下来看看Presenter是怎么跟Model交互完了以后去告诉activity更新ui的。
先定义一个接口,这个接口主要就是View-> Presenter->Model,意思就是通过ui(View) 的操作,然后通过Presenter 递交给Model处理。
package com.aniu.mvpexample.app.buy_flower;

interface IBuyFlowerPresenter {

    public void buyFlower(int num);
    public int getFlowerNum();

}
OK,界面想要操作的就是买花、获取花的数量。
接着去实现它。
package com.aniu.mvpexample.app.buy_flower;

public class IBuyFlowerPresenterImpl implements IBuyFlowerPresenter {

    private IBuyFlowerView buyFlowerView;

    public IBuyFlowerPresenterImpl(IBuyFlowerView buyFlowerView){
        this.buyFlowerView = buyFlowerView;
    }


    @Override
    public void buyFlower(int num) {
        //买的时候显示进度
        buyFlowerView.showProgress();

        //...此处递交给model层处理数据

    }

    @Override
    public int getFlowerNum() {
        //..此处递交给model层处理数据,然后返回数量
        return 0;
    }
}
可以看到,Presenter层负责的就是告诉model什么时候处理数据,同时也告诉View什么时候更新。即:View<- Presenter ->model
OK,接下来把Model层的接上。
package com.aniu.mvpexample.app.buy_flower;

public interface IBuyFlowerInteractor {

    public void buyFlower(int num);

    public int getFlowerNum();
}
跟上面的IBuyFlowerPresenter方法一样,一层一层的传到model层去处理。
实现:
package com.aniu.mvpexample.app.buy_flower;

public class IBuyFlowerInteractorImpl implements IBuyFlowerInteractor {
    private int num = 100;//我是从网络获取的
    @Override
    public void buyFlower(int num) {
        this.num -= num;
    }

    @Override
    public int getFlowerNum() {
        return num;
    }
}
简单模拟一下买花的逻辑,然后把View Presenter Model 组装一下。
首先是activity中得使用Presenter传递业务。
public class BuyFlowerActivity extends Activity implements IBuyFlowerView, View.OnClickListener {

    private  EditText buy_et_num;
    private  ProgressBar buy_progress;
    private  IBuyFlowerPresenter buyFlowerPresenter;
    private  TextView buy_tv;
    @Override
    protected void onCreate(Bundle savedInstanceState) {
        super.onCreate(savedInstanceState);
        setContentView(R.layout.activity_buy_flower);
        //...省略一堆findViewById
        buyFlowerPresenter = new IBuyFlowerPresenterImpl(this);
    }
    //....省略部分代码
    @Override
    public void onClick(View v) {

        String num = buy_et_num.getText().toString();
        int numInt =Integer.valueOf(num);
        //需要买的数量
        buyFlowerPresenter.buyFlower(numInt);
        //显示剩下的数量
        buy_tv.setText(buyFlowerPresenter.getFlowerNum() + "");
    }
}
Presenter中把View需求传递给Model,修改代码:
package com.aniu.mvpexample.app.buy_flower;

/**
 * Created by aniu on 15/11/19.
 */
public class IBuyFlowerPresenterImpl implements IBuyFlowerPresenter {

    private IBuyFlowerView buyFlowerView;
    private IBuyFlowerInteractor buyFlowerInteractor;

    public IBuyFlowerPresenterImpl(IBuyFlowerView buyFlowerView){
        this.buyFlowerView = buyFlowerView;
        buyFlowerInteractor = new IBuyFlowerInteractorImpl();
    }

    @Override
    public void buyFlower(int num) {
        //买的时候显示进度
        buyFlowerView.showProgress();

        //...此处递交给model层处理数据
        buyFlowerInteractor.buyFlower(num);

    }
    @Override
    public int getFlowerNum() {
        //..此处递交给model层处理数据,然后返回数量
        return buyFlowerInteractor.getFlowerNum();
    }
结果是这样的,数能正常获取,ProgressBar能转。
一个简单的栗子基本能看懂MVP了。
Presenter作为View 和 Model的中间层,主要起到一个很好的衔接作用。
- View->Presenter :View层到Presenter层主要也就是将用户操作界面后产生的需求传递给Presenter。具体数据怎么来的View真不需要管。
- Presenter->Model:Presenter拿到了View的需求了以后,就跟Model层说,Model哥们,我要买5朵花,然后Model哥就一系列网络请求、缓存数据、等。
- Model->Presenter:Model处理数据的时候不管是失败还是成功都会告诉Presenter一个结果。
Presenter->View:所以Presenter拿到结果了以后就去告诉View,然后View就根据结果是成功还是失败来显示界面。
MVP优势:
分层带来的就是复用性强、易调试(易调试bug就少有木有)、还有很直观的就是别都堆在activity里了有木有。
MVP缺点:
就写个简单的功能蹦出这么多个类来。。。

完整的栗子:
https://github.com/linchangjian/android_aniu_mvp
参考:
https://github.com/konmik/konmik.github.io/wiki/Introduction-to-Model-View-Presenter-on-Android
https://github.com/antoniolg/androidmvp

