opencv自定义深度学习层 官方实例解析 笔记
环境 Windows,visual studio 15,opencv3.4.2,c++
1、代码地址
https://docs.opencv.org/3.4.2/dc/db1/tutorial_dnn_custom_layers.html
2、自定义层
类名称就是层的名称
class InterpLayer : public cv::dnn::Layer
//新层是Layer基类的派生类
类方法
public:
InterpLayer(const cv::dnn::LayerParams ¶ms) : Layer(params){}
//读取层当中输入的参数
static cv::Ptr create(cv::dnn::LayerParams& params){}
//创建层
virtual bool getMemoryShapes(const std::vector > &inputs,
		const int requiredOutputs,
		std::vector > &outputs,
		std::vector > &internals) const CV_OVERRIDE{}
//定义输出数据的形状
virtual void forward(std::vector &inputs, std::vector &outputs, std::vector &internals) CV_OVERRIDE{}
//层当中的主要执行过程卸载这里
virtual void forward(cv::InputArrayOfArrays, cv::OutputArrayOfArrays, cv::OutputArrayOfArrays) CV_OVERRIDE {}
//Layer基类当中的纯虚拟函数,如果不写上去的话会一直提醒你,新建层是一个抽象类
getMemoryShapes函数理解
virtual bool getMemoryShapes(const std::vector > &inputs,
		const int requiredOutputs,
		std::vector > &outputs,
		std::vector > &internals) const CV_OVERRIDE
	{
		CV_UNUSED(requiredOutputs); CV_UNUSED(internals);
		std::vector outShape(4);
		outShape[0] = inputs[0][0];  // batch size
		outShape[1] = inputs[0][1];  // number of channels
		outShape[2] = outHeight;
		outShape[3] = outWidth;
		outputs.assign(1, outShape);
		return false;
	}
输入参数
const std::vector > &inputs
//首先是一个二维数组,类型为int,
//然后是一个引用类型,就是给第一个输入参数去了一个别称叫做inputs
//最后是一个常量,将指针指向的对象设置为常量,全局化
//一共涉及到四个参数
const std::vector > &inputs,//这个参数获取的是层的bottom值,是当前层的输入
const int requiredOutputs,                   //
std::vector > &outputs,     //这个参数表示的是层的top值,是当前层的输出
std::vector > &internals    //
函数声明
const CV_OVERRIDE
//OVERRIDE时,函数声明必须完全不变,否则报错。
//在编写const成员函数时,不慎修改了数据成员,或者调用了其它非const成员函数,编译器将指出错误。
具体过程
std::vector outShape(4); //创建一个长度为4的数组
// 在mnist里面输入的input大小是[1,1,28,28]
outShape[0] = inputs[0][0];  // batch size
outShape[1] = inputs[0][1];  // number of channels
outShape[2] = outHeight;
outShape[3] = outWidth;
outputs.assign(1, outShape); //将outShape复制给outputs[1,1,8,9]
forward层
virtual void forward(std::vector &inputs, std::vector &outputs, std::vector &internals) CV_OVERRIDE
	{
		CV_UNUSED(internals);
		cv::Mat& inp = *inputs[0];
		cv::Mat& out = outputs[0];
		const float* inpData = (float*)inp.data;
		float* outData = (float*)out.data;
		const int batchSize = inp.size[0];
		const int numChannels = inp.size[1];
		const int inpHeight = inp.size[2];
		const int inpWidth = inp.size[3];
		const float rheight = (outHeight > 1) ? static_cast(inpHeight - 1) / (outHeight - 1) : 0.f;
		const float rwidth = (outWidth > 1) ? static_cast(inpWidth - 1) / (outWidth - 1) : 0.f;
		for (int h2 = 0; h2 < outHeight; ++h2)
		{
			const float h1r = rheight * h2;
			const int h1 = static_cast(h1r);
			const int h1p = (h1 < inpHeight - 1) ? 1 : 0;
			const float h1lambda = h1r - h1;
			const float h0lambda = 1.f - h1lambda;
			for (int w2 = 0; w2 < outWidth; ++w2)
			{
				const float w1r = rwidth * w2;
				const int w1 = static_cast(w1r);
				const int w1p = (w1 < inpWidth - 1) ? 1 : 0;
				const float w1lambda = w1r - w1;
				const float w0lambda = 1.f - w1lambda;
				const float* pos1 = inpData + h1 * inpWidth + w1;
				float* pos2 = outData + h2 * outWidth + w2;
				for (int c = 0; c < batchSize * numChannels; ++c)
				{
					pos2[0] =
						h0lambda * (w0lambda * pos1[0] + w1lambda * pos1[w1p]) +
						h1lambda * (w0lambda * pos1[h1p * inpWidth] + w1lambda * pos1[h1p * inpWidth + w1p]);
					pos1 += inpWidth * inpHeight;
					pos2 += outWidth * outHeight;
				}
			}
		}
	}
输入参数
std::vector &inputs,
//首先是个一维数组
//然后数组类型是Mat*,Mat是矩阵,Mat*是矩阵的指针,所以这个应该是一个矩阵指针的列表
//最后& 引用就是给输入的第一个参数去一个新的名字叫input

std::vector &output,
//首先是个一维数组
//然后数组类型是Mat,Mat是矩阵,所以这是一个个矩阵的列表
//最后& 引用就是给输入的第二个参数去一个新的名字叫output
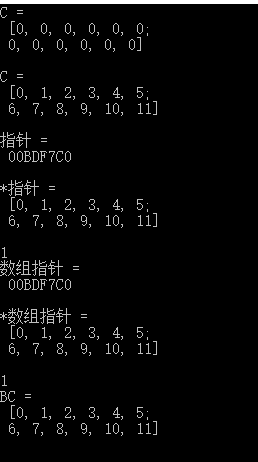
指向Mat的指针数组的测试
#include "stdafx.h"
#include
#include
#include
using namespace cv;
using namespace std;

int main()
{
	Mat C(2, 2, CV_32FC3, Scalar()); //声明一个2*2*3的Mat,实际上大小是2*6
	cout << "C = " << endl << " " << C << endl << endl;

	int kk = 0;
	//给Mat赋值
	for (int i = 0; i<2; i++)
	{
		for (int j = 0; j<6; j++)
		{
			C.at(i, j) = kk;  //方法1
			C.ptr(i)[j] = kk; //方法2
			kk = kk + 1;
		}
	}

	cout << "C = " << endl << " " << C << endl << endl;

	vector B; //声明一个Mat的指针数组
	Mat* pimage = &C; //pimage里面保存Mat C的地址
					  //通过指针pimage查看Mat C
	cout << "指针 = " << endl << " " << pimage << endl << endl;
	cout << "*指针 = " << endl << " " << *pimage << endl << endl;

	B.push_back(pimage);//将pimgage指针放入数组B中
						//通过B查看Mat C
	cout << B.size() << endl;
	cout << "数组指针 = " << endl << " " << B[0] << endl << endl;
	cout << "*数组指针 = " << endl << " " << *B[0] << endl << endl;

	vector A; //声明一个Mat的数组


	A.push_back(C);//将Mat C放到数组中
				   //通过B查看Mat C
	cout << A.size() << endl;
	cout << "BC = " << endl << " " << A[0] << endl << endl;

	return 0;
}
过程
CV_UNUSED(internals);
cv::Mat& inp = *inputs[0];
//读取数组里面第一个Mat的地址,并通过地址获取Mat的值,然后使用引用名称inp指向该Mat
//因为inp是一个引用,所以指向的输入数据的地址还是原来的输入,如果inp发生改变,那么在系统中的输入数据会相应的发生改变
cv::Mat& out = outputs[0];
//读取数组里面第一个Mat,然后将引用名称out指向该Mat
const float* inpData = (float*)inp.data;
//(float*)inp.data表示指向Mat的第一个数据地址的指针
// inpData是一个指向Mat第一个数据地址的指针,*inpData是Mat第一个数据的值
float* outData = (float*)out.data;
const int batchSize = inp.size[0]; //获取输入Mat的四个维度
const int numChannels = inp.size[1];
const int inpHeight = inp.size[2];
const int inpWidth = inp.size[3];
const float rheight = (outHeight > 1) ? static_cast(inpHeight - 1) / (outHeight - 1) : 0.f;
//因为outHeight是类中的声明参数,所以可以在类方法中直接使用
//如果outHeight大于1,就输出(inpHeight - 1) / (outHeight - 1)
//否则输出0
//static_cast是一个强制类型转换符
const float rwidth = (outWidth > 1) ? static_cast(inpWidth - 1) / (outWidth - 1) : 0.f;
for (int h2 = 0; h2 < outHeight; ++h2)
{
	const float h1r = rheight * h2;
	const int h1 = static_cast(h1r);
	const int h1p = (h1 < inpHeight - 1) ? 1 : 0;
	const float h1lambda = h1r - h1;
	const float h0lambda = 1.f - h1lambda;
	for (int w2 = 0; w2 < outWidth; ++w2)
	{
		const float w1r = rwidth * w2;
		const int w1 = static_cast(w1r);
		const int w1p = (w1 < inpWidth - 1) ? 1 : 0;
		const float w1lambda = w1r - w1;
		const float w0lambda = 1.f - w1lambda;
		const float* pos1 = inpData + h1 * inpWidth + w1;
        //inpData是一个地址,在地址上做计算,pos1指向另一个地址的数据
		float* pos2 = outData + h2 * outWidth + w2;
		for (int c = 0; c < batchSize * numChannels; ++c)
		{
			pos2[0] =
				h0lambda * (w0lambda * pos1[0] + w1lambda * pos1[w1p]) +
				h1lambda * (w0lambda * pos1[h1p * inpWidth] + w1lambda * pos1[h1p *             inpWidth + w1p]);
			pos1 += inpWidth * inpHeight;
			pos2 += outWidth * outHeight;
		}
    }
}
