用R语言进行数据探索
以iris数据集为例做演示。
1.查看数据
> #1.查看数据集的大小和结构,维度、名称、属性。
> dim(iris)
[1] 150   5
> names(iris)
[1] "Sepal.Length" "Sepal.Width"  "Petal.Length" "Petal.Width"  "Species"
> str(iris)
'data.frame':	150 obs. of  5 variables:
 $ Sepal.Length: num  5.1 4.9 4.7 4.6 5 5.4 4.6 5 4.4 4.9 ...
 $ Sepal.Width : num  3.5 3 3.2 3.1 3.6 3.9 3.4 3.4 2.9 3.1 ...
 $ Petal.Length: num  1.4 1.4 1.3 1.5 1.4 1.7 1.4 1.5 1.4 1.5 ...
 $ Petal.Width : num  0.2 0.2 0.2 0.2 0.2 0.4 0.3 0.2 0.2 0.1 ...
 $ Species     : Factor w/ 3 levels "setosa","versicolor",..: 1 1 1 1 1 1 1 1 1 1 ...
> attributes(iris)
$names
[1] "Sepal.Length" "Sepal.Width"  "Petal.Length" "Petal.Width"  "Species"

$row.names
  [1]   1   2   3   4   5   6   7   8   9  10  11  12  13  14  15  16  17  18  19  20  21  22  23  24  25
 [26]  26  27  28  29  30  31  32  33  34  35  36  37  38  39  40  41  42  43  44  45  46  47  48  49  50
 [51]  51  52  53  54  55  56  57  58  59  60  61  62  63  64  65  66  67  68  69  70  71  72  73  74  75
 [76]  76  77  78  79  80  81  82  83  84  85  86  87  88  89  90  91  92  93  94  95  96  97  98  99 100
[101] 101 102 103 104 105 106 107 108 109 110 111 112 113 114 115 116 117 118 119 120 121 122 123 124 125
[126] 126 127 128 129 130 131 132 133 134 135 136 137 138 139 140 141 142 143 144 145 146 147 148 149 150

$class
[1] "data.frame"> iris[1:5,]
Sepal.Length Sepal.Width Petal.Length Petal.Width Species
1 5.1 3.5 1.4 0.2 setosa
2 4.9 3.0 1.4 0.2 setosa
3 4.7 3.2 1.3 0.2 setosa
4 4.6 3.1 1.5 0.2 setosa
5 5.0 3.6 1.4 0.2 setosa
> head(iris)
Sepal.Length Sepal.Width Petal.Length Petal.Width Species
1 5.1 3.5 1.4 0.2 setosa
2 4.9 3.0 1.4 0.2 setosa
3 4.7 3.2 1.3 0.2 setosa
4 4.6 3.1 1.5 0.2 setosa
5 5.0 3.6 1.4 0.2 setosa
6 5.4 3.9 1.7 0.4 setosa
> tail(iris)
Sepal.Length Sepal.Width Petal.Length Petal.Width Species
145 6.7 3.3 5.7 2.5 virginica
146 6.7 3.0 5.2 2.3 virginica
147 6.3 2.5 5.0 1.9 virginica
148 6.5 3.0 5.2 2.0 virginica
149 6.2 3.4 5.4 2.3 virginica
150 5.9 3.0 5.1 1.8 virginica> iris[1:10,"Sepal.Length"]
[1] 5.1 4.9 4.7 4.6 5.0 5.4 4.6 5.0 4.4 4.9
> iris$Sepal.Length[1:10]
[1] 5.1 4.9 4.7 4.6 5.0 5.4 4.6 5.0 4.4 4.92.单变量探索
用summary()看数据的分布情况,当变量是数值型时,返回的是最小值、最大值、平均值、中位数、四分之一中位数、四分之三中位数。如果变量是因子类型,则返回的是每一个等级水平的频数。
> summary(iris)
  Sepal.Length    Sepal.Width     Petal.Length    Petal.Width          Species
 Min.   :4.300   Min.   :2.000   Min.   :1.000   Min.   :0.100   setosa    :50
 1st Qu.:5.100   1st Qu.:2.800   1st Qu.:1.600   1st Qu.:0.300   versicolor:50
 Median :5.800   Median :3.000   Median :4.350   Median :1.300   virginica :50
 Mean   :5.843   Mean   :3.057   Mean   :3.758   Mean   :1.199
 3rd Qu.:6.400   3rd Qu.:3.300   3rd Qu.:5.100   3rd Qu.:1.800
Max. :7.900 Max. :4.400 Max. :6.900 Max. :2.500 > mean(iris$Sepal.Length)
[1] 5.843333
> median(iris$Sepal.Length)
[1] 5.8
> range(iris$Sepal.Length)
[1] 4.3 7.9
> mean(iris$Sepal.Length)
[1] 5.843333
> median(iris$Sepal.Length)
[1] 5.8
> range(iris$Sepal.Length)
[1] 4.3 7.9
> quantile(iris$Sepal.Length)
0% 25% 50% 75% 100%
4.3 5.1 5.8 6.4 7.9
> quantile(iris$Sepal.Length, c(.1, .3, .65))
10% 30% 65%
4.80 5.27 6.20 > var(iris$Sepal.Length)
[1] 0.6856935> hist(iris$Sepal.Length)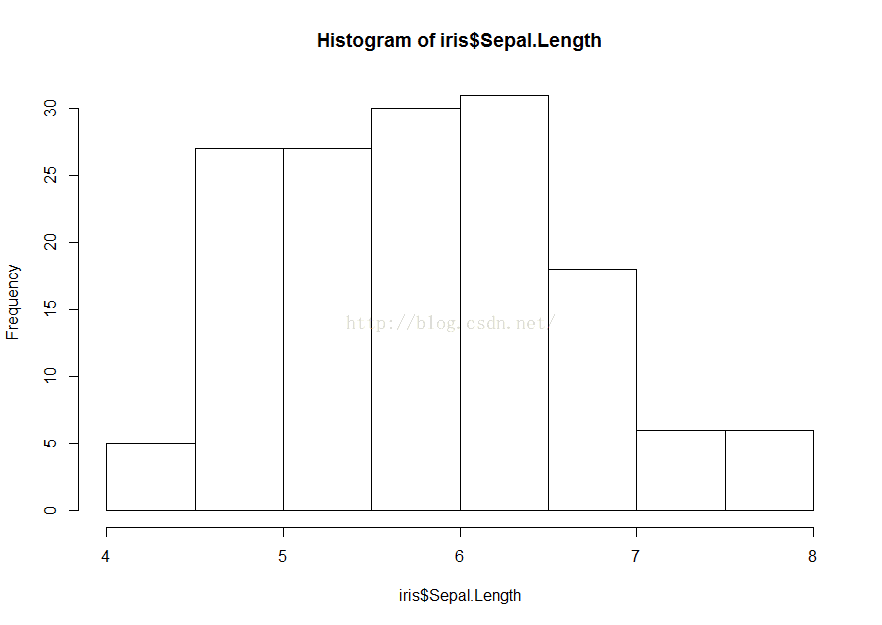
> hist(iris$Sepal.Length)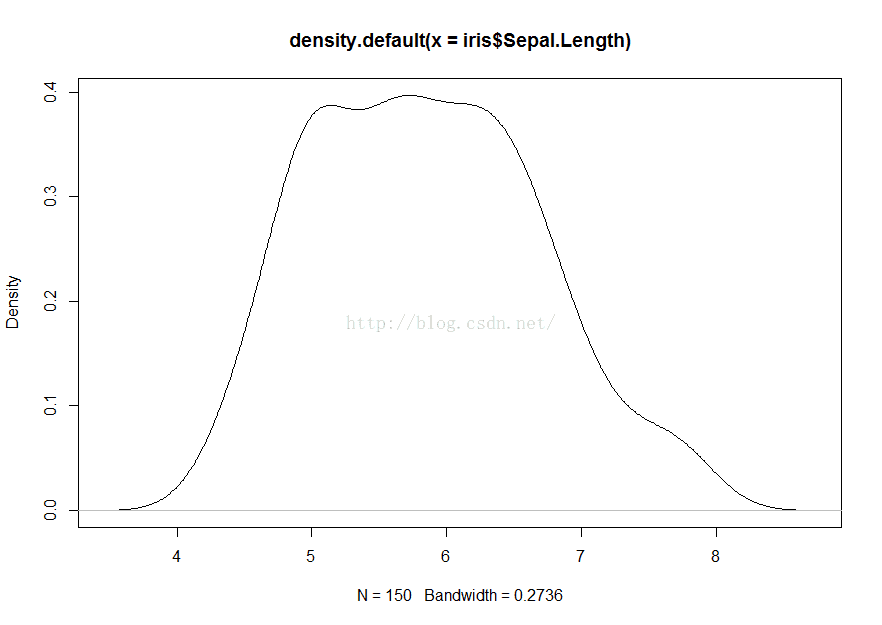
对于因子,可以先算频数,然后画饼图或条形图。
> table(iris$Species)

    setosa versicolor  virginica
        50         50         50
> pie(table(iris$Species))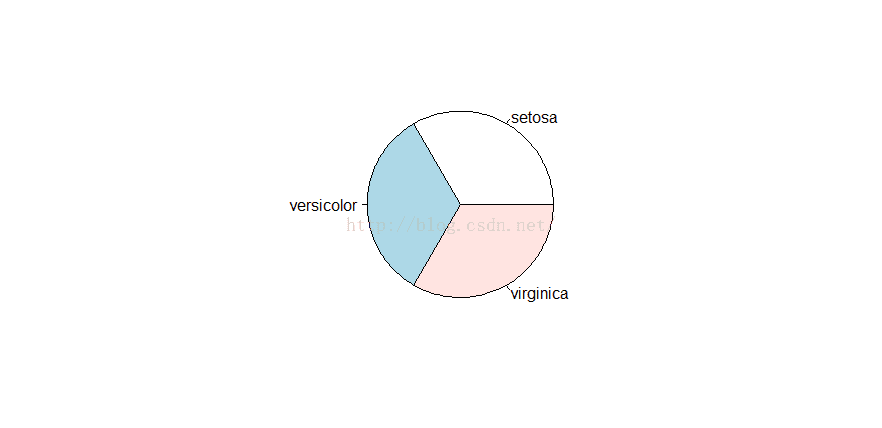
> barplot(table(iris$Species))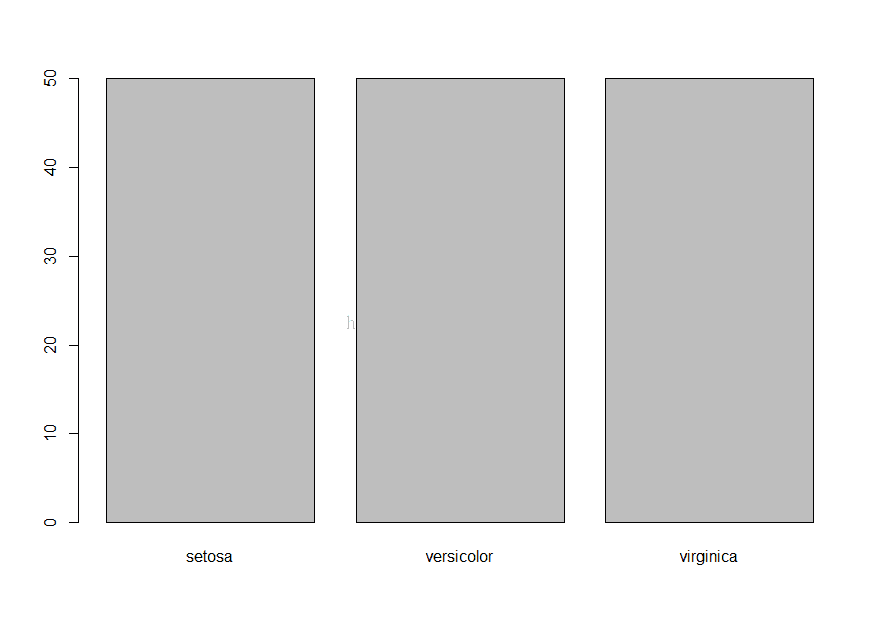
3.多变量探索
计算变量之间的协方差和相关系数。
> cov(iris$Sepal.Length, iris$Petal.Length)
[1] 1.274315
> cov(iris[,1:4])
             Sepal.Length Sepal.Width Petal.Length Petal.Width
Sepal.Length    0.6856935  -0.0424340    1.2743154   0.5162707
Sepal.Width    -0.0424340   0.1899794   -0.3296564  -0.1216394
Petal.Length    1.2743154  -0.3296564    3.1162779   1.2956094
Petal.Width     0.5162707  -0.1216394    1.2956094   0.5810063
> cor(iris$Sepal.Length, iris$Petal.Length)
[1] 0.8717538
> cor(iris[,1:4])
             Sepal.Length Sepal.Width Petal.Length Petal.Width
Sepal.Length    1.0000000  -0.1175698    0.8717538   0.8179411
Sepal.Width    -0.1175698   1.0000000   -0.4284401  -0.3661259
Petal.Length    0.8717538  -0.4284401    1.0000000   0.9628654
Petal.Width 0.8179411 -0.3661259 0.9628654 1.0000000> aggregate(Sepal.Length ~ Species, summary, data=iris)
Species Sepal.Length.Min. Sepal.Length.1st Qu. Sepal.Length.Median Sepal.Length.Mean
1 setosa 4.300 4.800 5.000 5.006
2 versicolor 4.900 5.600 5.900 5.936
3 virginica 4.900 6.225 6.500 6.588
Sepal.Length.3rd Qu. Sepal.Length.Max.
1 5.200 5.800
2 6.300 7.000
3 6.900 7.900> boxplot(Sepal.Length~Species, data=iris)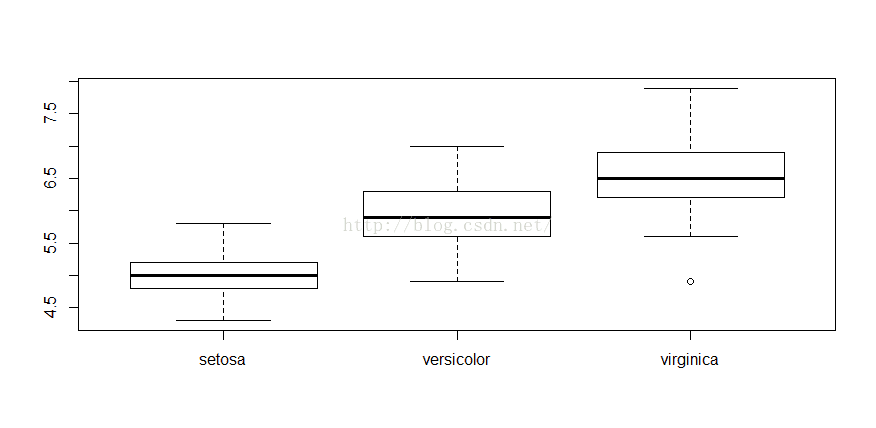
绘制两个变量的散点图。
> with(iris, plot(Sepal.Length, Sepal.Width, col=Species, pch=as.numeric(Species)))
> #使用with()后,不需要变量名称前面加上iris前缀。不同类别的数据点设置了不同的颜色和标志。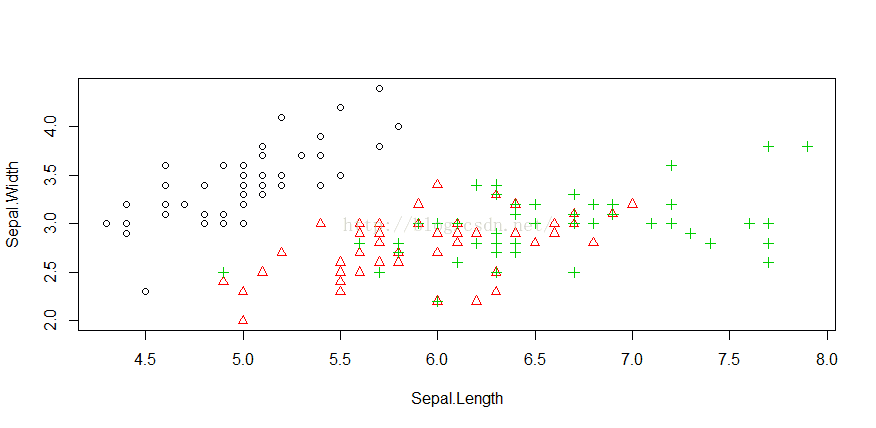
当数据量大时,为了避免数据点之间的重叠,可以添加少量扰动噪声数据。
> plot(jitter(iris$Sepal.Length), jitter(iris$Sepal.Width))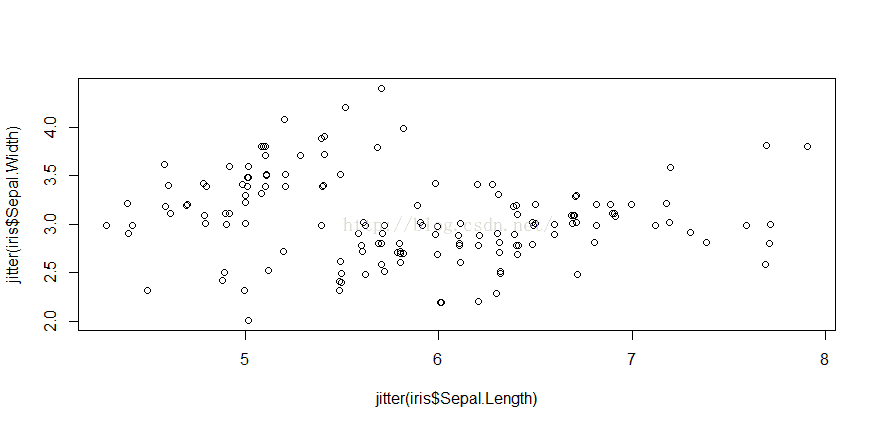
生成散点图矩阵。
> pairs(iris)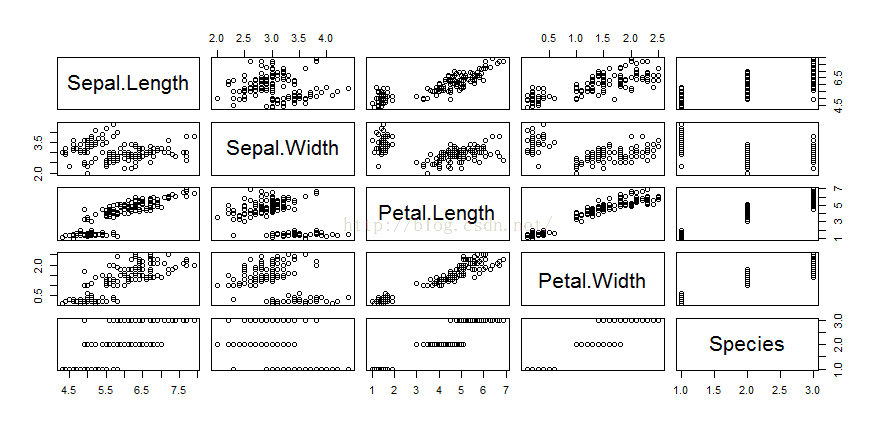
4.更多探索
更多的有3D散布图、等级图、等高图、交互图和平行坐标。
3D散布图可以通过scatterplot3d包生成。
> #install.packages('scatterplot3d')
> library(scatterplot3d)
> scatterplot3d(iris$Petal.Width, iris$Sepal.Length, iris$Sepal.Width)> #install.packages('rgl')
> library(rgl)
> plot3d(iris$Petal.Width, iris$Sepal.Length, iris$Sepal.Width)热力图是数据矩阵的2D展示,下面用dist()函数计算不同观测之间的相似度,并绘制热力图。
> distMatrix <- as.matrix(dist(iris[,1:4]))
> heatmap(distMatrix)library(lattice)
levelplot(Petal.Width~Sepal.Length*Sepal.Width, iris, cuts=9,
col.regions=grey.colors(10)[10:1])> filled.contour(volcano, color=terrain.colors, asp=1,plot.axes=contour(volcano, add=T))> persp(volcano, theta=25, phi=30, expand=0.5, col="lightblue")
> library(MASS)
> parcoord(iris[1:4], col=iris$Species)
> library(lattice)
> parallelplot(~iris[1:4] | Species, data=iris)> library(ggplot2)
> qplot(Sepal.Length, Sepal.Width, data=iris, facets=Species ~.)数据探索过程中生成的大量图表,最好保存到一个文件中,以便查看分析。pdf()将图表保存到pdf文件,postscript()将图表保存到PS文件中。BMP, JPEG, PNG, TIFF格式的图像文件可以分别由bmp(), jpeg(), png(), tiff()生成。要提醒的是,这些文件(图像设备)在图像绘制完成后,需要使用函数graphics.off()或dev.off()关闭。
> # save as a PDF file
> pdf("myPlot.pdf")
> x <- 1:50
> plot(x, log(x))
> graphics.off()
> # Save as a postscript file
> postscript("myPlot2.ps")
> x <- -20:20
> plot(x, x^2)
> graphics.off()