linux centos7安装配置nexus3.16.1-02
环境:
1、操作系统:CentOS release 7
2、安装版本:nexus-3.16.1-02-unix.tar.gz
3、下载地址:https://www.sonatype.com/
4、下载说明:
可以直接通过下边链接下载最新版本:https://www.sonatype.com/oss-thank-you-tar.gz
可以通过后边的这个链接选择历史版本:
https://help.sonatype.com/repomanager3/download/download-archives—repository-manager-3
5、特殊说明:在搭建Maven私服之前,对我们的安装环境是有要求的,需要我们的Linux安装了 JDK 和 Maven
安装步骤
0、安装jdk1.8
Nexus3xx的安装依赖jdk环境,且必须1.8版本以上,否则可能会遇到其他不可知问题。本次安装jdk1.8.0_211版本,此安装不再赘述
1、安装maven
官网下载 Maven,我这里下载的以下这个版本的apache-maven-3.5.4-bin.tar.gz包
解压到安装目录,编辑 /etc/profile 文件,在该文件的末尾添加以下的命令:
export MAVEN_HOME=/home/ apache-maven-3.5.4
export PATH=${MAVEN_HOME}/bin:${PATH}
执行以下的命令,让配置文件立即生效:
source /etc/profile
2、解压
tar -zxvf nexus-3.16.1-02-unix.tar.gz
下载到指定目录并解压,我们可以看到解压后有通常两个文件
| nexus-x.x.x |
Nexus运行所需要的文件,如运行脚本,依赖jar包等 |
| sonatype-work |
该目录包含Nexus生成的配置文件、日志文件、仓库文件等 |
3、启动
cd /home/nexus/nexus-3.16.1-02/bin/
./nexus run &
大概等待一分钟左右,如果在日志输出当中看到如下显示,则说明启动成功
Started Sonatype Nexus OSS 3.16.1-02
4、访问
默认监听端口为8081,默认用户名密码为admin/admin123,因此可以访问以下首页并登陆。
172.16.100.81:8081
如果访问不了注意防火墙
5、设置开机自启
ln -s /home/nexus/nexus-3.16.1-02/bin/nexus /etc/init.d/nexus3
chkconfig --add nexus3
chkconfig nexus3 on
6、配置运行用户
这个地方可以使用root运行,不过官方文档里边也不建议使用root来运行,因此使用普通用户来运行
useradd nexus
cd /home/nexus/nexus-3.16.1-02/bin/
vim nexus.rc
填写下面内容:
run_as_user="nexus"
配置之后记得更改目录权限,否则下次启动会没有权限
chown -R nexus.nexus /home/nexus/nexus-3.16.1-02
chown -R nexus.nexus /home/nexus/sonatype-work
7、配置jdk
如果这里不配置,一般会使用默认的JAVA_HOME的变量,如果系统中有多个,那么可以进行配置
cd /home/nexus/nexus-3.16.1-02/bin/
修改下面内容
INSTALL4J_JAVA_HOME_OVERRIDE= /home/jdk1.8.0_211
8、修改端口
一般使用默认的,如果需要修改,则更改/home/nexus/nexus-3.16.1-02/etc/nexus-default.properties里边的配置。
这里不做修改了,采用默认配置就行。
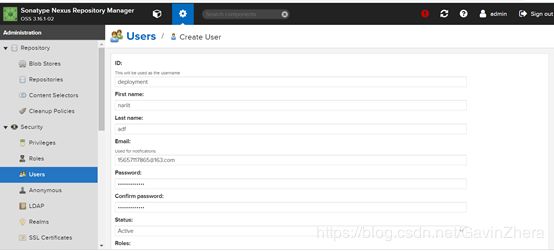
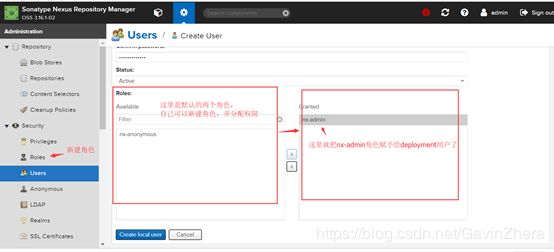
9、新建deployment用户
10、新建仓库
新建3td_part和my-repo,类型分别为Release和Snapshot,用来存放手动上传的jar包(这里也可以使用默认已经创建的仓库)
11、上传jar包
11.1 单个上传
单个上传可以利用nexu提供的web页面上传,也可以使用maven命令
网页:
Maven命令示例:
mvn -s D:\dev\apache-maven-3.0.5\conf\settings.xml deploy:deploy-file -Dversion=1.2.2.RELEASE -Durl=http://172.16.100.81:8081/repository/3rd_part/ -DrepositoryId=3rd_part -DgeneratePom=false -DpomFile=C:\Users\15657\.m2\repo\org\springframework\cloud\spring-cloud-starter-config\1.2.2.RELEASE\spring-cloud-starter-config-1.2.2.RELEASE.pom -Dpackaging=jar -Dfile=C:\Users\15657\.m2\repo\org\springframework\cloud\spring-cloud-starter-config\1.2.2.RELEASE\spring-cloud-starter-config-1.2.2.RELEASE.jar
11.2 批量上传
对于nexus3.16.1-02版,批量上传我目前没发现较好的方法,之前的版本好像可以直接吧仓库文件夹复制过去重建索引,这里用java代码方式,其实就是调用maven命令,遍历文件一次上传,以下是代码示例(注:如果上传Snapshot版本时,需要修改红色部分切换仓库,这里其实还可以优化,实现自动切换)
| import java.io.*; import java.util.concurrent.ExecutorService; import java.util.concurrent.Executors; import java.util.regex.Pattern;
public class Deploy { /** * mvn -s F:\.m2\settings.xml * org.apache.maven.plugins:maven-deploy-plugin:2.8.2:deploy-file * -Durl=http://IP:PORT/nexus/content/repositories/thirdpart * -DrepositoryId=thirdpart * -Dfile=antlr-2.7.2.jar * -DpomFile=antlr-2.7.2.pom * -Dpackaging=jar * -DgeneratePom=false * -Dsources=./path/to/artifact-name-1.0-sources.jar * -Djavadoc=./path/to/artifact-name-1.0-javadoc.jar */ public static final String BASE_CMD = "cmd /c mvn " + "-s D:\\dev\\apache-maven-3.0.5\\conf\\settings.xml " + "deploy:deploy-file " + "-Durl=http://172.16.100.81:8081/repository/3rd_part/ " + "-DrepositoryId=3rd_part " + "-DgeneratePom=false"; /*public static final String BASE_CMD = "cmd /c mvn " + "-s D:\\dev\\apache-maven-3.0.5\\conf\\settings.xml " + "deploy:deploy-file " + "-Durl=http://172.16.100.81:8081/repository/my-repo/ " + "-DrepositoryId=my-repo " + "-DgeneratePom=false";*/
public static final Pattern DATE_PATTERN = Pattern.compile("-[\\d]{8}\\.[\\d]{6}-");
public static final Runtime CMD = Runtime.getRuntime();
public static final Writer ERROR;
public static final ExecutorService EXECUTOR_SERVICE = Executors.newFixedThreadPool(10);
static { Writer err = null; try { err = new OutputStreamWriter(new FileOutputStream("deploy-error.log"), "utf-8"); } catch (Exception e) { e.printStackTrace(); System.exit(0); } ERROR = err; }
public static void main(String[] args) { deploy(new File("C:\\Users\\15657\\.m2\\repo\\ant\\ant\\1.5").listFiles()); // if(checkArgs(args)){ // File file = new File(args[0]); // deploy(file.listFiles()); // } EXECUTOR_SERVICE.shutdown(); try { ERROR.close(); } catch (IOException e) { e.printStackTrace(); } }
public static void error(String error) { try { System.err.println(error); ERROR.write(error + "\n"); ERROR.flush(); } catch (IOException e) { e.printStackTrace(); } }
public static boolean checkArgs(String[] args) { if (args.length != 1) { System.out.println("用法如: java -jar Deploy D:\\some\\path\\"); return false; } File file = new File(args[0]); if (!file.exists()) { System.out.println(args[0] + " 目录不存在!"); return false; } if (!file.isDirectory()) { System.out.println("必须指定为目录!"); return false; } return true; }
public static void deploy(File[] files) { if (files.length == 0) { //ignore } else if (files[0].isDirectory()) { for (File file : files) { if (file.isDirectory()) { deploy(file.listFiles()); } } } else if (files[0].isFile()) { File pom = null; File jar = null; File source = null; File javadoc = null; //忽略日期快照版本,如 xxx-mySql-2.2.6-20170714.095105-1.jar for (File file : files) { String name = file.getName(); if (DATE_PATTERN.matcher(name).find()) { //skip } else if (name.endsWith(".pom")) { pom = file; } else if (name.endsWith("-javadoc.jar")) { javadoc = file; } else if (name.endsWith("-sources.jar")) { source = file; } else if (name.endsWith(".jar")) { jar = file; } } if (pom != null) { if (jar != null) { deploy(pom, jar, source, javadoc); } else if (packingIsPom(pom)) { deployPom(pom); } } } }
public static boolean packingIsPom(File pom) { BufferedReader reader = null; try { reader = new BufferedReader(new InputStreamReader(new FileInputStream(pom))); String line; while ((line = reader.readLine()) != null) { if (line.trim().indexOf(" return true; } } } catch (Exception e) { e.printStackTrace(); } finally { try { reader.close(); } catch (Exception e) { } } return false; }
public static void deployPom(final File pom) { EXECUTOR_SERVICE.execute(new Runnable() { public void run() { StringBuffer cmd = new StringBuffer(BASE_CMD); cmd.append(" -DpomFile=").append(pom.getName()); cmd.append(" -Dfile=").append(pom.getName()); execute(cmd,pom); } }); }
public static void deploy(final File pom, final File jar, final File source, final File javadoc) { EXECUTOR_SERVICE.execute(new Runnable() { public void run() { StringBuffer cmd = new StringBuffer(BASE_CMD); cmd.append(" -DpomFile=").append(pom.getName()); if (jar != null) { //获取版本号,防止读取Snapshot版时识别不了的问题 String filename = jar.getParentFile().getName(); String s = filename.substring(filename.lastIndexOf("\\") + 1); //当有bundle类型时,下面的配置可以保证上传的jar包后缀为.jar cmd.append(" -Dpackaging=jar -Dfile=").append(jar.getName()).append(" -Dversion=").append(s); } else { cmd.append(" -Dfile=").append(pom.getName()); } if (source != null) { cmd.append(" -Dsources=").append(source.getName()); } if (javadoc != null) { cmd.append(" -Djavadoc=").append(javadoc.getName()); }
execute(cmd,pom); } }); }
public static void execute(StringBuffer cmd, File pom) { try { final Process proc = CMD.exec(cmd.toString(), null, pom.getParentFile()); InputStream inputStream = proc.getInputStream(); InputStreamReader inputStreamReader = new InputStreamReader(inputStream); BufferedReader reader = new BufferedReader(inputStreamReader); String line; StringBuffer logBuffer = new StringBuffer(); logBuffer.append("\n\n\n=======================================\n"); while ((line = reader.readLine()) != null) { if (line.startsWith("[INFO]") || line.startsWith("Upload")) { logBuffer.append(Thread.currentThread().getName() + " : " + line + "\n"); } } System.out.println(logBuffer); int result = proc.waitFor(); if (result != 0) { error("上传失败:" + pom.getAbsolutePath()); } } catch (IOException e) { error("上传失败:" + pom.getAbsolutePath()); e.printStackTrace(); } catch (InterruptedException e) { error("上传失败:" + pom.getAbsolutePath()); e.printStackTrace(); } } } |


