OpenCV--使用ssd进行目标检测(附源码)
最近在使用opencv做一些图像处理和检测的内容,以下是个人学习记录,如果有问题,欢迎指正!
部署环境:vs2017 +opencv3.3+C++
1、添加引用库和命名空间
添加我们所需要使用的dnn库,和相关依赖
#include
#include//opencv2的dnn模块
#include

using namespace std;
using namespace cv;
using namespace cv::dnn; ![]()
2、指定模型文件和描述文件位置
String caffe_bin_file = "D:/new_cv/opencv/sources/samples/data/dnn/model_ssd_det/VGG_ILSVRC2016_SSD_300x300_iter_440000.caffemodel";
String caffe_txt_file = "D:/new_cv/opencv/sources/samples/data/dnn/model_ssd_det/deploy.prototxt";
String label_txt = "D:/new_cv/opencv/sources/samples/data/dnn/model_ssd_det/label.txt";![]()
3、读取label文件内容
label文本:
0,0,background
5,1,aeroplane
2,2,bicycle
15,3,bird
9,4,boat
40,5,bottle
6,6,bus
3,7,car
16,8,cat
57,9,chair
20,10,cow
61,11,diningtable
17,12,dog
18,13,horse
4,14,motorbike
1,15,person
59,16,pottedplant
19,17,sheep
58,18,sofa
7,19,train
63,20,tvmonitor![]()
我们的label文本主要是模型文件中可以识别的种类信息,我们用cv::String 进行存储,方法如下
vectorreadfromLabels()
{
	ifstream fp(label_txt);//创建文件流
	vector result;
	if (!fp.is_open())//判断是否可以正常打开
	{
		cout << "count not open file" << endl;
		exit(-1);
	}
	string labelname;
	while (!fp.eof()) //取流状态
	{
		getline(fp, labelname);//读取一行数据到label中
		if (labelname.length())
		{
			string temps = labelname.substr(labelname.find(",") + 1);//截取第一个逗号以后的部分
			string temp2 = temps.substr(temps.find(",") + 1);
			result.push_back(temp2);
		}
	}
	//for (vector::iterator it = result.begin(); it != result.end(); it++)
	//{
	//	cout << *it << endl;
	//}
	return result;
}
4、输入待检测目标图片
接下来我们输入我们需要检测的图片,并验证可以访问
Mat src = imread("D:/test/test.jpg");
if (src.empty())
{
cout << "load image error" << endl;
return -1;
}
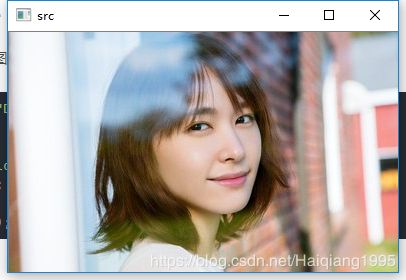
imshow("src", src);原始src:最喜欢的明星,哈哈哈哈
5、查看模型描述文件,确定图像width和height
对于定义好的caffemodel,我们在进行检测和训练的过程中,都要按模型的需要resize成目标大小,下面是样例的描述文件(deploy.prorotxt)的起始位置,data是我们输入的层级名称(后面会用到),
name: "VGG_ILSVRC2016_SSD_300x300_deploy"
input: "data"
input_shape {
  dim: 1
  dim: 3
  dim: 300
  dim: 300
}

dim:1  ——表示对待识别样本进行数据增广的数量,该值的大小可自行定义。但一般会进行5次crop,将整幅图像分为多个flip。该值为10则表示会将待识别的样本分为10部分输入到网络进行识别。如果相对整幅图像进行识别而不进行图像数据增广,则可将该值设置为1.

dim:3 ——该值表示处理的图像的通道数,若图像为RGB图像则通道数为3,设置该值为3;若图像为灰度图,通道数为1则设置该值为1.

dim:300 ——图像的长度,可以通过网络配置文件中的数据层中的crop_size来获取。

dim:300——图像的宽度,可以通过网络配置文件中的数据层中的crop_size来获取。
我们可以看到,该模型需要输入单个3通道的300*300的图像,因此,我们在程序中指定输入固定的width和height如下
const size_t width = 300;//const表示不能被修改
const size_t height = 300;//size_t 表示vector的下标类型,一般是sizeof(*)的返回值
6、图像预处理
对输入图片进行处理,包括resize,norminalize等,我们为了检测,可以先获取均值图像,然后返回原始图像和均值凸显的差值(特征图像)
1)获取均值
const int meanv[3]= { 104, 117, 123 };
可以使用下面的api进行计算,也可以通过公式遍历Mat对象,进行计算
void cv::meanStdDev (
InputArray src,
OutputArray mean,
OutputArray stddev,
InputArray mask = noArray()
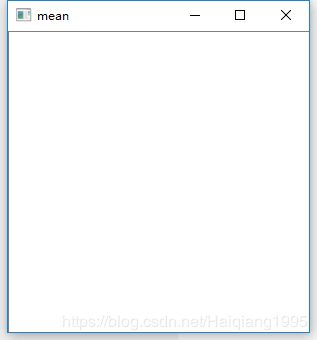
) 2)得到均值图像
Mat getMean(const size_t &width,const size_t &height)
{
	vector channels;
	for (int i = 0; i < 3; i++)
	{
		Mat channel(width,height,CV_32F,Scalar(meanv[i]));
		channels.push_back(channel);
	}
	Mat mean;
	merge(channels, mean);//图像合并
	return mean;
}
均值图像如下,哈哈,可能是选的美女所以比价白!请谅解~
3)获取特征图像
Mat preprocessed(const Mat &src)
{
	Mat out_p;
	src.convertTo(out_p, CV_32F);//尽量不更改原始图像,从新定义一个Mat 对象做处理
	Mat mean = getMean(width, height);
	resize(out_p, out_p, Size(width, height));
	subtract(out_p, mean, out_p);//取差值

	return out_p;
}
特征图像如下:

7、初始化网络模型
常见初始化caffe网络模型接口有两种方法:
方法1)
	Ptr importer;//智能指针的用法
	try {
		importer = dnn::createCaffeImporter(caffe_txt_file, caffe_bin_file);
	}
	catch (const cv::Exception &err)//Importer can throw error which we can catch
	{
		cerr << err.msg << endl;
	}

	Net net;
	importer->populateNet(net);//填充网络
	importer.release();
这种方法:在opencv3.3 之前可以用,之后的版本,Importer被禁掉了,可以使用
方法2)
Net net = readNetFromCaffe(caffe_txt_file, caffe_bin_file);
8、数据载入和检测环节
Mat detectionMat(detection.size[2], detection.size[3], CV_32F, detection.ptr());
float confidence_threshold = 0.2;
cout <<"rows" <(i, 2);
if (confidence > confidence_threshold) {
size_t objIndex = (size_t)(detectionMat.at(i, 1));
// cout << objIndex << endl;
float tl_x = detectionMat.at(i, 3) * frame.cols;
float tl_y = detectionMat.at(i, 4) * frame.rows;
float br_x = detectionMat.at(i, 5) * frame.cols;
float br_y = detectionMat.at(i, 6) * frame.rows;
Rect object_box((int)tl_x, (int)tl_y, (int)(br_x - tl_x), (int)(br_y - tl_y));
rectangle(frame, object_box, Scalar(0, 0, 255), 2, 8, 0);
// cout << objNames[objIndex].c_str() << endl;
// putText(frame, format("%s", objNames[objIndex].c_str()),Point(tl_x, tl_y), FONT_HERSHEY_PLAIN, 1.0, Scalar(255, 0, 0), 2);
}
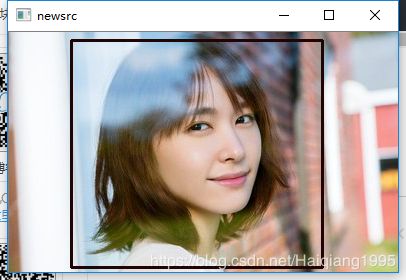
} 检测图像:
源代码:https://github.com/haiqiang2017/open-dnn