仿美团的下拉筛选菜单
项目下载
项目在GitHub上的地址:
https://github.com/Hebin320/DropDownMenu
项目在CSDN上的下载地址:
http://download.csdn.net/detail/hebin320320/9716576
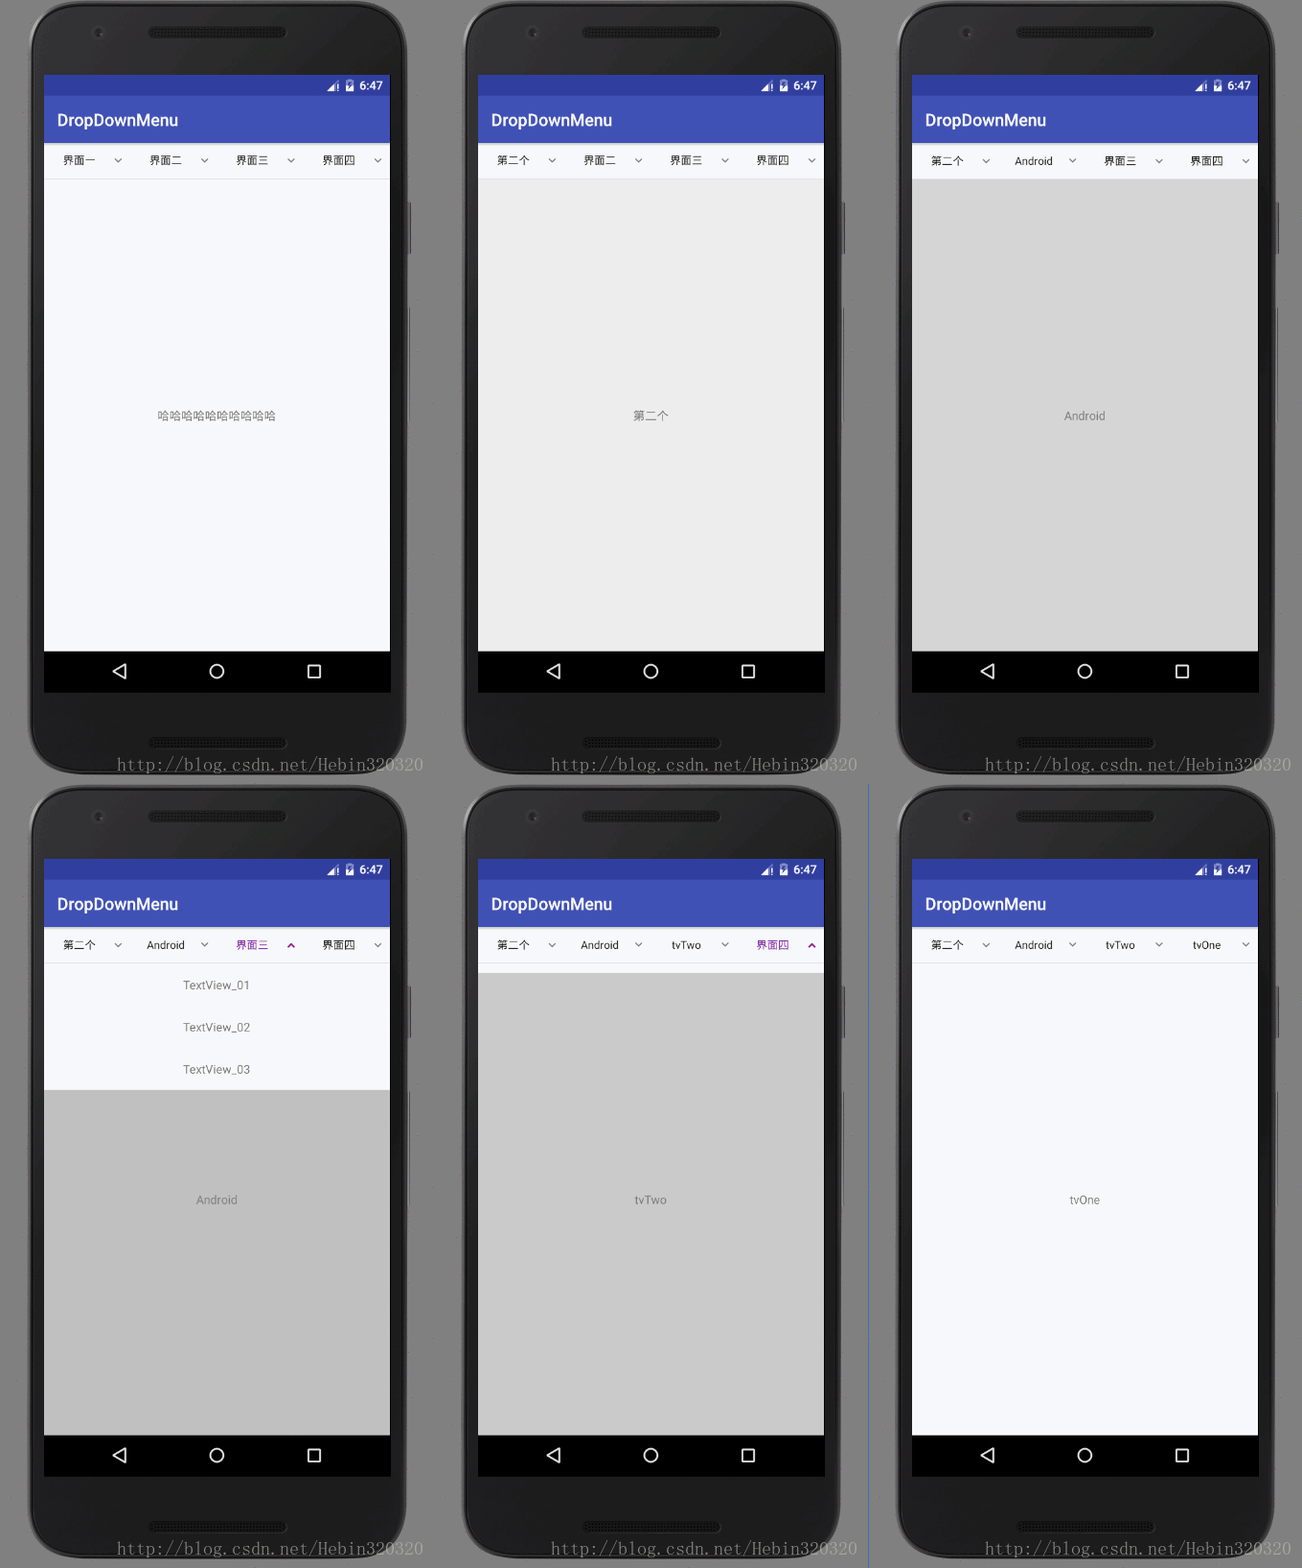
项目预览图
DropDownMenu介绍与使用
这个项目是对开源项目DropDownMenu的在实际项目中的应用。在这个项目中,实现了用自定义view和fragment两种方式完成了对DropDownMenu的使用,一个view独立成一个类,通过接口的方式供Activity调用,同时解决了复用自定义view的问题。通过这个项目,可以能够很清楚地搭建一个下拉筛选框,不仅能供多个Activity使用同一个view,而且还大大减少了Activity中的代码量。
DropDownMenu在github上的地址:
https://github.com/fg2q1q3q/DropDownMenu
项目使用
Gradle
在project 中build.gradle下增加:
  allprojects {
        repositories {
            ...
            maven { url "https://jitpack.io" }
        }
    }
在app module中增加:
  dependencies {
            compile 'com.github.fg2q1q3q:DropDownMenu:1.1.1'
    }
layout
.zxl.library.DropDownMenu
    android:id="@+id/dropDownMenu"
    android:layout_width="match_parent"
    android:layout_height="match_parent"
    app:ddmenuTextSize="13sp" //tab字体大小
    app:ddtextUnselectedColor="@color/drop_down_unselected" //tab未选中颜色
    app:ddtextSelectedColor="@color/drop_down_selected" //tab选中颜色
    app:ddmenuSelectedIcon="@mipmap/drop_down_selected_icon" //tab选中状态图标
    app:ddmenuUnselectedIcon="@mipmap/drop_down_unselected_icon"//tab未选中状态图标
    app:ddmaskColor="@color/mask_color"     //遮罩颜色,一般是半透明
    app:ddmenuBackgroundColor="@color/white" //tab 背景颜色
    app:ddmenuMaxHeight="280dp"//筛选菜单最大高度,默认为wrap
    app:ddneedSetSlectedColor="true"//设置选中option后tab是否改变颜色
    ...
 />
注意:DropDownMenu高度必须是match_parent,否则动画效果会出现问题
Activity中,除了下拉筛选框之外,还有它的主体内容,一般情况下是个列表;这里需要说明的是,主体内容的控件不是写在DropDownMenu的下方,而是通过view的形式,设置给DropDownMenu。
所以,新建一个xml,名字为activity_main_view,里面就放了个TextView,用来显示筛选框选中的文字,代码如下:
<LinearLayout xmlns:android="http://schemas.android.com/apk/res/android"
    android:layout_width="match_parent"
    android:layout_height="match_parent"
    android:background="@color/white"
    android:orientation="vertical"
    android:layout_gravity="center"
    >

    <TextView
        android:id="@+id/tv_text"
        android:layout_width="match_parent"
        android:layout_height="match_parent"
        android:text="哈哈哈哈哈哈哈哈哈哈"
        android:gravity="center"
        />


LinearLayout>
从预览图可以看出,筛选框里面有四个界面,前两个界面是用实例化xml的方式来实现界面内容的自定义,后两个界面用Fragment的方式实现的;前两个界面的实现方式是一样的,后两个界面实现了给Fragment传参从而显示不同的内容。
第一个界面的xml,layout_first,界面只有两个按钮,实现点击改变Activity中文本框的文本;代码如下:
"http://schemas.android.com/apk/res/android"
    android:layout_width="match_parent"
    android:layout_height="match_parent"
    android:background="@color/white"
    android:orientation="horizontal"
    android:layout_gravity="center"
    >

    "@+id/btn_one"
        android:layout_width="wrap_content"
        android:layout_height="wrap_content"
        android:layout_margin="10dp"
        android:background="@color/colorPrimary"
        android:gravity="center"
        android:padding="8dp"
        android:text="第一个"
        android:textColor="@color/white"
        android:textSize="16sp" />
    "@+id/btn_two"
        android:layout_width="wrap_content"
        android:layout_height="wrap_content"
        android:layout_margin="10dp"
        android:background="@drawable/ok_bg"
        android:gravity="center"
        android:padding="8dp"
        android:text="第二个"
        android:textColor="@color/white"
        android:textSize="16sp" />

</LinearLayout>
新建一个类,名字叫做FirstView.class,实例化xml,并对相应的控件做相应的操作,代码如下:
class FirstView {

    private Context context;
    private MyItemClickListener listener;

    FirstView(Context context) {
        this.context = context;
    }

    /**
    *  供Activity调用的方法 ,将选择的值传给Activity
    * */
    void setListener(MyItemClickListener listener) {
        this.listener = listener;
    }

    View firstView() {
        View view = LayoutInflater.from(context).inflate(R.layout.layout_first, null);
        TextView tvBtnOne = (TextView) view.findViewById(R.id.btn_one);
        TextView tvBtnTwo = (TextView) view.findViewById(R.id.btn_two);
        tvBtnOne.setOnClickListener(new mClick("第一个"));
        tvBtnTwo.setOnClickListener(new mClick("第二个"));
        return view;
    }

    private class mClick implements View.OnClickListener {

        String string;

        private mClick(String string) {
            this.string = string;
        }

        @Override
        public void onClick(View v) {
            listener.onItemClick(v, 1, string);
        }
    }

}
然后,新建一个Fragment,ThirdView.class,xml中是三个文本框,Fragment的代码如下:
public class ThirdView extends Fragment {

    @InjectView(R.id.tv_01)
    TextView tv01;
    @InjectView(R.id.tv_02)
    TextView tv02;
    @InjectView(R.id.tv_03)
    TextView tv03;

    MyItemClickListener listener;

    public void setListener(MyItemClickListener listener) {
        this.listener = listener;
    }

    @Override
    public View onCreateView(LayoutInflater inflater, ViewGroup container,
                             Bundle savedInstanceState) {
        View view = inflater.inflate(R.layout.fragment_third_view, container, false);
        ButterKnife.inject(this, view);
        return view;
    }

    @Override
    public void onDestroyView() {
        super.onDestroyView();
        ButterKnife.reset(this);
    }
   /**
    * 通过这个方法,可以实现Fragment的复用
    * */
    public void setDifferentUse(String tag){
        switch (tag){
            case "four":
                tv01.setText("复用界面的第一个文本");
                tv02.setText("复用界面的第二个文本");
                tv03.setText("复用界面的第三个文本");
                break;
            default:
                break;
        }
    }

    @OnClick({R.id.tv_01, R.id.tv_02, R.id.tv_03})
    public void onClick(View view) {
        switch (view.getId()) {
            case R.id.tv_01:
                listener.onItemClick(view,3,"tvOne");
                break;
            case R.id.tv_02:
                listener.onItemClick(view,3,"tvTwo");
                break;
            case R.id.tv_03:
                listener.onItemClick(view,3,"tvThree");
                break;
        }
    }
}
然后在xml中引用Fragment,新建xml,名字为layout_third.xml,代码如下:
"http://schemas.android.com/apk/res/android"
    xmlns:tools="http://schemas.android.com/tools"
    android:id="@+id/fg_third"
    android:layout_width="match_parent"
    android:layout_height="match_parent"
    android:name="com.hebin.dropdownmenu.ThirdView"
    tools:layout="@layout/fragment_third_view" />
最后在Activity中,new 各个界面,然后设置给DropDownMenu,即可实现效果,代码如下:
public class MainActivity extends AppCompatActivity implements MyItemClickListener {

    @InjectView(R.id.dropDownMenu)
    DropDownMenu mDropDownMenu;


    private String headers[] = {"界面一", "界面二","界面三","界面四"};
    private List popupViews = new ArrayList<>();
    private TextView tvText;

    @Override
    protected void onCreate(Bundle savedInstanceState) {
        super.onCreate(savedInstanceState);
        setContentView(R.layout.activity_main);
        ButterKnife.inject(this);
        initView();
    }

    private void initView() {

        /**
         * 第一个界面
        * */
        FirstView firstView = new FirstView(MainActivity.this);
        firstView.setListener(this);
        popupViews.add(firstView.firstView());
        /**
        * 第二个界面
        * */
        SecView secView = new SecView(MainActivity.this);
        secView.setListener(this);
        popupViews.add(secView.secView());
        /**
        * 第三个界面
        * */
        View thirdView = LayoutInflater.from(MainActivity.this).inflate(R.layout.layout_third, null);
        ThirdView fragment = (ThirdView) getSupportFragmentManager().findFragmentById(R.id.fg_third);
        fragment.setListener(this);
        fragment.setDifferentUse("third");
        popupViews.add(thirdView);
        /**
        * 第四个界面
        * */
        View fourView = LayoutInflater.from(MainActivity.this).inflate(R.layout.layout_four, null);
        ThirdView fragment_01 = (ThirdView) getSupportFragmentManager().findFragmentById(R.id.fg_four);
        fragment_01.setListener(this);
        fragment_01.setDifferentUse("four");
        popupViews.add(fourView);

        /**
        * Dropdownmenu下面的主体部分
        * */
        View fifthView = LayoutInflater.from(MainActivity.this).inflate(R.layout.activity_main_view, null);
        tvText = (TextView) fifthView.findViewById(R.id.tv_text);
        mDropDownMenu.setDropDownMenu(Arrays.asList(headers), popupViews, fifthView);
    }

    @Override
    public void onBackPressed() {
        //退出activity前关闭菜单
        if (mDropDownMenu.isShowing()) {
            mDropDownMenu.closeMenu();
        } else {
            super.onBackPressed();
        }
    }


    /**
    * 每个界面中的控件的点击事件,点击将界面中的参数传给activity中调用
    * */
    @Override
    public void onItemClick(View view, int postion, String string) {
        switch (postion){
            case 1:
                mDropDownMenu.setTabText(string);
                mDropDownMenu.closeMenu();
                tvText.setText(string);
                break;
            case 2:
                mDropDownMenu.setTabText(string);
                mDropDownMenu.closeMenu();
                tvText.setText(string);
                break;
            case 3:
                mDropDownMenu.setTabText(string);
                mDropDownMenu.closeMenu();
                tvText.setText(string);
                break;
            default:
                break;
        }
    }
}
注意:第四个界面用的也是第三个界面的Fragment,但是不能用layout_third.xml这个布局,也不能用同一个id,所以新建一个layout_four.xml,里面内容跟layout_third.xml的一样,只不过换了个ID
