zabbix部署及监控
一 zabbix简介
一 Zabbix简介
基于Web界面的分布式系统监控的企业级开源软件。可以监控各种系统与设备,网络参数,保证服务器设备安全运营;提供灵活的通知机制。
二 Zabbix的特功能
1.特点
1)安装与配置简单
2)可视化web管理界面
3)免费开源
4)支持中文
5)自动发现网络设备和服务器
6)支持分布式监控,扩展性强
7)实时绘图
8)email报警通知
9)数据收集,支持snmp(包括trapping and polling ),IPMI,JMX,SSH,TELNET;
2.主要功能
CPU负荷、内存使用、磁盘使用、网络状况、端口监视、日志监控
三 Zabbix架构和逻辑图
zabbix进程:zabbix_agentd、zabbix_sender、zabbix_get、zabbix_server、zabbix_proxy(和zabbix_jave_gateway)
1.zabbix_agentd 客户端守护进程,收集客户端数据,如cpu负载、内存、磁盘等使用状况。
2.zabbix_sender zabbix工具,用于客户端发送数据给server或proxy.通常用于耗时比较长的检查。为防止zabbix超时,可以在脚本执行完成后通过sender主动提交数据。
3.zabbix_get zabbix工具,用于server或proxy获取客户端数据。(通常用于排错,如果server收不到客户端数据,可以使用zabbix_get获取数据来做故障排查)
4.zabbix_server 服务端守护进程。其他守护进程最后数据都要提交给zabbix_server
5.zabbix_proxy zabbix代理守护进程,类似中转站。
6.zabbix_java_gateway Java网关,类似agentd,但只能用于Java.
所以zabbix监控有两种模式:
server_agentd模式:简单,监控主机少。
server-proxy-agentd模式:监控主机多,减轻server压力。
四 zabbix重要术语
1.监控项(item):一个特定的监控指标的相关数据;这些数据来自被监控对象;item是zabbix收集数据的核心,相对监控对象,每个监控项都由“key”标识。
2.触发器(tirgger):一个表达式,通过设定阀值,判断监控对象特定item数据是否合理,合理“OK”,有问题“Problem”。
3.动作(active):主要用于处理错误进行远程操作和报警。
二 zabbix部署及监控实例
1.zabbix服务端部署
1.Zabbix环境搭建lamp
#安装httpdyum install httpd -ysystemctl enable httpdsystemctl start httpd#开启防火墙80端口firewall-cmd --permanent --add-port=80/tcpfirewall-cmd --reload
#安装mariadb数据库(mysql开源版)yum install mariadb mariadb-server -ysystemctl enable mariadb.servicesystemctl start mariadb.servicecp /usr/share/mysql/my-huge.cnf /etc/my.cnf#初始化数据库(输入密码后选项全选yes)mysql_secure_installation
#安装php- yum install php php-mysql php-gd libjpeg* php-ldap php-odbc php-pear php-xml php-xmlrpc php-mbstring php-bcmath php-mhash -y
#重启mariadb,httpdsystemctl restart mariadb.servicesystemctl restart httpd#编辑text.php文件测试网页
2.Zabbix安装
#登录数据库mysql -u root -p123456#创建zabbix数据库使用中文编码create database zabbix character set utf8;#赋予zbuser关于zabbix全部权限,并设置zbuser密码(自动创建用户)grant ALL on zabbix.* to zbuser@localhost identified by 'zbpass';flush privileges;exit
#创建zabbix用户(不可登录)useradd zabbix -M -s /bin/falsecd /usr/local/src/#下载zabbix源码包 (包中可设置安装服务(监控端)或客户端(被监控端))wget https://sourceforge.net/projects/zabbix/files/ZABBIX%20Latest%20Stable/3.2.4/zabbix-3.2.4.tar.gztar -zxvf zabbix-3.2.4.tar.gz#zabbix数据库导入 注意:顺序不可倒,会报错mysql -uroot -p123456 zabbixusr/local/src/zabbix-3.2.4/database/mysql/schema.sqlmysql -uroot -p123456 zabbixusr/local/src/zabbix-3.2.4/database/mysql/images.sqlmysql -uroot -p123456 zabbixusr/local/src/zabbix-3.2.4/database/mysql/data.sql#下载编译zabbix所需的库和文件yum install gcc make net-snmp-devel curl curl-devel mysql-devel -ycd /usr/local/src/zabbix-3.2.4#安装服务端,客户端,分布式监控服务 (测试主机,用zabbix对自身主机监控)(被检测的其它主机可以只安装agent)./configure --prefix=/usr/local/zabbix --enable-server --enable-agent --enable-proxy --with-net-snmp --with-libcurl --with-mysql=/usr/bin/mysql_configmake && make installln -s /usr/local/zabbix/sbin/* /usr/local/sbin/ln -s /usr/local/zabbix/bin/* /usr/local/bin/#修改服务端数据库相关信息vim /usr/local/zabbix/etc/zabbix_server.conf (可备份后使用 sed -ie '/^#/d;/^$/d' zabbix_server.conf去除注释和空行)LogFile=/tmp/zabbix_server.log #日志
DBName=zabbix #数据库databaseDBUser=zbuser #数据库用户DBPassword=zbpass #登录密码ListenIP=127.0.0.1 #数据库IPTimeout=4LogSlowQueries=3000
AlertScriptsPath=/usr/local/zabbix/share/zabbix/alertscripts #zabbix运行脚本存放目录-
- #客户端配置
vim /usr/local/zabbix/etc/zabbix_agentd.confLogFile=/tmp/zabbix_agentd.log #日志Server=127.0.0.1 #被动模式,允许那台服务器连接agentServerActive=127.0.0.1 #主动模式,主动向哪台服务器传送数据Hostname=Zabbix server
#注意:一个agent可同时向几个服务发送数据,分号隔开
#添加开机自启脚本cp /usr/local/src/zabbix-3.2.4/misc/init.d/fedora/core/zabbix_server /etc/rc.d/init.d/zabbix_server- cp /usr/local/src/zabbix-3.2.4/misc/init.d/fedora/core/zabbix_agentd /etc/rc.d/init.d/zabbix_agentd
- chmod +x /etc/rc.d/init.d/zabbix_server
chmod +x /etc/rc.d/init.d/zabbix_agentdchkconfig zabbix_server onchkconfig zabbix_agentd on
vim /etc/rc.d/init.d/zabbix_server#修改基础目录BASEDIR=/usr/local/zabbix
vim /etc/rc.d/init.d/zabbix_agentdBASEDIR=/usr/local/zabbix
#配置Web站点cp -r /usr/local/src/zabbix-3.2.4/frontends/php/ /var/www/html/zabbixchown apache.apache -R /var/www/html/zabbix/service zabbix_server restartservice zabbix_agentd restart- #可能会有个警告,按提示输入解决
-
- #配置php相关
- vim /etc/php.ini
- #修改以下参数值(不修改在网页配置安装时会有报错)
- date.timezone = /Asia/Shanghai
- post_max_size = 16M
- max_execution_time = 300
- max_input_time = 300
-
- systemctl restart httpd
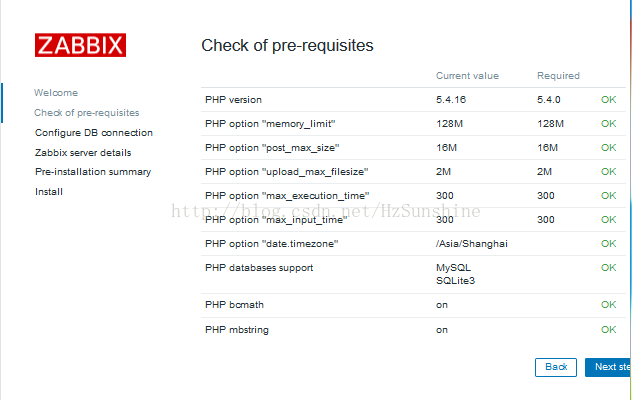
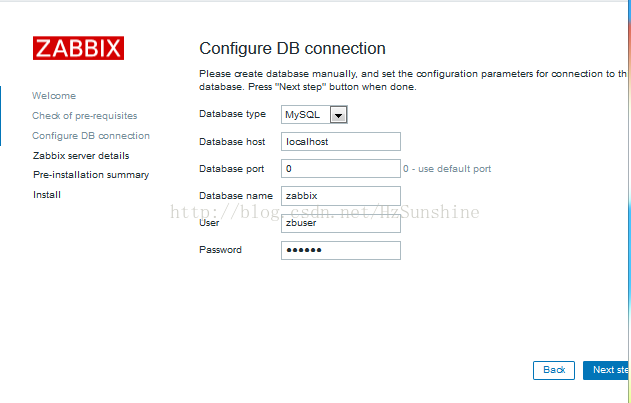
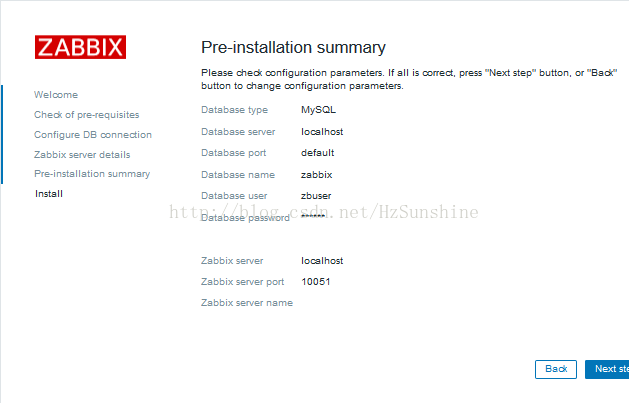
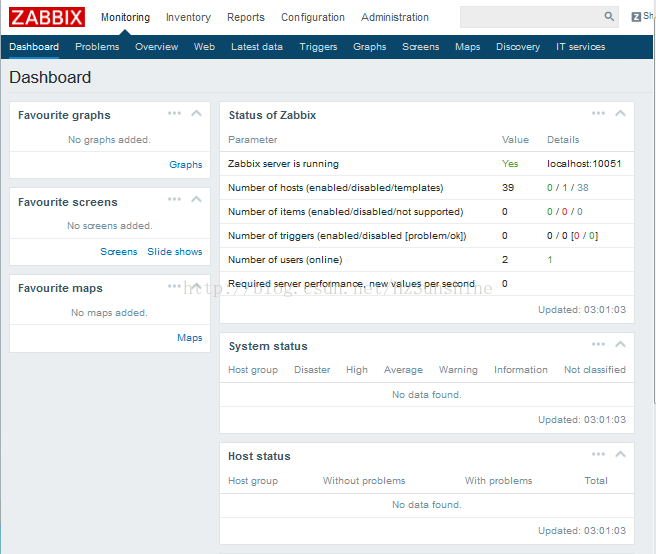
网页配置置安装zabbix服务端
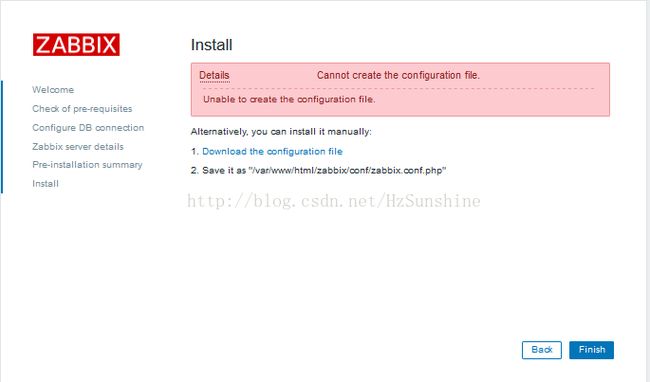
根据提示下载打开文档后复制写入上视文件中。(如果自动导入就不用了)
登录的管理员:
admin/zabbix
注:登录可能会有个错:zabbix server is running | No.
解决方法:
          #开启防火墙


          firewall-cmd --permanent --add-port=10051/tcp


          firewall-cmd --reload


          #设置selinux允许


          setsebool -P httpd_can_network_connect=on
点击右上方人管理源图像,可以设置中文。
2.zabbix客户端部署
#创建zabbix用户(不可登录)useradd zabbix -M -s /bin/falsecd /usr/local/src/#下载zabbix源码包 (包中可设置安装服务(监控端)或客户端(被监控端))wget https://sourceforge.net/projects/zabbix/files/ZABBIX%20Latest%20Stable/3.2.4/zabbix-3.2.4.tar.gztar -zxvf zabbix-3.2.4.tar.gz-
- cd /usr/local/src/zabbix-3.2.4
./configure --prefix=/usr/local/zabbix --enable-agentmake && make install
ln -s /usr/local/zabbix/sbin/* /usr/local/sbin/ln -s /usr/local/zabbix/bin/* /usr/local/bin/- #客户端配置
vim /usr/local/zabbix/etc/zabbix_agentd.confLogFile=/tmp/zabbix_agentd.log #日志Server=192.168.1.166 #被动模式,允许那台服务器连接agent ListenPort=10050 #监听端口
ServerActive=192.168.1.166 #主动模式,主动向哪台服务器传送数据Hostname=192.168.1.168
#注意:一个agent可同时向几个服务发送数据,分号隔开
#添加开机自启脚本- cp /usr/local/src/zabbix-3.2.4/misc/init.d/fedora/core/zabbix_agentd /etc/rc.d/init.d/zabbix_agentd
chmod +x /etc/rc.d/init.d/zabbix_agentdchkconfig zabbix_agentd on-
vim /etc/rc.d/init.d/zabbix_agentdBASEDIR=/usr/local/zabbix
service zabbix_agentd restart
firewall-cmd --permanent --add-port=10050/tcp
firewall-cmd --reload
三 zabbix_server配置监控(web页面操作)
1.监控os资源(内存,cpu,io,负载,带宽)
主机添加:配置->主机->创建主机(添加主机名等信息)->添加
链接模板:主机(刚新建服务名)->模版(选择Template OS Linux添加)->更新
观察图形:检测中->图形->选择主机和要观察图形
2.内存监控(自定义key)
1.Zabbix_agent操作
1.内存查看
[root@test2 ~]# cat /proc/meminfo | awk '/^MemTotal:/{print $2}'1001360[root@test2 ~]# cat /proc/meminfo | awk '/^MemFree:/{print $2}'630748[root@test2 ~]# cat /proc/meminfo | awk '/^Buffers:/{print $2}'948[root@test2 ~]# cat /proc/meminfo | awk '/^Cached:/{print $2}'111248
2.zabbix_agentd.conf添加(重启)
- vim /usr/local/zabbix/etc/zabbix_agentd.conf
- #格式:UserParameter=key,commod其中$1代表写入[*]的参数,$$2代表awk提取参数$2
UserParameter=memory.usage[*],/bin/cat /proc/meminfo | awk '/^$1:/{print $$2}'
2.zabbix_server操作
1.测试查看
[root@test1 ~]# zabbix_get -s 192.168.1.168 -k "memory.usage[MemTotal]"1001360[root@test1 ~]# zabbix_get -s 192.168.1.168 -k "memory.usage[MemFree]"624140[root@test1 ~]# zabbix_get -s 192.168.1.168 -k "memory.usage[Buffers]"948[root@test1 ~]# zabbix_get -s 192.168.1.168 -k "memory.usage[Cached]"115868
2.web页面配置
监控项配置:配置->主机->选择对应主机->监控项->创建监控项
图形设置:配置->主机->选择对应主机->图形->创建新图形
触发项设置:配置->主机->选择对应主机->触发项->创建新触发项
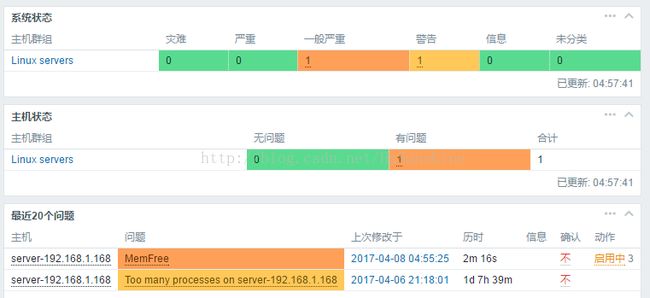
观察仪表板,发现出现一个一般严重问题。
3.mysql监测
1.Zabbix_agent操作
1.mysql添加权限用户
- grant all on *.* to zabbix@'localhost' identified by '12345';
flush priveges;
2.
zabbix_agent创建.my.cnf连接目录
[mysql]host=localhostuser=zabbixpassword=12345socket=/var/lib/mysql/mysql.sock[mysqladmin]host=localhostuser=zabbixpassword=12345socket=/var/lib/mysql/mysql.sock
3.配置mysql的key文件
#将msql的key从源码包中复制至zabbix_agent配置文件cp /usr/local/src/zabbix-3.2.4/conf/zabbix_agentd/userparameter_mysql.conf /usr/local/zabbix/etc/zabbix_agentd.conf.d/#编辑修改HOME路径(全修改3)sed -i 's#/var/lib/zabbix#/usr/loca/zabbix/etc#g' /usr/local/zabbix/etc/zabbix_agentd.conf.d/userparameter_mysql.conf#加载zabbix_agentd.conf.d目录配置文件echo "Include=/usr/local/zabbix/etc/zabbix_agentd.conf.d/" >>/usr/local/zabbix/etc/zabbix_agentd.conf
4.重启zabbix_agent
- service zabbix_agentd restart
2.zabbix_server操作
1.zabbix_server测试
zabbix_get -s 192.168.1.168 -p 10050 -k"mysql.status[Uptime]"
2.web页面配置(主机已经建过)
模版添加:配置->主机->选择主机->模板->添加模板
Template App MySQL
观察图形:
监测
中->图形->选择主机和要观察图形
4.nginx监控
1.Zabbix_agent操作
1.nginx配置开启监控模块(提前编译nginx_status模块)
              location /NginxStatus {


                  #启用StubStatus的工作访问状态


                  stub_status    on;


                  #指定StubStaus模块的访问日志文件


                  access_log     off;


                  #Nginx认证机制(需Apache的htpasswd命令生成)


                  #auth_basic    "NginxStatus";


                  #用来认证的密码文件


                  #auth_basic_user_file    ../htpasswd;


                  allow 127.0.0.1;


                  deny all;


              }
[root@test2 ~]# curl 192.168.1.168:80/NginxStatusActive connections: 1 server accepts handled requests 5 5 3 Reading: 0 Writing: 1 Waiting: 0
active connections – 活跃的连接数量server accepts handled requests — 总共处理了n个连接 , 成功创建n握手, 总共处理了n个请求reading — 读取客户端的连接数.writing — 响应数据到客户端的数量waiting — 开启 keep-alive 的情况下,这个值等于 active – (reading+writing), 意思就是 Nginx 已经处理完正在等候下一次请求指令的驻留连接.
2.nginx-status取值脚本(记得执行权限)
vim /usr/local/zabbix/nginx_status.sh#!/bin/bash-
host='127.0.0.1'port='80'status='/NginxStatus'active() { curl -s http://${host}:${port}${status} | awk '/^Active/{print $3}'}accepts() { curl -s http://${host}:${port}${status} | awk 'NR==3{print $1}'}handled() { curl -s http://${host}:${port}${status} | awk 'NR==3{print $2}'}requests() { curl -s http://${host}:${port}${status} | awk 'NR==3{print $3}'}reading() { curl -s http://${host}:${port}${status} | awk 'NR==4{print $2}'}writing() { curl -s http://${host}:${port}${status} | awk 'NR==4{print $4}'}waiting() { curl -s http://${host}:${port}${status} | awk 'NR==4{print $6}'}#调用上面函数- $1
3.zabbix_agent配置文件追加(重启)
vim /usr/local/zabbix/etc/zabbix_agentd.confUserParameter=nginx.status[*],/usr/local/zabbix/nginx_status.sh
$1
2.zabbix_server操作
1.zabbix_server测试
[root@test1 ~]# zabbix_get -s 192.168.1.168 -k "nginx.status[active]"1
2.web页面配置
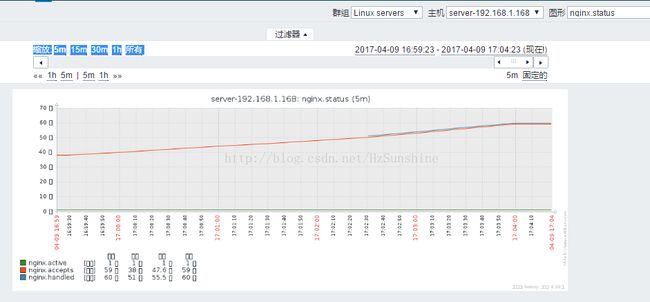
1.选择主机创建监控项(主机已添加)
三 zabbix报警(邮件和微信)
1.邮件报警设置
1.安装sendEmail邮件服务
#安装邮件cd /usr/local/srcwget http://caspian.dotconf.net/menu/Software/SendEmail/sendEmail-v1.56.tar.gztar -xzvf sendEmail-v1.56.tar.gz mv sendEmail-v1.56/sendEmail /usr/local/bin/chown zabbix:zabbix /usr/local/bin/sendEmail
#发送邮件测试/usr/local/bin/sendEmail \-f msun1996@163.com \-t msun1996@163.com \-s smtp.163.com \-u "hello" \-o message-content-type=html \-o message-charset=utf8 \-xu msun1996@163.com \-xp ****** \-m "hello"
2.创建报警脚本
cd /usr/local/zabbix/share/zabbix/alertscripts/vim mail.sh#!/bin/bashto=$1subject=$2body=$3/usr/local/bin/sendEmail -o tls=auto -f msun1996@163.com -t "$to" -s smtp.163.com -u "$subject" -o message-content-type=html -o message-charset=utf8 -xu msun1996@163.com -xp ****** -m "$body"chmod +x mail.sh#邮件脚本测试./mail.sh msun1996@163.com hello hellword
3.web界面添加报警媒介
报警媒介设置:管理->报警媒介类型->新建(如图)
({ALERT.SENDTO},{ALERT.SUBJECT},{ALERT.MESSAGE})
4.动作执行
配置->动作->创建动作->动作(名称写入)->操作->操作 新的(添加发送消息到用户添加(Admin))->恢复操作->操作 新的(添加发送到用户添加(Admin))(动作操作里也可设置执行命令,试图进行恢复)
5.测试
停用客户端的zabbix_agent测试,观察报表里的动作日志,查看邮件是否接收。
- service zabbix_agentd stop
2.微信报警设置 (参考http://www.cnyunwei.com/thread-29593-1-1.html)
1.注册企业号(https://qy.weixin.qq.com)
2.新建部门和成员(查看部门ID)
3.新建应用,用于报警的机器人(查看应用ID)
4.新建管理组(有读取运维报警组通讯录权限,对报警机器人应用有权限)(关注CorpID和Secret信息)
5.shell脚本调用微信接口
cd /usr/local/zabbix/share/zabbix/alertscripts/vim weixin.sh
- #!/bin/bash
- #send message from weixin for zabbix monitor
- #传递三参数 $1消息接收帐号 $2报警标题 $3报警内容
-
CorpID='wx118bf3a3202f9fa3' #你的corpID-
Secret='WRK9WJ_sTMQlqnup3Aolp8PPz4p4Pk99K9LwG-6oSdyGbgQI9mJIWrxo0qcDnZSk' #你的secretGURL="https://qyapi.weixin.qq.com/cgi-bin/gettoken?corpid=$CorpID&corpsecret=$Secret"Gtoken=$(/usr/bin/curl -s -G $GURL | awk -F\" '{print $4}') PURL="https://qyapi.weixin.qq.com/cgi-bin/message/send?access_token=$Gtoken" function body() {local int AppID=1 #企业号应用IDlocal UserID=$1 #部门成员IDzabbix中微信的接收者(可不设置,不设置则发送到部门)local PartyID=2 #部门ID.定义范围后,组成员都可接收消息local Msg=$(echo "$@" | cut -d" " -f3-) #过滤出zabbix中传递三参数printf '{\n'printf '\t"touser": "'"$UserID"\"",\n"printf '\t"toparty": "'"$PartyID"\"",\n"printf '\t"msgtype": "text",\n' #消息类型(必须项)printf '\t"agentid": "'" $AppID "\"",\n" #企业号应用ID(必须项)printf '\t"text": {\n'printf '\t\t"content": "'"$Msg"\""\n" #传递的消息(必须项)printf '\t},\n'printf '\t"safe":"0"\n'printf '}\n'}/usr/bin/curl --data-ascii "$(body $1 $2 $3)" $PURL
chown zabbix.zabbix weixin.sh chmod +x weixin.sh
7.报警媒介设置
报警媒介设置:管理->报警媒介类型->新建
({ALERT.SENDTO},{ALERT.SUBJECT},{ALERT.MESSAGE})
报警媒介关联用户:管理->用户->选择用户(Admin)->媒介->添加
8.动作执行
配置->动作->创建动作->动作(名称写入)->操作->操作 新的(添加发送消息到用户添加(Admin))->恢复操作->操作 新的(添加发送到用户添加(Admin))(动作操作里也可设置执行命令,试图进行恢复)
9.测试
停用客户端的zabbix_agent测试,观察报表里的动作日志,查看微信是否接收。
- service zabbix_agentd stop
三 zabbix Agent自动注册
一 Zabbix Server配置
(IP:192.168.1.199 在(二)中以配置完成)
1.创建Host Group
Configuration->Host Groups菜单右上测Create host Group按钮。创建Agent Auto Register。添加模版。
2.添加自动操作规则
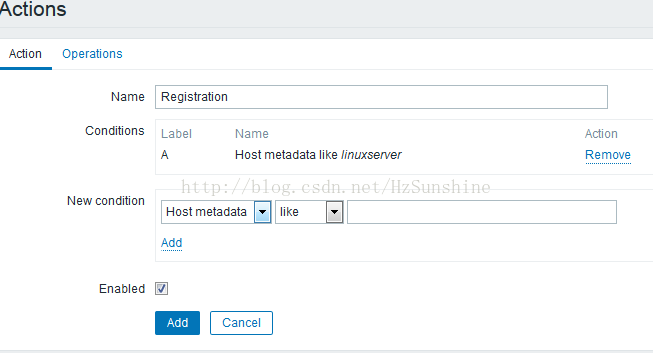
Configuration->Actions 菜单的最右边,选择下拉框Event Source中Auto registration,Create action.
Host metadata 配置为linuxserver,(客户端来注册时,匹配客户端的HostMetadata复制,如果匹配成功,则触发自动注册规则)。
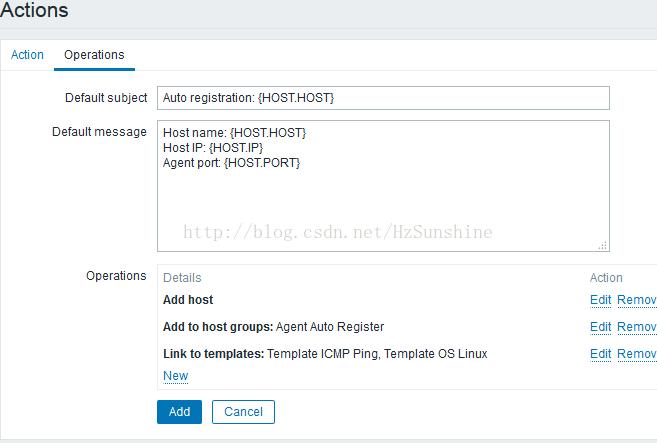
添加执行以下,1.添加主机;2添加主机到Agent Auto Resister分组;3.应用模版选择。
OK!!!现在server端就OK了。
二 客户端安装zabbix agent(192.168.1.166)(参考上)
三 监控主机观察
学习参考博客: http://zhang789.blog.51cto.com/11045979/1868880
学习参考博客:http://www.osyunwei.com/archives/7984.html


