springCloud踩坑系列-Eureka-单节点服务端
1.继承springboot,依赖eurekaServer
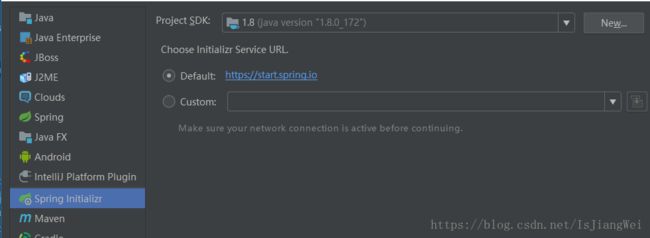
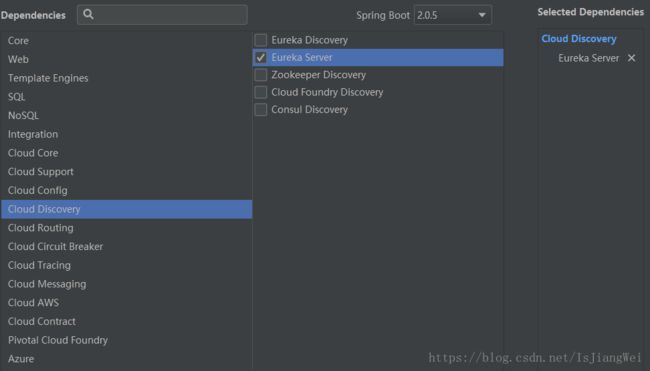
使用idea自带的初始化工具创建springboot项目,并且添加eurekaServer依赖.如图:


或者直接创建maven项目,这里因为是springcloud踩坑项目,因此新建了一个父工程:spring-cloud,其pom文件如下:
    4.0.0

    com.vj.study
    spring-cloud
    0.0.1-SNAPSHOT

        eureka-server1

    pom

    spring-cloud
    Study project for Spring Cloud


        org.springframework.boot
        spring-boot-starter-parent
        2.0.5.RELEASE


        UTF-8
        UTF-8
        1.8
        Finchley.SR1


                org.springframework.cloud
                spring-cloud-dependencies
                ${spring-cloud.version}
                pom
                import


                org.springframework.boot
                spring-boot-maven-plugin
创建子项目:eureka-server1,其pom文件如下:
        spring-cloud
        com.vj.study
        0.0.1-SNAPSHOT

    4.0.0

    eureka-server1
    jar

    eureka-server1
    Eureka project for Spring Boot


            org.springframework.cloud
            spring-cloud-starter-netflix-eureka-server


            org.springframework.boot
            spring-boot-starter-test
            test
2.修改hosts
127.0.0.1       server1
127.0.0.1       server2
127.0.0.1       server3
127.0.0.1       server4
127.0.0.1       server5
127.0.0.1       server6
127.0.0.1       server7
127.0.0.1       server8
127.0.0.1       server9
127.0.0.1       server10
这里需要注意,当我们的eureka服务部署高可用模式的时候,如果在同一台机测试或者多台服务器但没有不同域名的时候,需要对hostname以及prefer-ip-address进行配置(见下篇文章springCloud踩坑系列-Eureka-构建高可用服务注册中心),但当我在网上找答案的时候得到的解答基本没有完全解释这个问题,这也是本系列文章的由来,对得到的解答进行整合以及给出一些自己的看法.
3.创建配置文件: application.yml
server:
  port: 6021                    # 指定该Eureka实例的端口
spring:
  application:
    name: vjEurekaServer
#  cloud:
#    inetutils:
#      ignoredInterfaces:
#        - VMware Network Adapter VMnet1
#        - VMware Network Adapter VMnet8
#      default-ip-address: 192.168.3.115
#      preferredNetworks: 192.168.3


eureka:
  environment: dev
  instance:
    appname: ${spring.application.name}
#    hostname: ${spring.cloud.client.ipAddress}        # 指定该Eureka实例的主机名
    hostname: server1        # 指定该Eureka实例的主机名
#    ip-address: 192.168.3.115      # 指定该Eureka实例的IP
    prefer-ip-address: false     # 使用IP注册
#    prefer-ip-address: true     # 使用IP注册
    instanceId: ${eureka.instance.hostname}:${server.port}
#    instanceId: ${spring.cloud.client.ipAddress}:${server.port}
  client:
    register-with-eureka: false
    fetch-registry: false
    serviceUrl:
      defaultZone: http://${eureka.instance.hostname}:${server.port}/eureka/  #指定默认注册中心,eureka服务也是微服务体系中的一个,因此也需要进行服务发现与治理,这里指向自身.
# 参考文档:http://projects.spring.io/spring-cloud/docs/1.0.3/spring-cloud.html#_standalone_mode
4.新建启动类
新建一个java class : EurekaServerApplication.java,代码如下:
package com.vj.study.eurekaserver1;

import org.springframework.boot.SpringApplication;
import org.springframework.boot.autoconfigure.SpringBootApplication;
import org.springframework.cloud.netflix.eureka.server.EnableEurekaServer;

@SpringBootApplication
@EnableEurekaServer
public class EurekaServerApplication {

    public static void main(String[] args) {
        SpringApplication.run(EurekaServerApplication.class, args);
    }
}
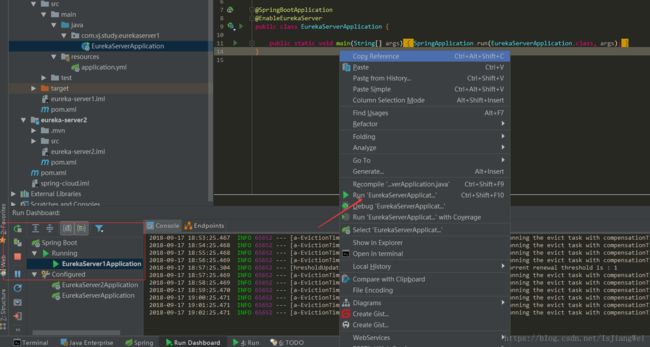
推荐使用idea的runDashbord,仪表盘,专为springboot打造的运行入口,哈哈.
5.访问eureka服务,查看节点状态
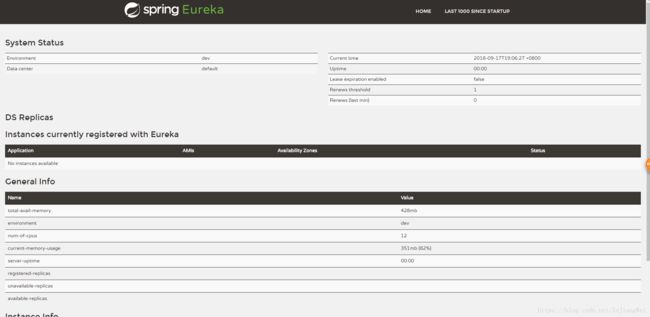
打开浏览器,访问http://server1:6021/, 由于之前配置了hosts,此处使用server即可访问,出来的界面如下:

在此我们已经成功创建了第一个eureka服务端,接下来我们构建高可用的eureka服务注册中心并且使用feign进行服务之间的调用.
