小程序开发--表格table的实现
表格table的实现
Github:https://github.com/tomsiebel/MGTableView--MiniProgram
Gitee:https://gitee.com/siebel/MGTableView--MiniProgram

说表格前先说下 列表渲染wx:for及block
wx:for
在组件上使用 wx:for 控制属性绑定一个数组,即可使用数组中各项的数据重复渲染该组件。
默认数组的当前项的下标变量名默认为 index,数组当前项的变量名默认为 item
示例代码1
index.wxml
{{item}}
index.js
// index.js
Page({
  data: {
    array: [1, 2, 3, 4, 5]
  }
})
打印结果
1
2
3
4
5
示例代码2
index.wxml
{{index}}: {{item.message}}
index.js
// index.js
Page({
  data: {
    array: [{
      message: 'foo',
    }, {
      message: 'bar'
    }]
  }
})
打印结果
0:foo
1:bar
注:item为数组当前元素的变量名,可以通过wx:for-item制定变量名
列表渲染属性
- wx:for-item 可以指定数组当前元素的变量名
- wx:for-index 可以指定数组当前下标的变量名
- wx:key 指定列表中项目的唯一的标识符
wx:for-item
wx:for-item指 定数组当前元素的变量名,默认item
如wx:for-item="itemName",则下面的循环变量名itemName,
wx:for-index
wx:for-index 可以指定数组当前下标的变量名,默认index, 下标的值为从0递增,即第一个元素为index=0
如wx:for-index="idx",则下面的循环数组的下标名变为idx 即第一个元素变为idx=0
示例代码
index.wxml
{{idx}}: {{itemName.message}}
index.js
// index.js
Page({
  data: {
    array: [{
      message: 'foo',
    }, {
      message: 'bar'
    }]
  }
})
打印结果
0:foo
1:bar
wx:key
如果列表中项目的位置会动态改变或者有新的项目添加到列表中,并且希望列表中的项目保持自己的特征和状态(如 中的输入内容, 的选中状态),需要使用 wx:key 来指定列表中项目的唯一的标识符。
wx:key 的值以两种形式提供
1. 字符串,代表在 for 循环的 array(数组) 中 item 的某个 property(属性),该 property 的值需要是列表中唯一的字符串或数字,且不能动态改变。
2.保留关键字 *this 代表在 for 循环中的 item 本身,这种表示需要 item 本身是一个唯一的字符串或者数字
如:
当数据改变触发渲染层重新渲染的时候,会校正带有 key 的组件,框架会确保他们被重新排序,而不是重新创建,以确保使组件保持自身的状态,并且提高列表渲染时的效率。
### 如不提供 wx:key,会报一个 warning, 如果明确知道该列表是静态,或者不必关注其顺序,可以选择忽略。
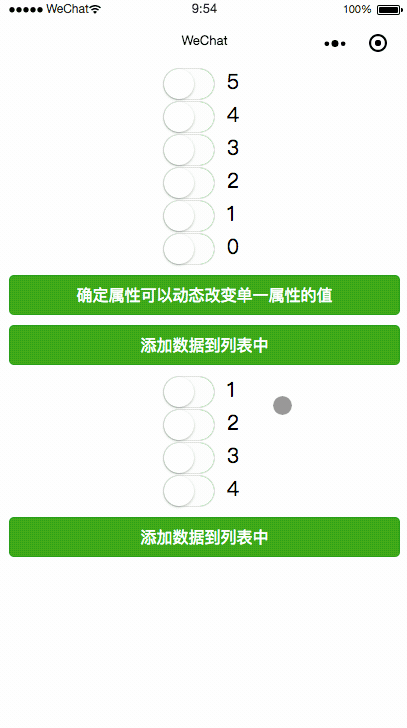
示例代码
效果展示
index.wxml
{{item.id}}
{{item}}
index.wxss
/**index.wxss**/
switch{
  margin-left: 300rpx;
}
button{
  margin: 20rpx;
  font-size: 30rpx;
}
index.js
// index.js
Page({
  data: {
    objectArray: [
      { id: 5, unique: 'unique_5' },
      { id: 4, unique: 'unique_4' },
      { id: 3, unique: 'unique_3' },
      { id: 2, unique: 'unique_2' },
      { id: 1, unique: 'unique_1' },
      { id: 0, unique: 'unique_0' },
    ],
    numberArray: [1, 2, 3, 4]
  },
  //确定属性可以动态改变单一属性的值
  switchClick(e) {
    const length = this.data.objectArray.length
    for (let i = 0; i < length; ++i) {
      const x = Math.floor(Math.random() * length)
      const y = Math.floor(Math.random() * length)
      const temp = this.data.objectArray[x]
      this.data.objectArray[x] = this.data.objectArray[y]
      this.data.objectArray[y] = temp
    }
    this.setData({
      objectArray: this.data.objectArray
    })
  },
  //添加数据到列表中
  addToFront(e) {
    const length = this.data.objectArray.length
    this.data.objectArray = [{ id: length, unique: 'unique_' + length }].concat(this.data.objectArray)
    this.setData({
      objectArray: this.data.objectArray
    })
  },
  //添加数据到列表中
  addNumberToFront(e) {
    this.data.numberArray = [this.data.numberArray.length + 1].concat(this.data.numberArray)
    this.setData({
      numberArray: this.data.numberArray
    })
  }
})
注:
(1)当 wx:for 的值为字符串时,会将字符串解析成字符串数组
等同于
(2)花括号和引号之间如果有空格,将最终被解析成为字符串
等同于
block
在条件渲染中block wx:if
因为 wx:if 是一个控制属性,需要将它添加到一个标签上。如果要一次性判断多个组件标签,可以使用一个 标签将多个组件包装起来,并在上边使用 wx:if 控制属性。
  view1
  view2
在列表渲染中 block wx:for
类似 block wx:if,也可以将 wx:for 用在标签上,以渲染一个包含多节点的结构块。例如:
index.wxml
  {{index}}:
  {{item}}
注意: 并不是一个组件,它仅仅是一个包装元素,不会在页面中做任何渲染,只接受控制属性。
下面回归正题如何写一个你想要的表格
知道了列表渲染wx:for 后其实表格只是css位置排序和添加竖线的问题
首先我画两条垂直的线

之后每添加一组数据只需要画出数据的下边缘和右边缘即可

下面我们上代码
示例代码
效果展示

代码
index.wxml
表格模板


    日期
    时间
    工作内容


      {{work.date}}
      {{work.time}}
      {{work.content}}
index.wxss
/**index.wxss**/
.title{
  width: 100%;
  text-align: center;
  font-size: 50rpx;
  font-weight: 900
}
.tableView{
  border:1px solid #000;
  border-right:0;
  border-bottom: 0;
  width: 98%;
  margin-left: 1%;
}
/* 表头 */
.table_header{
  display: flex;
  justify-content: space-between; /* 项目位于各行之间留有空白的容器内。 */
  background-color: #fffb00;
  width: 100%;
  font-size: 35rpx;
  color: #330e0e;
  text-align: center;
  font-weight: 900;
}
.th{
  display: flex;
  align-items: center;
  justify-content: center;
  height: 80rpx;
  border-bottom: 1px solid #000;
  border-right: 1px solid #000;
}
.th1,.th2{
  width: 20%
}
.th3{
  width: 60%
}
/* 表格cell */
.table_cell{
  display: flex;
  justify-content: space-between; /* 项目位于各行之间留有空白的容器内。 */
  width: 100%;
  font-size: 25rpx;
  color: #330e0e;
  text-align: center;
}
.td{
  display: flex;
  align-items: center;
  justify-content: center;
  height: 60rpx;
  border-bottom: 1px solid #000;
  border-right: 1px solid #000;

}
.td1,.td2{
  width: 20%
}
.td3{
  width: 60%
}
index.js
// index.js
Page({
  data: {
    listData: [
      { "date": "2019/01/01", "time": "9:00", "content": "工作内容1" },
      { "date": "2019/01/01", "time": "10:30", "content": "工作内容2" },
      { "date": "2019/01/01", "time": "12:00", "content": "工作内容3" },
      { "date": "2019/01/01", "time": "2:30", "content": "工作内容4" },
      { "date": "2019/01/01", "time": "3:30", "content": "工作内容5" },
      { "date": "2019/01/01", "time": "4:00", "content": "工作内容6" },
      { "date": "2019/01/01", "time": "5:00", "content": "工作内容7" },
      { "date": "2019/01/02", "time": "9:00", "content": "工作内容1" },
      { "date": "2019/01/02", "time": "10:30", "content": "工作内容2" },
      { "date": "2019/01/02", "time": "12:00", "content": "工作内容3" },
      { "date": "2019/01/02", "time": "2:30", "content": "工作内容4" },
      { "date": "2019/01/02", "time": "3:30", "content": "工作内容5" },
      { "date": "2019/01/02", "time": "4:00", "content": "工作内容6" },
      { "date": "2019/01/02", "time": "5:00", "content": "工作内容7" }
    ]
  },
  onLoad: function () {
    console.log('onLoad')
  }
})
附表格demo:
Github :https://github.com/tomsiebel/MGTableView--MiniProgram
Gitee :https://gitee.com/siebel/MGTableView--MiniProgram
CSDN: https://download.csdn.net/download/jackjia2015/11006399