Springboot项目与vue项目整合打包
.为什么需要前后端项目开发时分离,部署时合并?
在一些公司,部署实施人员的技术无法和互联网公司的运维团队相比,由于各种不定的环境也无法做到自动构建,容器化部署等。因此在这种情况下尽量减少部署时的服务软件需求,打出的包数量也尽量少。针对这种情况这里采用的在开发中做到前后端独立开发,打包时在后端springboot打包发布时将前端的构建输出一起打入,最后只需部署springboot的项目即可,无需再安装nginx服务器
后端:
准备工作:
- 安装JDK
- 配置环境变量
- 安装IDEA
一. 在IDEA中新建SpringBoot项目 - 点击File -> new -> Project
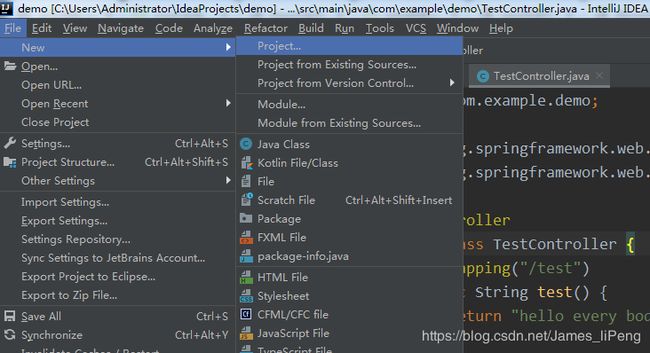
然后选择Spring initializr, 之后选择自己的JDK, 我测试安装的是12.0版本, 一般开发使用的是1.8稳定版
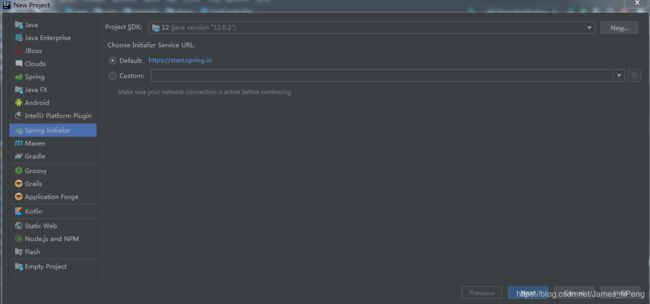
选择好相应的JDK之后点击next, 根据个人需求进行相应的修改, 然后next
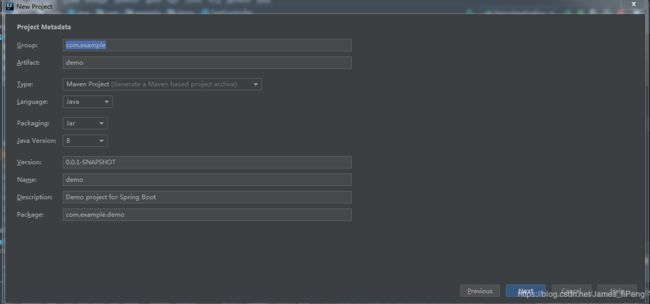
然后选择web -> Spring Web Starter, 我的IDEA 版本高一点, 低版本的是 Web -> Web

然后next, 修改自己的项目名和相应的根目录

然后点击finish, 可以看到目录结构如下图
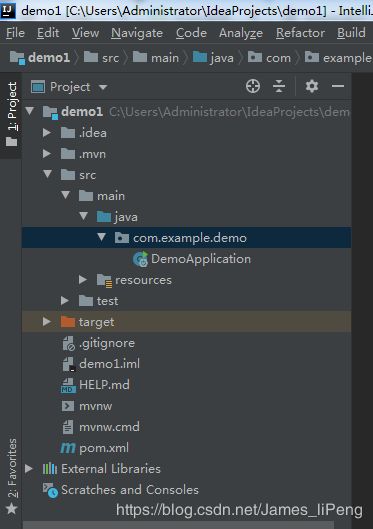
然后启动是会报错的, 提示我们和maven相关的信息,
是说明我们没有maven import

import maven 之后再运行
打开localhost:8080 之后

会出现这样的界面, 那是因为我们没有controller 可以去执行
我们新建一个controller

然后重新运行, 再浏览器访问

前端:
然后是前端使用vue-cli构建前端
项目搭建在我的这篇博客里
使用vue-cli构建项目前端
项目打包, 点击IDEA的右侧, 如图所示, 点击install

引入axios
npm install axios --save
在 main.js 中引入 axios
这时候如果在其它的组件中,是无法使用 axios 命令的。所以我们将 axios 改写为 Vue 的原型属性
Vue.prototype.$axios = axios;
然后在需要调用接口的地方调用
    this.$axios({
      method: 'get',
      url: 'http://localhost:8080/test',
      data: {}
    }).then((response) => { // 这里使用了ES6的语法
      this.responseMessage = response
      console.log('success', response) // 请求成功返回的数据
    }).catch((error) => {
      console.log(error) // 请求失败返回的数据
    })
然后运行
npm run build
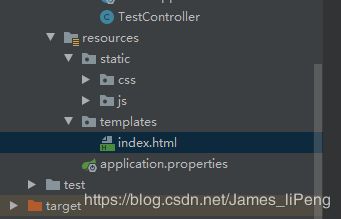
打包前端项目, 然后将打包好的dist文件 中的static文件覆盖后端项目的resources -> static,
index.hml放到templates中
springboot中使用thymeleaf模板访问html页面
在传统的web开发中通常使用jsp页面,首先需要在pom文件中引入springmvc相关的包,然后写springmvc的配置文件(包括访问资源的路径解析),之后还需再web.xml中配置访问路由。这无疑太麻烦了,每次开发前都需要编写大量的配置文件。
springboot为此提供了高效便捷的解决方案,只需再pom.xml中添加web开发的依赖,便可进行web开发,省去了繁琐的配置步骤。
下面为web开发引入的依赖
- 在pom.xml文件中添加thymeleaf依赖
            org.springframework.boot
            spring-boot-starter-web


            org.springframework.boot
            spring-boot-starter-test
            test


            org.springframework.boot
            spring-boot-starter-thymeleaf
在application.xml中添加访问请求配置(也可以是application.yml文件,个人习惯)
添加controller
package com.example.demo.controller;

import org.springframework.stereotype.Controller;
import org.springframework.web.bind.annotation.GetMapping;
import org.springframework.web.bind.annotation.RequestMapping;
import org.springframework.web.bind.annotation.RestController;

@Controller
@RequestMapping("/TestDemo")
public class IndexController {
   @RequestMapping("Index")
    public String demo() {
        return "index"; // 地址指向index.hml
    }
}
注意:不要使用@RestController注解,@RestController注解是@ResponseBody和@Controller的集合体,使用@RestController注解会默认返回数据,而不会请求到页面。
application.properties添加如下配置:
# 定位模板的目录
spring.mvc.view.prefix=classpath:/templates/
# 给返回的页面添加后缀名
spring.mvc.view.suffix=.html
注意:
spring boot默认开启了静态文件的配置,任何放在static文件夹下的资源都是静态文件。引用静态文件时以/或者前缀不加任何定位符,都会去static文件夹下查找。
Thymeleaf模版默认会使用templates作为视图文件下
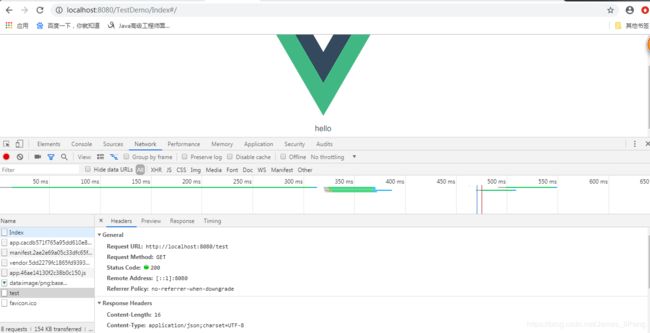
然后请求界面, 看到如上图所示就是请求成功
如果在启动的过程中

因为spring boot static路径下的文件可以直接/ 访问, 不需要加static前缀
找到index.html 文件将/static 去掉, 重新运行

然后这个项目打包发布
点击IDEA右侧的maven -> lifecycle ->install

打包成功之后再 target目录下的jar文件就是我们要的jar文件
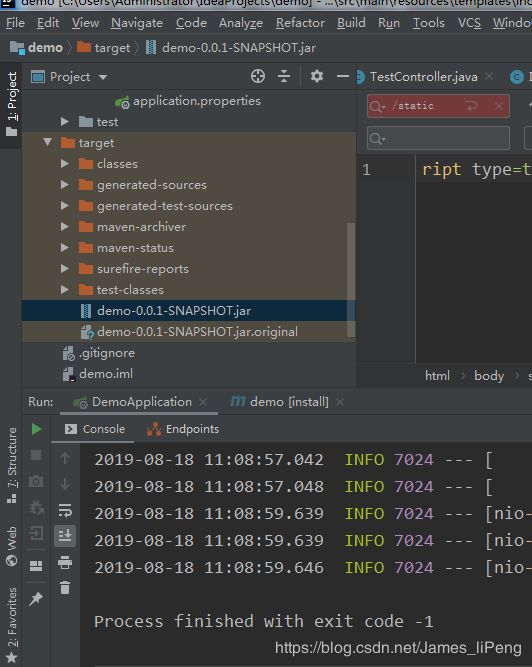
springboot 打包的项目是可以使用java -jar 来启动的
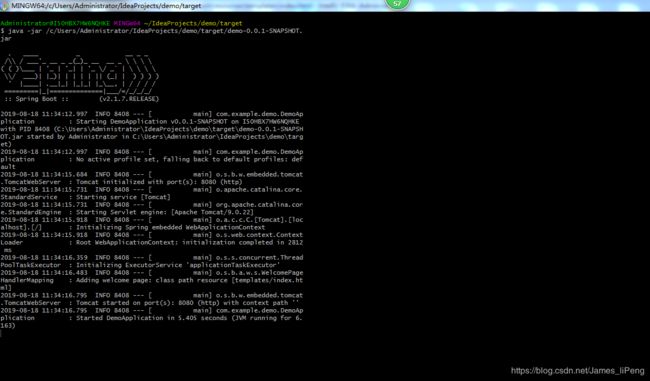
启动后再次访问项目
