Texlive for Ubuntu
安装
官网下载Texlive,附上安装手册,由于采用的时在线安装,所以安装过程比较漫长。
默认情况下,Texlive安装在/usr/local目录下。在安装完之后,还需要配置环境变量。在用户主目录下找到.profile文件末尾加上如下内容(对于的Texlive安装路径):
PATH="/usr/local/texlive/2015/bin/x86_64-linux:$PATH"回到终端执行latex --version确认是否以正确安装。Texlive同时还提供了一个xelatex命令,在处理中文时,主要使用它。
接着利用xetex opentype-info.tex测试Texlive是否能访问系统字体。若出现
This is XeTex, Version 3.14...
...
OutPut written on opentype-info.pdf (1 page).
Transcript written on opentype-info.log.
则说明可以正常访问系统字体。否则需要进行配置才能使Texlive找到系统自带的字体。
在安装Texlive之后,会创建/usr/local/texlive/2015/texmf-var/fonts/conf/texlive-fontconfig.conf文件,该文件包含了Texlive字体的配置信息。在/etc/fonts/conf.d目录下建立到该文件的一个符号链接。
$ sudo ln -s /usr/local/texlive/2015/texmf-var/fonts/conf/texlive-fontconfig.conf /etc/fonts/conf.d/09-texlive-fontconfig.conf
$ sudo fc-cache
$ fc-list新建一个example.tex文件,内容如下:
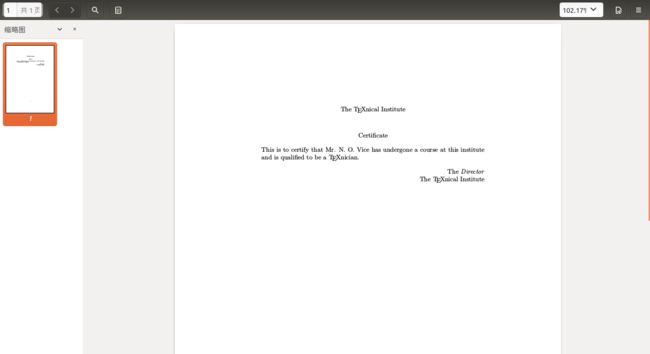
\documentclass{article}

\begin{document}

\begin{center} % 居中对齐
  The \TeX nical Institute\\[1cm] % 换行并设定间距
  Certificate
\end{center}

% 取消缩进
\noindent This is to certify that Mr. N. O. Vice has undergone a course at this institute and is qualified to be a \TeX nician.

\begin{flushright} % 右对齐
  The \emph{Director}\\ % emph 强调
  The \TeX nical Institute
\end{flushright}

\end{document}使用latex编译并使用xdevi查看。
$ latex example.tex
$ xdvi example.dvi当然,你也可以使用xelatex来编译出pdf文件。
上述所产生的pdf文件如下所示:
至此,Texlive基本工作平台就算完成了,但是当在排版中文时,回发现中文不能正常显示。这就需要使用xelatex命令了。如果xelatex编译后还不能显示,这就是由于中文字体导致的。
中文的处理
此外,我使用了Windows下的中文字体,以下用楷体和新宋体作为示例。
首先,在/usr/local/texlive/2015/texmf-dist/fonts/目录下建立windows目录,并将Windows下的字体文件拷贝到该目录下。接着使用sudo fc-cache更新字体缓存。使用fc-list :lang=zh-cn可以查看当前系统可用的中文字体,
... ...
/usr/local/texlive/2015/texmf-dist/fonts/windows/simkai.ttf: 楷体,KaiTi:style=Regular,Normal,obyčejné,Standard,Κανονικά,Normaali,Normál,Normale,Standaard,Normalny,Обычный,Normálne,Navadno,Arrunta
... ...
/usr/local/texlive/2015/texmf-dist/fonts/windows/simsun.ttc: 新宋体,NSimSun:style=常规,Regular
... ...
若出现上述显示说明,系统已可识别楷体和新宋体了。
接下来测试是否能正确处理中文,新建chinese.tex文件,内容如下:
\documentclass{article}

\usepackage{fontspec,xunicode,xltxtra}

\newfontfamily\newsong{新宋体}
\newfontfamily\kai{楷体}

\begin{document}

\begin{center}
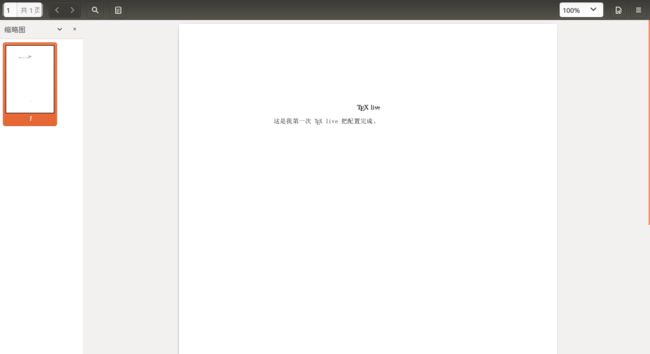
  \TeX\ live \kai 中文编辑
\end{center}

\indent\newsong 这是我第一次 \TeX\ live 把配置完成。

\end{document}
需要注意的是,此处不是使用latex来编译文件,而是使用xelatex chinese.tex编译出pdf文件。
上述文件编译后的pdf效果如下图所示:
LaTex学习资源
[1] http://www.pdfdrive.net/latex-tutorials-a-primer-tug-e7630455.html
[2] http://www.latex-tutorial.com/tutorials/
[3] http://www.rpi.edu/dept/arc/training/latex/class-slides-pc.pdf
[4] http://www.forkosh.com/mimetextutorial.html

