Decal的另类用法
Decal在没有办法得到深度之前都是根据地形的高度自己生成三角形来生成的,有了深度之后一切变的很简单,只需要画一个box就可以解决,类似于点光源。
以前做过的一个项目最后就是把地形的一个sector分成几个decal来画,虽然DP增加了,但是最后GPU反而省了,原因是原始的材质是将5个ue的材质合并blend到一起,texture和ALU实在太多,导致GPR占用非常严重,最后能并行的GPU线程少的可怜,而改为decal画之后,每个ps的texture和ALU大幅下降,GPR也很少,同时并行的GPU线程就很多。这可以理解为原来的做法类似于大卡车严重超载,走的很慢,一小时才走了20公里,而优化的做法可以理解为只拉了一点点货,用了40分钟就跑了5个来回。
Decal在游戏里用的也很多,但是大多用法都是用在特效上,其实直接将decal刷到mesh或者地形上可以很大程度的提高场景的丰富程度。这样做的好处有2个:
1.和不同的decal结合可以组合出新的外观表现的模型,比方一个石头上可以投一段文字来模拟石头上刻字的效果,也可以给房子上投一点苔藓来提高房子的表现。。。
2.有时候在地形上放一大块石头,石头本身和地形的贴图差别太大显得很突兀,这时候就可以通过头一个decal到石头和地形的接缝来完美解决这个问题并且能提高石头的丰富程度。下面的转载内容正好描述了这个详细过程。
Why are decals important?
The decal is one of my favorite 3D graphics tools. It serves so many purposes: covering seams, spicing up tiling textures, adding unique details, and allowing dynamic cosmetic environmental changes. Here is a naked 'land chunk' model, with no decals:
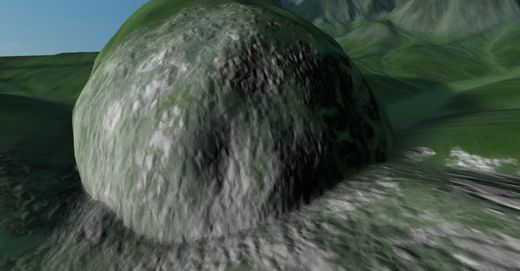
Here is the same model again after adding a rock decal and a moss decal:
As you can see, the surface is now more interesting and detailed, and the transition between the ground and the 'land chunk' is less abrupt and unrealistic.
How do decals work?
We've already discussed the user interface for adding decals in parts one andtwo, so now I will talk about how the shading works. We start by placing a couple decals using the decal editor.
As each decal is placed, it creates a small 'base normal' map (the 'normal' of a surface is a vector perpendicular to it) and blurs it slightly to remove any seams. Here is what the base normal map looks like for these decals. The red, green, and blue channels represent the X, Y and Z axes respectively, so the surfaces pointing up (+Y) are green, surfaces facing 'right' (+X) are red, and surfaces facing 'in' (+Z) are blue.
The decals use the alpha channel of their color map to control their transparency. Here is the base normal map color combined with the decal map alpha, so we can see how much of the base mesh shows through.
The base normal map is then combined with the decal normal map to get the final surface normals. This is used to make the lighting respond to the surface details of the decals, such as the roughness of the moss and the smooth roundness of the rocks.
Here is what the direct diffuse lighting looks like on the final normal map. This is easy to calculate because we are using world-space normals -- we just have to calculate the dot product of the light vector and the normal vector in the fragment shader. We don't have to worry at all about tangents and bitangents.
Finally, we modulate the decals by their color channels, and add ambient lighting. The decals blend into the scene very well because they are using the same lighting model as everything else.
In Lugaru I used decals for all sorts of effects, including footprints, wall cracks, blood puddles, and shadows. Can you think of anything special we can use decals for in Overgrowth?