【Python开发】Python PIL ImageDraw 和ImageFont模块学习
ImageDraw
新建一个空白图片为本文作示例,新建空白文件的方法 见Image模块,Image.new:
mport Image
blank = Image.new("RGB",[1024,768],"white")
1、模块引入
import ImageDraw
2、ImageDraw.Draw(image)
创建一个可用来对image进行操作的对象。对所有即将使用ImageDraw中操作的图片都要先进行这个对象的创建。
drawObject = ImageDraw.Draw(blank)
3、drawObject.line([x1,y1,x2,y2] ,options)
以(x1,y1)为起始点,以(x2,y2)为终止点划一条直线。
[x1,y1,x2,y2]也可以写为:(x1,y1,x2,y2),[(x1,y1),(x2,y2)]等,options选项包含的fill选项规定线条颜色,具体方法如下各例所示:drawObeject.line([100,100,100,600],fill = 10)
drawObject.line([(100,100),600,100],fill = 128)
drawObject.line([(600,100),(600,600)],"black")
drawObject.line((100,600,600,600),fill = "yellow")4、drawObject.arc([x1, y1, x2, y2], startAngle, endAngle, options)
在左上角坐标为(x1,y1),右下角坐标为 (x2,y2)的矩形区域内满圆O内,以starangle为起始角度,endAngle为终止角度,截取圆O的一部分圆弧画出来
(如果[x1,y1,x2,y2]区域不是正方形,则在该区域内的最大椭圆中根据角度截取片段)
注意:
[x1,y1,x2,y2]规定矩形框的水平中位线为0度角,角度顺时针变大(与数学坐标系规定方向相反!!)
options规定圆弧线的颜色。具体方法同drawObject.line
#画一个60度蓝色圆弧
drawObject.arc((100,100,600,600),0,90,fill = "blue")
#画一个上半圆弧
drawObject.arc((100,100,600,600),180,360,fill = "red")
#画一个右半椭圆,只需改区域大小为长方形
drawObject.arc((100,100,600,400),90,270,fill = "blue")5、drawObject.ellipse([x1,y1,x2,y2], options)
用法同arc,用于画圆(或者椭圆)
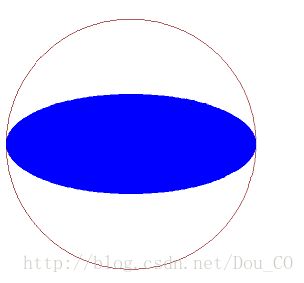
Options选项中fill表示将圆(或者椭圆)用指定颜色填满,outlie表示只规定圆的颜色
drawObject.ellipse((100,100,600,600),outline = 128)
drawOject.ellipse((100,250,600,450),fill = "blue")6、drawObject.chord([x1, y1, x2, y2], startAngle, endAngle, options)
用法与arc相同,用来画圆从startAngle到endAngle的弦。
Options选项中fill表示将弦与圆弧之间空间用指定颜色填满,outlie表示只规定弦线的颜色
画一个圆,并在园内画弦示例如下:
#画圆
drawObject.ellipse((100,100,600,600),outline = 128)
#画一条弦
drawObject.chord((100,100,600,600),0,90,outline = "red")
#画弦并且将弦与弧包围区域涂色
drawObject.chord((100,100,600,600),90,180,fill = "red")7、drawObject.pieslice([x1,y1,x2,y2], startAngle, endAngle, options)
用法与ellipse相同,用于画起始角度间的扇形区域
options选项中fill选项将扇形区域用指定颜色填满,outline选项只用指定颜色描出区域轮廓,示例如下:
#画一个圆
d.ellipse((100,100,600,600),outline = 128)
#在上一行画出的园内画180度到210度的扇形区域轮廓
d.pieslice((100,100,600,600),180,210,outline = 128)
#画60度到90度的扇形区域
d.pieslice((100,100,600,600),60,90,fill = "blue")8、drawObject.polygon(([x1,y1,x2,y2,…],options)
根据坐标画多边形,Python会根据第一个参量中的xy坐标对,连接出整个图形
options选项中fill选项将多边形区域用指定颜色填满,outline选项只用指定颜色描出区域轮廓,示例如下:
d.polygon([(200,200),(600,300),(300,600)],outline = "red")
d.polygon([(300,300),(500,300),(300,500),(500,500)],fill = "red")9、drawObeject.rectangle([x1,y1,x2,y2],options)
在给定区域内画一个矩形,(x1,y1)表示矩形左上角坐标值,(x2,y2)表示矩形右下角坐标值
options选项中fill选项将多边形区域用指定颜色填满,outline选项只用指定颜色描出区域轮廓,示例如下:
#画矩形
drawObject.rectangle((200,200,500,500),outline = "red")
drawObject.rectangle((250,300,450,400),fill = 128)10、drawObject.text(position, string, options)
在图像内添加文字
Position是一个二元元组,指定字符串左上角坐标,string是要写入的字符串
options选项可以为fill或者font(只能选择其中之一作为第三参量,不能两个同同时存在,要改变字体颜色,见ImageFont模块中的NOTE)。其中fill指定字的颜色,font指定字体与字的尺寸,font必须为ImageFont中指定的font类型,具体用法见ImageFont.Truetype()
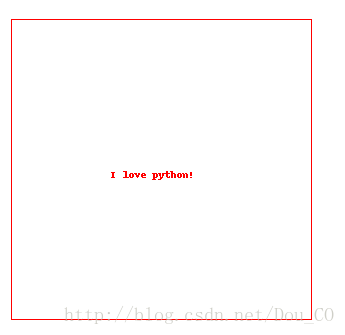
第三参量为font示例参见下文ImageFont.Truetype(),第三那参量为fill时示例如下:
#在空白图像上矩形区域内添加文字
text = "I love python!"
d.rectangle((200,200,500,500),outline = "red")
d.text([300,350],text,"red")11、drawObject.textsize(string, options)
这个函数返回一个两元素的元组,是给定字符串像素意义上的size
ImageFont
1、模块引入
import ImageFont
2、 ImageFont.truetype(filename , wordsize)
这个函数创建字体对象给ImageDraw中的text函数使用。
Filename是字体文件的名称,通常为ttf文件,还有少数ttc文件,可以在C:\Windows\Fonts中找到。
“simsun.ttc是三种ttf文件的集合,是“宋体、新宋体、宋体-PUA”三种字体的集合,可以通过在truetype中增加index参量实现对集合内字体的调用
Eg.font = ImageFont.truetype("simsun.ttc",24,index=1) “
(我看到网上说是三种字体的集合,但是我试验的过程中发现似乎只有两种)
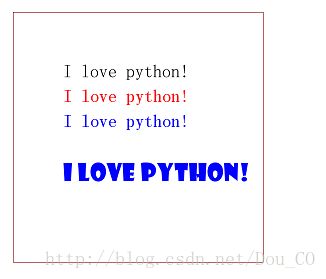
Wordsize参数指定字的大小。结合drawObject.text()示例如下:
text = "I love python!"
d.rectangle((100,100,600,600),fill = 128)
#字体对象1为simsunb,字大小为36号
Font1 = ImageFont.truetype("C:\Windows\Fonts\simsunb.ttf",36)
#字体对象2在ttc中第一个(我也不知道具体是什么字形),字大小为36号
Font2 = ImageFont.truetype("C:\Windows\Fonts\simsun.ttc",36,index = 0)
#字体对象2在ttc中第二个,字大小为36号
Font3 = ImageFont.truetype("C:\Windows\Fonts\simsun.ttc",36,index = 1)
#字体对象1为SHOWG,字大小为48号
Font4 = ImageFont.truetype("C:\Windows\Fonts\SHOWG.TTF",48)
#利用text函数添加文字
drawObject.text([200,200],text,font = Font1)
drawObject.text([200,250],text,font = Font2)
drawObject.text([200,300],text,font = Font3)
drawObject.text([200,400],text,font = Font4)注意:
画笔颜色默认为透明的,直接在白纸上写字是看不到的。所以上面的例子中要先画出一个被颜色填充过的矩形框,在矩形框内添加文字。
画笔的颜色可以通过draw的ink属性来改变:
draw.ink = 0(R) + 0(G) * 256 + 0(B) * 256 * 256
text = "I love python!"
d.rectangle((100,100,600,600),outline = 128)
#字体对象1为simsunb,字大小为36号
Font1 = ImageFont.truetype("C:\Windows\Fonts\simsunb.ttf",36)
#字体对象2在ttc中第一个(我也不知道具体是什么字形),字大小为36号
Font2 = ImageFont.truetype("C:\Windows\Fonts\simsun.ttc",36,index = 0)
#字体对象2在ttc中第二个,字大小为36号
Font3 = ImageFont.truetype("C:\Windows\Fonts\simsun.ttc",36,index = 1)
#字体对象1为SHOWG,字大小为48号
Font4 = ImageFont.truetype("C:\Windows\Fonts\SHOWG.TTF",48)
#在图像上写字
d.ink = 0 + 0 * 256 + 0 * 256 * 256 #黑色
d.text([200,200],text,font = Font1)
d.ink = 255 + 0 * 256 + 0 * 256 * 256 #红色
d.text([200,250],text,font = Font2)
d.ink = 0 + 0 * 256 + 255 * 256 * 256 #蓝色
d.text([200,300],text,font = Font3)
d.text([200,400],text,font = Font4)
3、Font.getsize(text)
返回一个二元素元组,为指定text在指定字体大小之后的size
Questions:
① Getsize()与textsize()的区别与用途
② 字体加粗、倾斜、下划线、删除线等的设置
③ 画图时线宽的规定
④ 线型设置(加粗,虚线...)


