spring cloud config+自动更新配置+多数据源druid+读写分离(类上自定义注解,通过AOP获取标识区分主从数据库)
公司有个spring config的预想开发。(已经实现Spring Cloud Eureka),正好这段时间闲来无事,就先自己搭一个单独的config的demo(本例中没有整合Eureka,后面慢慢更新,因为它不是本次重点)。
项目是springboot的,maven管理,git上的数据库配置文件信息。
共有两个spring boot项目:
1. config-server(提供获取git上配置信息,并转成接口返回数据,供client端调用)
2. config-client (获取server端提供的配置信息--多数据源配置,利用 druid 手动set,通过自定义注解的标识在service层调用方法时自动区分读写库操作)
源码:https://github.com/LUNG18/demo
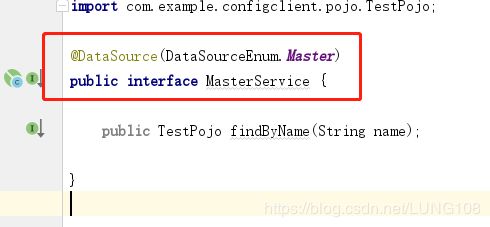
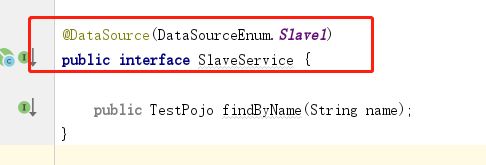
PS:网上之前搜了不少资料,也是同样的方式,但是基本都是自定义的注解用在方法上,通过aop,根据方法名的前缀来区分主从库的使用。但是我们公司目前的项目是:定义两个service接口--MasterService和SlaveService,其上有@DS注解,标识为master和slave来选择不同的数据库,就是本文标题说的 类上添加注解,区分数据库。为了不影响这种架构,才有了本次的demo。
但是我觉得aop切面表达式来匹配,进行读写分离应该是通常的做法
demo流程:
目录
一、spring cloud config项目搭建
1.config-server项目
2.config-client项目
二、多数据源配置
1.DataSourceConfig配置类
2.给多数据源添加标识,并且保证按照标识可以取出对应的dataSource
a.DatabaseContextHolder
b.根据标识把对应的数据源存放和获取,并且设置默认数据源
三、注解方式进行读写分离---类上添加自定义注解
1.自定义注解
2.AOP切面
3.读写分离逻辑
四、说明:
一、spring cloud config项目搭建
1.config-server项目
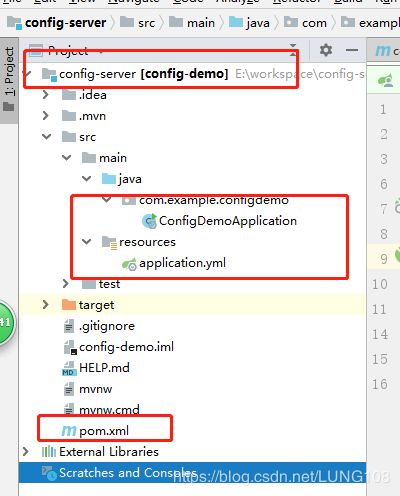
结构:
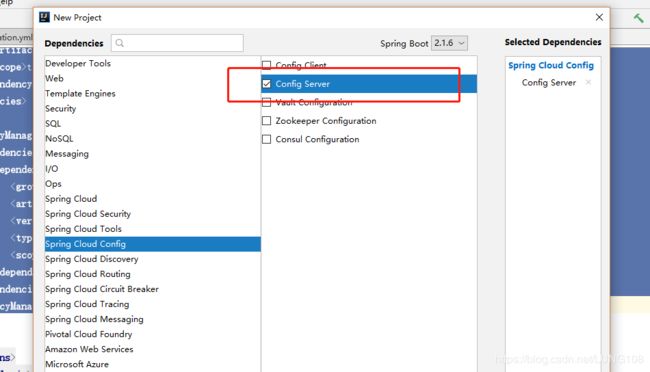
最基本的springboot项目,重点是pom.xml,application.yml和启动类 (我是使用的idea开发工具,其实就是新建一个spring boot项目,在新建过程中勾选server即可),如下图:
具体的pom.xml文件如下:
        org.springframework.boot
        spring-boot-starter-parent
        2.1.6.RELEASE


    com.example
    config-server
    0.0.1-SNAPSHOT
    config-demo
    Demo project for Spring Boot


        1.8
        Greenwich.SR1


            org.springframework.cloud
            spring-cloud-config-server


            org.springframework.cloud
            spring-cloud-starter-bus-amqp


            org.springframework.boot
            spring-boot-starter-test
            test


                org.springframework.cloud
                spring-cloud-dependencies
                ${spring-cloud.version}
                pom
                import


                org.springframework.boot
                spring-boot-maven-plugin
需要说明的一点是:只是spring config的话,是静态的。所以集成了 spring-cloud-starter-bus-amqp,以便于当git上的配置文件变化时,不用重启服务就可以自动更新配置。说是自动更新,其实client端使用的话,还是要发一个post请求的:http://localhost:8888/actuator/bus-refresh (我的service端口时8888,最好是这个,似乎是spring config中有相关的配置要求吧)后面的路径是现在使用的这个版本的固定写法
application.yml文件如下:
server:
  port: 8888
spring:
  application:
    namme: config-server
  cloud:
    config:
      server:
        git:
          uri: https://github.com/LUNG18/spring-cloud
          searchPaths: helloworldConfig
management:
  endpoints:
    web:
      exposure:
        include: '*'
简单说下配置文件的说明:定义端口为8888,服务名为:config-server,请求的git路径和该路径仓库名,management节点下的配置是git上配置文件改变时可以动态获取的配置
我git上的内容如下:
最后是启动类,就是添加一个注解: @EnableConfigServer ,如下图:
至此,server端已经构建完成,启动后通过url已经可以访问到git上的配置信息 : http://localhost:8888/visea-dev/master
PS: 更改git上的信息,不需要发送上面的post请求,就可以动态获取。那个请求是client端用的,发送后client端才能获取到变化后的信息
2.config-client项目
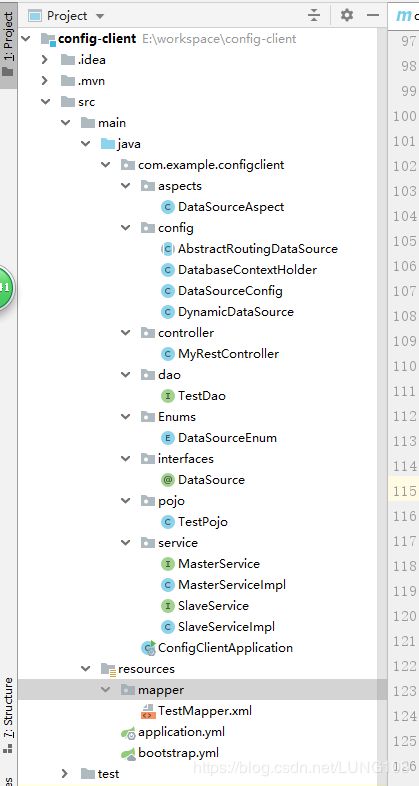
结构如下:
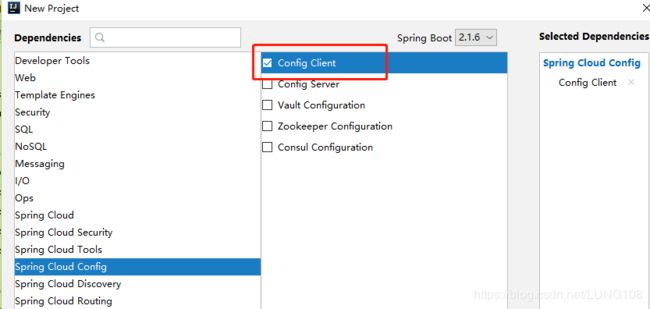
同样是新建一个springboot,勾选client选项。如下:
具体pom.xml如下:
        org.springframework.boot
        spring-boot-starter-parent
        2.1.6.RELEASE


    com.example
    config-client
    0.0.1-SNAPSHOT
    config-client
    Demo project for Spring Boot


        1.8
        Greenwich.SR1


            org.springframework.boot
            spring-boot-starter-web


            org.springframework.cloud
            spring-cloud-config-client


            org.springframework.retry
            spring-retry


            org.springframework.boot
            spring-boot-starter-aop


            org.springframework.boot
            spring-boot-starter-actuator


            org.springframework.cloud
            spring-cloud-starter-bus-amqp


            org.mybatis.spring.boot
            mybatis-spring-boot-starter
            1.3.3


            com.alibaba
            druid
            1.1.10


            mysql
            mysql-connector-java
            5.1.38


            org.projectlombok
            lombok
            1.18.8


            com.baomidou
            mybatis-plus-boot-starter
            2.2.0


            com.baomidou
            dynamic-datasource-spring-boot-starter
            2.5.4


            org.springframework.boot
            spring-boot-starter-test
            test


                org.springframework.cloud
                spring-cloud-dependencies
                ${spring-cloud.version}
                pom
                import


                org.springframework.boot
                spring-boot-maven-plugin
配置文件有点需要说明的地方,我是两个配置文件:bootstrap和application。
其中config部分的配置一定要放在bootstrap中(它加载优先级高),如下:
server:
  port: 8888
spring:
  application:
    namme: config-server
  cloud:
    config:
      server:
        git:
          uri: https://github.com/LUNG18/spring-cloud
          searchPaths: helloworldConfig
management:
  endpoints:
    web:
      exposure:
        include: '*'
说明点: application.name节点的名称 必须和git上的配置文件名一致(可以看上面git信息的截图)!!!否则请求不到。cloud.config.profie节点就是配置文件的后缀了,可以用来区分不同环境的配置文件,而 uri 节点就是 server端的地址了
application.yml配置文件就是一般配置的信息了,什么端口,项目名什么的,如下:
server:
  port: 8889

spring:
  cloud:
    config:
      retry:
        max-attempts: 6
        multiplier: 1.1
        initial-interval: 1000
        max-interval: 2000
启动类不用做任何变化
至此,可以新建一个controller方法,以 @Value(${xxx}) 的方式注入从server端获取的信息了,可以如下:
    @Value("${murl}")
    private String url;
    @Value("${musername}")
    private String username;
    @Value("${mpassword}")
    private String password;
    @Value("${mdriver}")
    private String driver;

    @RequestMapping("/database")
    public String database() {
        return url+" "+username+" "+password+" "+driver;
    }
启动项目后访问 http://localhost:8889/database 应该就可以看到信息返回了。
PS:我在controller类上添加了一个注解 @RefreshScope,以配合server端配置可以自动获取变化后的配置信息,后面会给出完整的controller类
至此,spring config这一块算是暂时完成
二、多数据源配置
咱们一般使用 DynamicDataSource 动态数据源的时候都是框架自动集成的--只要给出配置文件,自动配置注册。有个自动配置类:DynamicDataSourceAutoConfiguration 起到的作用。
由于本例是从git上获取的配置信息,所以我的做法是先排除DynamicDataSourceAutoConfiguration,然后手动把数据库信息配置、注册到spring的Ioc容器。
1.DataSourceConfig配置类
package com.example.configclient.config;

import com.alibaba.druid.pool.DruidDataSource;
import org.apache.ibatis.session.SqlSessionFactory;
import org.mybatis.spring.SqlSessionFactoryBean;
import org.springframework.beans.factory.annotation.Qualifier;
import org.springframework.beans.factory.annotation.Value;
import org.springframework.context.annotation.Bean;
import org.springframework.context.annotation.Configuration;
import org.springframework.core.io.support.PathMatchingResourcePatternResolver;
import org.springframework.jdbc.datasource.DataSourceTransactionManager;

import javax.sql.DataSource;
import java.util.HashMap;
import java.util.Map;

@Configuration
public class DataSourceConfig {

    public final static String MAPPER_LOCATION = "classpath:mapper/*.xml";
    public final static String POJO_PACKAGE = "com.example.configclient.pojo";

    /**
     * master 数据源
     */
    @Value("${murl}")
    private String m_url;
    @Value("${musername}")
    private String m_username;
    @Value("${mpassword}")
    private String m_password;
    @Value("${mdriver}")
    private String m_driver;

    /**
     * slave_1 数据源
     */
    @Value("${s1url}")
    private String s_1_url;
    @Value("${s1username}")
    private String s_1_username;
    @Value("${s1password}")
    private String s_1_password;
    @Value("${s1driver}")
    private String s_1_driver;

    @Bean
    public DynamicDataSource dynamicDataSource(){
        DynamicDataSource dynamicDataSource = DynamicDataSource.getInstance();

        //master--jdbc配置
        DruidDataSource m_dataSource = new DruidDataSource();
        m_dataSource.setDriverClassName(m_driver);
        m_dataSource.setUrl(m_url);
        m_dataSource.setUsername(m_username);
        m_dataSource.setPassword(m_password);

        //slave_1--jdbc配置
        DruidDataSource s_1_dataSource = new DruidDataSource();
        s_1_dataSource.setDriverClassName(s_1_driver);
        s_1_dataSource.setUrl(s_1_url);
        s_1_dataSource.setUsername(s_1_username);
        s_1_dataSource.setPassword(s_1_password);

        Map map = new HashMap<>();
        map.put(DataSourceEnum.Master.getValue(), m_dataSource);
        map.put(DataSourceEnum.Slave1.getValue(), s_1_dataSource);

        dynamicDataSource.setTargetDataSources(map);
        dynamicDataSource.setDefaultTargetDataSource(s_1_dataSource);

        return dynamicDataSource;
    }

    @Bean(name = "transactionManager")
    public DataSourceTransactionManager transactionManager(){
        return new DataSourceTransactionManager(dynamicDataSource());
    }

    @Bean(name = "sqlSessionFactory")
    public SqlSessionFactory sqlSessionFactory(@Qualifier("dynamicDataSource")DataSource dynamicDataSource) throws Exception {
        final SqlSessionFactoryBean sessionFactory = new SqlSessionFactoryBean();
        sessionFactory.setDataSource(dynamicDataSource);
        sessionFactory.setTypeAliasesPackage(POJO_PACKAGE);
        sessionFactory.setMapperLocations(
            new PathMatchingResourcePatternResolver().getResources(MAPPER_LOCATION)
        );
        return sessionFactory.getObject();
    }
通过@Configuration和@Bean的方式,把获取的配置信息配置好,并且让spring管理起来。此时已经有两个dataSource了,如果以后需要增加数据库,在dynamicDataSource方法中 new DruidDataSource(),配置好put到map中就行。可以用来保存数据源的DynamicDataSource实例后面会讲到;其中用到的枚举类DataSourceEnum后面也会给出
此时,启动类需要改变--排除上面提到的自动装配类 DynamicDataSourceAutoConfiguration:
2.给多数据源添加标识,并且保证按照标识可以取出对应的dataSource
a.DatabaseContextHolder
可以理解为工具类,其中维护了本地变量作为数据库的标识
package com.example.configclient.config;

public class DatabaseContextHolder {

    private static final ThreadLocal contextHolder = new ThreadLocal<>();

    public static void setDBKey(String dataSourceKey) {
        contextHolder.set(dataSourceKey);
    }

    public static String getDBKey() {
        return contextHolder.get();
    }

    public static void clearDBKey() {
        contextHolder.remove();
    }

}
b.根据标识把对应的数据源存放和获取,并且设置默认数据源
这一步定义了一个抽象类和对应的实现类
1).抽象类---其中维护了 默认数据源,数据源集合等变量
package com.example.configclient.config;

import org.springframework.beans.factory.InitializingBean;
import org.springframework.jdbc.datasource.AbstractDataSource;
import org.springframework.jdbc.datasource.lookup.DataSourceLookup;
import org.springframework.jdbc.datasource.lookup.JndiDataSourceLookup;
import org.springframework.util.Assert;

import javax.sql.DataSource;
import java.sql.Connection;
import java.sql.SQLException;
import java.util.*;

public abstract class AbstractRoutingDataSource extends AbstractDataSource implements InitializingBean {

    private Map targetDataSources;
    private Object defaultTargetDataSource;
    private boolean lenientFallback = true;
    private DataSourceLookup dataSourceLookup = new JndiDataSourceLookup();
    private Map resolvedDataSources;
    private DataSource resolvedDefaultDataSource;

    public AbstractRoutingDataSource(){

    }

    public void setTargetDataSources(Map targetDataSources) {
        this.targetDataSources = targetDataSources;
    }

    public void setDefaultTargetDataSource(Object defaultTargetDataSource) {
        this.defaultTargetDataSource = defaultTargetDataSource;
    }

    public void setLenientFallback(boolean lenientFallback) {
        this.lenientFallback = lenientFallback;
    }

    public void setDataSourceLookup(DataSourceLookup dataSourceLookup) {
        this.dataSourceLookup = dataSourceLookup;
    }

    @Override
    public void afterPropertiesSet(){
        if(this.targetDataSources == null){
            throw new IllegalArgumentException("Property 'targetDataSources' is required");
        }else{

            this.resolvedDataSources = new HashMap(this.targetDataSources.size());
            Iterator var1 = this.targetDataSources.entrySet().iterator();

            while(var1.hasNext()) {
                Map.Entry entry = (Map.Entry)var1.next();
                Object lookupKey = this.resolveSpecifiedLookupKey(entry.getKey());
                DataSource dataSource = this.resolveSpecifiedDataSource(entry.getValue());
                this.resolvedDataSources.put(lookupKey, dataSource);
            }

            if (this.defaultTargetDataSource != null) {
                this.resolvedDefaultDataSource = this.resolveSpecifiedDataSource(this.defaultTargetDataSource);
            }

        }
    }

    protected Object resolveSpecifiedLookupKey(Object lookupKey) {
        return lookupKey;
    }

    protected DataSource resolveSpecifiedDataSource(Object dataSource) throws IllegalArgumentException {
        if (dataSource instanceof DataSource) {
            return (DataSource)dataSource;
        } else if (dataSource instanceof String) {
            return this.dataSourceLookup.getDataSource((String)dataSource);
        } else {
            throw new IllegalArgumentException("Illegal data source value - only [javax.sql.DataSource] and String supported: " + dataSource);
        }
    }

    @Override
    public Connection getConnection() throws SQLException {
        return this.determineTargetDataSource().getConnection();
    }

    @Override
    public Connection getConnection(String username, String password) throws SQLException {
        return this.determineTargetDataSource().getConnection(username, password);
    }

    @Override
    public  T unwrap(Class iface) throws SQLException {
        return iface.isInstance(this) ? (T) this : this.determineTargetDataSource().unwrap(iface);
    }

    @Override
    public boolean isWrapperFor(Class iface) throws SQLException {
        return iface.isInstance(this) || this.determineTargetDataSource().isWrapperFor(iface);
    }

    protected DataSource determineTargetDataSource() {
        Assert.notNull(this.resolvedDataSources, "DataSource router not initialized");
        Object lookupKey = this.determineCurrentLookupKey();
        DataSource dataSource = this.resolvedDataSources.get(lookupKey);
        if (dataSource == null && (this.lenientFallback || lookupKey == null)) {
            dataSource = this.resolvedDefaultDataSource;
        }

        if (dataSource == null) {
            throw new IllegalStateException("Cannot determine target DataSource for lookup key [" + lookupKey + "]");
        } else {
            return dataSource;
        }
    }

    protected abstract Object determineCurrentLookupKey();
其中的方法 :
抽象方法 determineCurrentLookupKey():
用于它的实现类可以自由的获取数据库标识,实现类中的实现方法 先从DatabaseContextHolder中获取保存的标识,如果为空,则把标识设为默认的master返回---以此来设置默认数据库。
setTargetDataSources():
在子集中重写这个方法,其中调用了父级的方法把数据源集合按照标识进行存放
2):实现类---实现和重写上面的抽象类的方法
如下:
package com.example.configclient.config;

import com.example.configclient.Enums.DataSourceEnum;
import org.springframework.util.StringUtils;

import java.util.HashMap;
import java.util.Map;

public class DynamicDataSource extends AbstractRoutingDataSource {

    private static DynamicDataSource instance;
    private static byte[] lock = new byte[0];
    private static Map dataSourceMap = new HashMap<>();

    @Override
    public void setTargetDataSources(Map targetDataSources) {
        super.setTargetDataSources(targetDataSources);
        dataSourceMap.putAll(targetDataSources);
        super.afterPropertiesSet();
    }

    public static Map getDataSourceMap() {
        return dataSourceMap;
    }

    @Override
    protected Object determineCurrentLookupKey() {
        String dbKey = DatabaseContextHolder.getDBKey();
        if(StringUtils.isEmpty(dbKey)){
            dbKey = DataSourceEnum.Master.getValue();
        }
        return dbKey;
    }

    private DynamicDataSource(){}

    public static synchronized DynamicDataSource getInstance(){
        if(instance == null){
            synchronized (lock){
                if(instance == null){
                    instance = new DynamicDataSource();
                }
            }
        }
        return instance;
    }
}
其中的 getInstance() 方法:
返回一个下面的DynamicDataSource实例,这个方法就是上面 DataSourceConfig配置类 使用@Bean注册时候的第一行代码
3):枚举类 DataSourceEnum---也可以不用这种方式,只要是用来标识的字符串能够对应上就可以,如下:
package com.example.configclient.Enums;

import lombok.Getter;

public enum DataSourceEnum {
    Master("master"),

    Slave1("slave_1");

    DataSourceEnum(String value) {
        this.value = value;
    }

    @Getter
    private String value;
}
至此,已经把多数据源装配到 config-client 中了,此时可以按照平常的方式搭建操作数据库的controller层,service层,mapper层了。具体我就不写了
三、注解方式进行读写分离---类上添加自定义注解
1.自定义注解
package com.example.configclient.interfaces;

import com.example.configclient.Enums.DataSourceEnum;

import java.lang.annotation.ElementType;
import java.lang.annotation.Retention;
import java.lang.annotation.RetentionPolicy;
import java.lang.annotation.Target;

@Target({ElementType.TYPE,ElementType.METHOD})
@Retention(RetentionPolicy.RUNTIME)
public @interface DataSource {

    DataSourceEnum value() default DataSourceEnum.Master;
}
2.AOP切面
package com.example.configclient.aspects;

import com.example.configclient.config.DatabaseContextHolder;
import com.example.configclient.interfaces.DataSource;
import lombok.extern.slf4j.Slf4j;
import org.aspectj.lang.JoinPoint;
import org.aspectj.lang.annotation.After;
import org.aspectj.lang.annotation.Aspect;
import org.aspectj.lang.annotation.Before;
import org.aspectj.lang.annotation.Pointcut;
import org.springframework.stereotype.Component;

@Component
@Aspect
@Slf4j
public class DataSourceAspect {

    @Pointcut("execution(public * com.example.configclient.service.*.*(..))")
    public void pointCut(){}

    @Before("pointCut()")
    public void doBefore(JoinPoint point){
        Class[] interfaces = point.getTarget().getClass().getInterfaces();
        for(Class inter : interfaces){
            if(inter.isAnnotationPresent(DataSource.class)){
                DataSource dataSource = (DataSource) inter.getAnnotation(DataSource.class);
                log.info("选择数据源---" + dataSource.value().getValue());
                DatabaseContextHolder.setDBKey(dataSource.value().getValue());
                break;
            }
        }
    }

    @After("pointCut()")
    public void doAfter(){
        DatabaseContextHolder.clearDBKey();
    }
}
其中,@Pointcut 切入点为所有的service层方法,然后在 @Before 的逻辑中判断当前切入的方法所属类实现的接口是否有自定义的注解DataSource,接着按照service层方法上自定义注解的值,即数据源标识,set到工具栏中。之后在我们之前注册的sqlSessionFactory中就会按照这个标识去取对应的数据源来操作了。
至此,配置方面已经做完。
3.读写分离逻辑
自定义测试controller层,service层,dao层。其中service定义两个接口---MasterService和SlaveService,其上分别加上自定义注解DataSource,并传入参数--标识来指定使用的数据源,然后分别实现这两个接口。如下:
完整的controller如下
package com.example.configclient.controller;

import com.example.configclient.service.MasterService;
import com.example.configclient.service.SlaveService;
import lombok.extern.slf4j.Slf4j;
import org.springframework.beans.factory.annotation.Value;
import org.springframework.cloud.context.config.annotation.RefreshScope;
import org.springframework.web.bind.annotation.RequestMapping;
import org.springframework.web.bind.annotation.RestController;

import javax.annotation.Resource;

@RestController
@RefreshScope
@Slf4j
public class MyRestController {


    @Resource
    private MasterService masterService;
    @Resource
    private SlaveService slaveService;

    @RequestMapping("test")
    public String test(String name){
        return masterService.findByName(name).toString();
    }

    @RequestMapping("test2")
    public String test2(String name){
        return slaveService.findByName(name).toString();
    }


    @Value("${murl}")
    private String url;
    @Value("${musername}")
    private String username;
    @Value("${mpassword}")
    private String password;
    @Value("${mdriver}")
    private String driver;

    @RequestMapping("/database")
    public String database() {
        return url+" "+username+" "+password+" "+driver;
    }

}
我在service层实现类方法中调用的是dao层的同一个方法。
具体测试方法,可以是本地真的配置主从数据库,然后git上的配置文件信息分别指向它们。
也可以在service层的方法打断点,查看sqlSessionFactory中当前正在使用的数据源信息。
至此,标题中提到的框架、技术已经全部实现。
四、说明:
1.此demo是为了经历一遍spring config而搭建的(前面说过,是我们公司的预想开发)。其中有不好考虑不周的问题,比如:git上配置文件加密、和spring Eureka的集成、是否还有别的方式来配置数据源(如:类似@ConfigurationProperties(prefix = "spring.datasource")这种方式,就不用手动set数据源配置)、缓存的集成、事务的管理等等。这些以后会看情况更新
2.如果直接使用我的git,没办法测试配置更改,client端动态获取。所以最好有自己的git(github、码云、svn都可以,配置在数据库也行,只是搭建的方式略有不同)
3.读写分离我的方式最终是:实现MasterService的service方法走写库,其他的走读库(默认读库)。但是AOP的切面那块可以不用我这么麻烦---可以从切入点获取切到的方法,然后根据方法名(自己定义规则--什么样的名称和哪个数据库标识匹配)来指定数据源。我这个是因为当前的项目是这种主从分离的方式
4.手动配置数据库配置--DataSourceConfig配置类,应该可以进行改写。现在是如果增减数据源,就要重新增减代码,重新部署项目。改写的思路是:通过git上拿到类似map类型的数据(key为master和slave1,value为其对应的配置信息),然后DataSourceConfig配置类中定义Map变量来接收后,在 dynamicDataSource方法 中遍历Map变量,每次循环都new DruidDataSource(),并且把Map变量的value值set到DruidDataSource对象中,同时按照之前的方式put到原来的map变量中
但是具体是否可以还需要以后测试看看,目前还不知道如果git配置信息增减,client端是否会重新走一遍这个DataSourceConfig配置类,如果不走的话都是白瞎,顶多这种改写方式可以不用一个个去new DruidDataSource()了
5.这两天看了不少资料才实现上面的框架的,很感谢他们提供的思路和方式。但是由于看了太多资料,已经不知道具体该感谢谁了。就谢谢所有不求回报、勇于探索、乐于分享的编程人员吧。
6.如果有人有幸看到此博客,对于其中不明白,或者有别的实现思路的同僚,都可以留言给我。(不止是本文提到的东西)
7.源码:https://github.com/LUNG18/demo
更新中……
LG
