13、spring的bean基础(5)
13、spring的bean基础(5)
在本文中主要介绍以下两个知识点,在博主做备忘之时,也可以分享给大家一起学习。
- spring依赖检查的两种实现方式
- spring bean初始化和销毁的函数调用
1、spring依赖检查的两种实现方式
说明:进行依赖检查的目的就在于确保bean的属性被注入一个目标值
在开始演示之前先创建两个实体类:
Customer.java
package com.main.autowrite.required;

public class Customer {

    private Person person;
    private String state;
    public Person getPerson() {
        return person;
    }
    public void setPerson(Person person) {
        this.person = person;
    }
    public String getState() {
        return state;
    }
    public void setState(String state) {
        this.state = state;
    }
    @Override
    public String toString() {
        return "Customer [person=" + person + ", state=" + state + "]";
    }
}
Person.java
package com.main.autowrite.required;

public class Person {

    private String name;
    private int type;
    public String getName() {
        return name;
    }
    public void setName(String name) {
        this.name = name;
    }
    public int getType() {
        return type;
    }
    public void setType(int type) {
        this.type = type;
    }
    @Override
    public String toString() {
        return "Person [name=" + name + ", type=" + type + "]";
    }
}
第一种:基于xml方式实现的依赖检查(四种检查形式)
依赖检查有以下四种检查规则
- none 规则,即不进行任何依赖检查,bean的属性可以为null
- simple 规则,对于bean中已经声明的简单类型(int,string等等)属性,必须要注入值
- objects 规则,对于bean中已经声明的对象属性(其他类,Integer等等),必须要为bean注入一个值
- all 规则,bean中定义的所有属性,均需要注入值
其中详细的实现方式如下:
<beans xmlns="http://www.springframework.org/schema/beans"
    xmlns:xsi="http://www.w3.org/2001/XMLSchema-instance"
    xsi:schemaLocation="http://www.springframework.org/schema/beans
    http://www.springframework.org/schema/beans/spring-beans-2.5.xsd">


    <bean id="CustomerNone" class="com.main.autowrite.required.Customer"
    dependency-check="all">
        <property name="person">
            <ref bean="Person"/>
        property>
        <property name="state" value="1">property>
    bean>

    <bean id="CustomerSimple" class="com.main.autowrite.required.Customer"
    dependency-check="simple">
        <property name="person">
            <ref bean="Person"/>
        property>
        <property name="state" value="1">property>
    bean>


    <bean id="CustomerObjects" class="com.main.autowrite.required.Customer"
    dependency-check="objects">
        <property name="person">
            <ref bean="Person"/>
        property>
        <property name="state" value="1">property>
    bean>


    <bean id="CustomerAll" class="com.main.autowrite.required.Customer"
    dependency-check="all">
        <property name="person">
            <ref bean="Person"/>
        property>
        <property name="state" value="1">property>
    bean>

    <bean id="Person" class="com.main.autowrite.required.Person">
        <property name="name" value="yiibai" />
        <property name="type" value="1" />
    bean>

beans>
上述的四种例子中,均为Customer的四个bean的所有属性注入了值,作为测试,现在把simple规则的state属性删除掉,然后运用下面的测试方法查看结果。
    @Test
    public void test(){
        ApplicationContext context =
                new ClassPathXmlApplicationContext("com/main/autowrite/required/bean.xml");

        Customer customer =
                (Customer)context.getBean("CustomerSimple");

        System.out.println(customer.toString());

    }
结果如下:提示state属性要注入值,或者停用simple规则 的dependency checking
Error creating bean with name 'CustomerSimple' defined in class path resource [com/main/autowrite/required/bean.xml]: Unsatisfied dependency expressed through bean property 'state': Set this property value or disable dependency checking for this bean.第二种:基于注解的依赖检查
说明:基于注解的依赖检查实现方式为:在实体类的属性对应的setter方法中加入@Required注解
例如:
    @Required
    public void setState(String state) {
        this.state = state;
    }
但是简单做完上述步骤是不够的,还需要在bean配置文件中注册一个RequiredAnnotationBeanPostProcessor。
注册的方式有以下两种:
第一种:添加context:annotation-config
<beans xmlns="http://www.springframework.org/schema/beans"
    xmlns:xsi="http://www.w3.org/2001/XMLSchema-instance"
    xmlns:context="http://www.springframework.org/schema/context"
    xsi:schemaLocation="http://www.springframework.org/schema/beans
    http://www.springframework.org/schema/beans/spring-beans-2.5.xsd
    http://www.springframework.org/schema/context
    http://www.springframework.org/schema/context/spring-context-2.5.xsd">

    <context:annotation-config />


    <bean id="CustomerRequired" class="com.main.autowrite.required.Customer">
        <property name="person">
            <ref bean="Person"/>
        property>
        <property name="state" value="1">property>
    bean>

    <bean id="Person" class="com.main.autowrite.required.Person">
        <property name="name" value="yiibai" />
        <property name="type" value="1" />
    bean>

beans>第二种:包含 RequiredAnnotationBeanPostProcessor
在beans标签里添加:
class="org.springframework.beans.factory.annotation.RequiredAnnotationBeanPostProcessor"/> 以上工作做完就可以使用注解形式的依赖检查了。
自定义依赖检查的注解:@Required-style
第一步:创建@MyRequired接口
package com.main;

import java.lang.annotation.ElementType;
import java.lang.annotation.Retention;
import java.lang.annotation.RetentionPolicy;
import java.lang.annotation.Target;

@Retention(RetentionPolicy.RUNTIME)
@Target(ElementType.METHOD)
public @interface MyRequired{
}第二步:注册自定义注解关键字@MyRequired
<bean
class="org.springframework.beans.factory.annotation.RequiredAnnotationBeanPostProcessor">
    <property name="requiredAnnotationType" value="com.main.MyRequired"/>
bean>
第三步:应用到bean属性的setter方法
    @MyRequired
    public void setState(String state) {
        this.state = state;
    }
这样就完成了自定义依赖检查的注解,当然还可以使用这种方式定义其他类型的注解。
spring bean初始化和销毁的函数调用
第一种方式:
说明:直接实现InitializingBean和DisposableBean的两个标记接口,并且重写响应的方法,然后在bean配置文件中声明bean,进一步提取(初始化)bean,最后释放spring容器。以上就是大概思路,下面我们来一步步分析。
第一步:
创建实体类和声明bean:
package com.main.bean.initAndDispose;

import org.springframework.beans.factory.DisposableBean;
import org.springframework.beans.factory.InitializingBean;

public class InitAndDisposeDemo implements InitializingBean,DisposableBean{

    private String name;

    public String getName() {
        return name;
    }

    public void setName(String name) {
        this.name = name;
    }

    @Override
    public String toString() {
        return "InitAndDisposeDemo [name=" + name + "]";
    }

    /**
     * destroy methods
     */
    public void destroy() throws Exception {

        System.out.println("我是销毁函数,当spring容器被销毁时,或者bean被回收资源时被调用。");
    }

    /**
     * Initializing methods
     */
    public void afterPropertiesSet() throws Exception {
        System.out.println("我是初始化函数,当bean被装进spring容器时调用");
    }

}id="InitAndDisposeDemo" class="com.main.bean.initAndDispose.InitAndDisposeDemo">
<property name="name" value="大家好,我是InitAndDisposeDemo"/>
第二步:测试:
    @Test
    public void test(){
        ConfigurableApplicationContext  context =
                new ClassPathXmlApplicationContext("com/main/bean/initAndDispose/bean.xml");

        InitAndDisposeDemo initAndDisposeDemo =
                (InitAndDisposeDemo)context.getBean("InitAndDisposeDemo");

        System.out.println(initAndDisposeDemo.toString());

        context.close();

    }
运行结果如下:
但是上述方法被不被推荐使用,因为这使得你的项目将会和spring框架耦合度变的更紧密,这是一个不好的处理方式。
第二种方式:
在bean配置文件中使用init-method和destroy-method
第一步,修改你的InitAndDisposeDemo类如下(直接删除实现的两个标标记接口):
package com.main.bean.initAndDispose;
import org.springframework.beans.factory.DisposableBean;
import org.springframework.beans.factory.InitializingBean;
public class InitAndDisposeDemo{
private String name;
public String getName() {
return name;
}
public void setName(String name) {
this.name = name;
}
@Override
public String toString() {
return "InitAndDisposeDemo [name=" + name + "]";
}
public void destroy() throws Exception {
System.out.println("destroy:我是销毁函数,当spring容器被销毁时,或者bean被回收资源时被调用。");
}
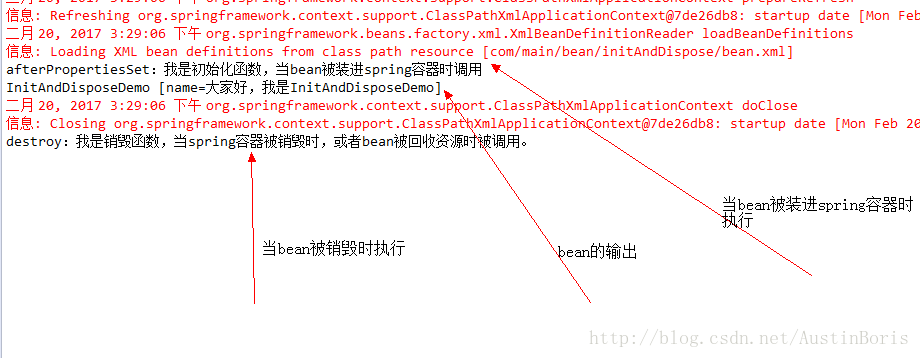
public void init() throws Exception {
System.out.println("afterPropertiesSet:我是初始化函数,当bean被装进spring容器时调用");
}
}
第二步:在bean配置文件中声明init-method和destroy-method
    "InitAndDisposeDemo" class="com.main.bean.initAndDispose.InitAndDisposeDemo"
    init-method="init" destroy-method="destroy">
        "name" value="大家好,我是InitAndDisposeDemo"/>
测试代码和运行结果:依然和第一种的一样;切记要把方法名写对,不然会抛出方法找不到的异常。
第三种方式:
第一步:修改你的InitAndDisposeDemo如下:
    @PreDestroy
    public void destroy() throws Exception {

        System.out.println("destroy:我是销毁函数,当spring容器被销毁时,或者bean被回收资源时被调用。");
    }

    @PostConstruct
    public void init() throws Exception {
        System.out.println("afterPropertiesSet:我是初始化函数,当bean被装进spring容器时调用");
    }
第二步:
在bean配置文件中注册CommonAnnotationBeanPostProcessor,有两种方法:
1:在bean配置文件中添加如下语句
class="org.springframework.context.annotation.CommonAnnotationBeanPostProcessor" /> 2:在bean配置文件中添加如下语句
<context:annotation-config />第三步:执行
说明:执行方法和结果均和上面的例子一样
文档结束,谢谢