android自定义View----通讯录导航栏(快速查找索引)
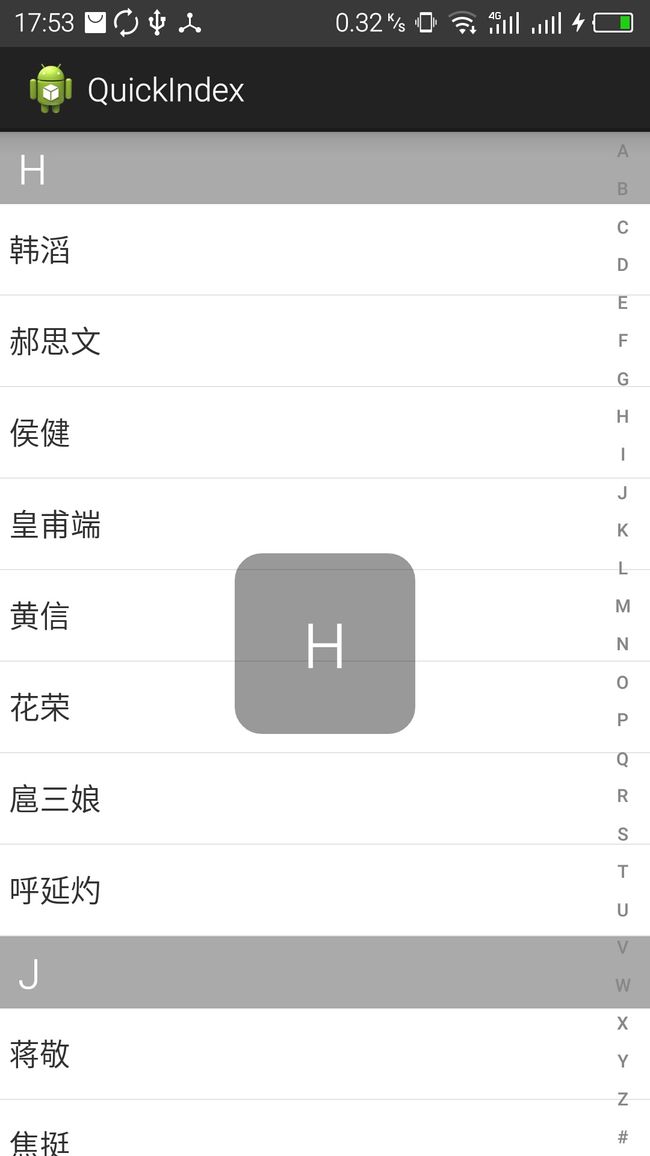
先上效果界面

如图右侧竖排字母即为导航栏,通过自定义View实现。
实现导航思路:当用户点击这个控件时我们需要知道用户点击的哪个字母,并根据字母设置listview的从哪里开始显示,并在中心显示一个该字母的textview,给用户以提示。
所以这个控件的作用:在用户点击按钮时或滑动时,根据手指位置,实时获取字母(假设为M),将字母暴露出来,并提供事件的处理接口setOnLetterUpdateListener。在接口方法中,将listview设置到要显示的item项(listview.setSelection(N))方法。
程序源码地址:https://github.com/dronly/ImoocNews
QuickIndex源码如下
public class QuickIndexBar extends View {

    private static final String[] LETTERS = new String[] { "A", "B", "C", "D",
            "E", "F", "G", "H", "I", "J", "K", "L", "M", "N", "O", "P", "Q",
            "R", "S", "T", "U", "V", "W", "X", "Y", "Z","#" };
    //画笔
    private Paint mPaint;
    //每个字母所在的矩形的宽高
    private float cellWidth;
    private float cellHeight;

    //回调接口
    private OnLetterUpdateListener mOnLetterUpdateListener;

    /*
     * 暴露一个字母的监听
     */
    public interface OnLetterUpdateListener{
        void letterUpdate(String letter);
    }

    public OnLetterUpdateListener getOnLetterUpdateListener() {
        return mOnLetterUpdateListener;
    }

    /*
     * 设置字母监听更新
     * @param listener
     */
    public void setOnLetterUpdateListener(OnLetterUpdateListener mOnLetterUpdateListener) {
        this.mOnLetterUpdateListener = mOnLetterUpdateListener;
    }

    public QuickIndexBar(Context context) {
        this(context, null);
    }

    public QuickIndexBar(Context context, AttributeSet attrs) {
        this(context, attrs, 0);
    }

    public QuickIndexBar(Context context, AttributeSet attrs, int defStyleAttr) {
        super(context, attrs, defStyleAttr);
        mPaint = new Paint(Paint.ANTI_ALIAS_FLAG);
        mPaint.setColor(0xff888888);
//      int textSize = (int)cellHeight/2;
//      mPaint.setTextSize(30);
        mPaint.setTypeface(Typeface.DEFAULT_BOLD);


    }

    @Override
    protected void onDraw(Canvas canvas) {

        for (int i = 0; i < LETTERS.length; i++) {
            String text = LETTERS[i];

            // 计算坐标
            int x = (int) (cellWidth / 2.0f - mPaint.measureText(text) / 2.0f);
            // 获取文本高度
            Rect bounds = new Rect();
            //设置字体大小为cellHeight的三分之二大小
            mPaint.setTextSize(cellHeight/1.5f);
            mPaint.getTextBounds(text, 0, text.length(), bounds);
            int textHeight = bounds.height();
            int y = (int) (cellHeight / 2.0f + textHeight / 2.0f + i
                    * cellHeight);

            // 根据按下的字母, 设置画笔颜色
            mPaint.setColor(touchIndex == i ? Color.BLACK : Color.GRAY);
            canvas.drawText(text, x, y, mPaint);
        }
    }

    int touchIndex = -1;

    @Override
    public boolean onTouchEvent(MotionEvent event) {
        int index = -1;
        switch (MotionEventCompat.getActionMasked(event)) {
        case MotionEvent.ACTION_DOWN:
            index = (int) (event.getY() / cellHeight);
            if (index >= 0 && index < LETTERS.length) {
                if (index != touchIndex) {
                    mOnLetterUpdateListener.letterUpdate(LETTERS[index]);
                }
                touchIndex = index;
            }
            break;
        case MotionEvent.ACTION_UP:
            index = -1;
            touchIndex = -1;
            break;
        case MotionEvent.ACTION_MOVE:
            index = (int) (event.getY() / cellHeight);
            if (index >= 0 && index < LETTERS.length) {
                if (index != touchIndex) {
                    mOnLetterUpdateListener.letterUpdate(LETTERS[index]);
                    Log.d("TAG", LETTERS[index]);
                }
                touchIndex = index;
            }
            break;
        default:
            break;
        }
        invalidate();

        return true;
    }

    @Override
    protected void onSizeChanged(int w, int h, int oldw, int oldh) {
        super.onSizeChanged(w, h, oldw, oldh);
        cellWidth = getMeasuredWidth();
        int mHeight = getMeasuredHeight();
        cellHeight = mHeight * 1.0f / LETTERS.length;
    }
}