本博文议程如下: |
1、生产情况应用案例 |
2、NFS客户端可挂载的参数 |
3、人为模拟错误的学习方法 |
4、NFS在网站架构中的位置 |
5、NFS的优缺点 |
议程1、生产情况实际案例概述:
实现当多台客户端同时挂载一台NFS Server时,无论从哪个客户端写入数据,其他客户端同样可以读写,即让所有NFS客户端写入到NFS Server的文件或目录在NFS Server上的用户和组都是同一个名称nfsnobody 。请给出操作步骤,并加以说明。
实现NFS服务端的/data目录共享,指定主机(自己设置),要求在NFS客户端可读可写入数据,写入的数据可以在NFS Server端看到,请给出操作步骤或配置方法?
解答:
要点:无论什么版本的操作系统,NFS服务默认的配置里匿名uid和gid都为65534
查看3台机器上查看nfsnobody用户的uid和gid分别是多少?是不是相同?
[root@nfs-server ~]# grep nfsnobody /etc/passwd
nfsnobody:x:65534:65534:Anonymous NFS User:/var/lib/nfs:/sbin/nologin
[root@nfs-client1 ~]# grep nfsnobody /etc/passwd
nfsnobody:x:65534:65534:Anonymous NFS User:/var/lib/nfs:/sbin/nologin
[root@nfs-client2 ~]# grep nfsnobody /etc/passwd
nfsnobody:x:65534:65534:Anonymous NFS User:/var/lib/nfs:/sbin/nologin
首先让服务端的portmap启动起来
[root@nfs-server ~]# /etc/init.d/portmap status
portmap (pid 3658) is running...
其次让服务端的NFS启动起来,NFS一定要确保在portmap服务启动之后再启动
[root@nfs-server ~]# /etc/init.d/nfs status
rpc.mountd (pid 3748) is running...
nfsd (pid 3745 3744 3743 3742 3741 3740 3739 3738) is running...
为了确保NFS在portmap之后启动的,让NFS服务重新启动一下即可
[root@nfs-server ~]# /etc/init.d/nfs restart
Shutting down NFS mountd:                                  [  OK  ]
Shutting down NFS daemon:                                  [  OK  ]
Shutting down NFS services:                                [  OK  ]
Starting NFS services:                                     [  OK  ]
Starting NFS daemon:                                       [  OK  ]
Starting NFS mountd:                                       [  OK  ]
分别把portmap和NFS设置为开机自启动
[root@nfs-server ~]# chkconfig portmap on
[root@nfs-server ~]# chkconfig nfs on
[root@nfs-server ~]# chkconfig --list|egrep"portmap|nfs"
nfs             0:off   1:off  2:on    3:on    4:on   5:on    6:off
nfslock         0:off  1:off   2:off   3:on   4:on    5:on    6:off
portmap         0:off  1:off   2:on    3:on   4:on    5:on    6:off
小细节:上面把portmap和NFS都设置成开机自启动了,那么开机的时候到底是哪个先启呢?我们来对比两者的启动脚本来进行深度剖析
[root@nfs-server ~]# more /etc/init.d/nfs #查看NFS服务的启动脚本
接下来就可以共享本地的/data目录给NFS客户端了
[root@nfs-server ~]# vim /etc/exports
[root@nfs-server ~]# cat /etc/exports
/data/ 192.168.1.0/24(rw,sync)
#<==rw表示让客户端可读写,sync表示当客户端把数据写入到服务端的时候,同时写入到硬盘里面。
配置好之后重新加载NFS服务即可
[root@nfs-server ~]# /etc/init.d/nfs reload
注意:这样配置的前提是要确保NFS服务端和客户端的nfsnobody所对应的uid和gid都是65534,这样就能够保证,NFS所有的客户端在往服务端写数据的时候,都会写同一个uid和gid,A服务写一个文件和B服务写一个文件他俩所对应的用户是相同的,此时A写,B可以删,那么这种机制具体是在哪里控制的呢?
[root@nfs-server ~]# cat /var/lib/nfs/etab
/data   192.168.1.0/24(rw,sync,wdelay,hide,nocrossmnt,secure,root_squash,no_all_squash,no_subtree_check,secure_locks,acl,mapping=identity,anonuid=65534,anongid=65534)
#<==红色部分为手动配置部分,其他均为系统默认附加上去的配置
~~~~~~~~~~~~~~~~~~~~~~~~~~~~~~~~~~~~~~~~~~~~~~~~~~~~~~~~~~~~~~~~~~~~~~~~~~~~~~~
开始测试
~~~~~~~~~~~~~~~~~~~~~~~~~~~~~~~~~~~~~~~~~~~~~~~~~~~~~~~~~~~~~~~~~~~~~~~~~~~~~~~
开启客户端portmap服务并加入开机自启动
[root@nfs-client1 ~]# /etc/init.d/portmap restart
Stopping portmap:                                          [  OK  ]
Starting portmap:                                          [  OK  ]
[root@nfs-client1 ~]# chkconfig portmap on
[root@nfs-client1 ~]# chkconfig --list portmap
portmap         0:off   1:off   2:on    3:on    4:on    5:on    6:off
[root@nfs-client2 ~]# /etc/init.d/portmap restart
Stopping portmap:                                          [  OK  ]
Starting portmap:                                          [  OK  ]
[root@nfs-client2 ~]# chkconfig portmap on
[root@nfs-client2 ~]# chkconfig --list portmap
portmap         0:off   1:off   2:on    3:on    4:on    5:on    6:off
客户端mount服务端共享的目录
首先检查服务端是否已经提供了共享目录
[root@nfs-client1 ~]# showmount -e 192.168.1.50
Export list for 192.168.1.50:
/data 192.168.1.0/24
[root@nfs-client2 ~]# showmount -e 192.168.1.50
Export list for 192.168.1.50:
/data 192.168.1.0/24
NFS客户端挂载测试
[root@nfs-client1 ~]# mount -t nfs 192.168.1.50:/data /mnt/
[root@nfs-client1 ~]# df -Th
Filesystem    Type    Size  Used Avail Use% Mounted on
/dev/sda2     ext3     15G  2.3G   12G  17% /
/dev/sda6     ext3    9.5G  151M  8.9G   2% /data
/dev/sda5     ext3    9.5G  151M  8.9G   2% /app
/dev/sda3     ext3    9.5G  151M  8.9G   2% /tools
/dev/sda1     ext3    190M   12M  169M   7% /boot
tmpfs        tmpfs    502M     0  502M   0% /dev/shm
192.168.1.50:/data
               nfs    9.5G  151M  8.9G   2% /mnt
[root@nfs-client2 ~]# mount -t nfs 192.168.1.50:/data/ /mnt/
[root@nfs-client2 ~]# df -Th
Filesystem    Type    Size  Used Avail Use% Mounted on
/dev/sda2     ext3     15G  2.3G   12G  17% /
/dev/sda6     ext3    9.5G  151M  8.9G   2% /data
/dev/sda5     ext3    9.5G  151M  8.9G   2% /app
/dev/sda3     ext3    9.5G  151M  8.9G   2% /tools
/dev/sda1     ext3    190M   12M  169M   7% /boot
tmpfs        tmpfs    502M     0  502M   0% /dev/shm
192.168.1.50:/data/
               nfs    9.5G  151M  8.9G   2% /mnt
[root@nfs-client1 ~]# cd /mnt/
[root@nfs-client1 mnt]# touch {6..8}.txt
touch: cannot touch `6.txt': Permission denied
touch: cannot touch `7.txt': Permission denied
touch: cannot touch `8.txt': Permission denied
[root@nfs-client2 ~]# cd /mnt/
[root@nfs-client2 mnt]# touch {7..10}.txt
touch: 无法触碰 “7.txt”: 权限不够
touch: 无法触碰 “8.txt”: 权限不够
touch: 无法触碰 “9.txt”: 权限不够
touch: 无法触碰 “10.txt”: 权限不够
 [root@nfs-client2 mnt]# export LANG=c
[root@nfs-client2 mnt]# touch {7..10}.txt
touch: cannot touch `7.txt': Permission denied
touch: cannot touch `8.txt': Permission denied
touch: cannot touch `9.txt': Permission denied
touch: cannot touch `10.txt': Permission denied
为什么不允许NFS的客户端来读写呢?
应为客户端过来肯定要被映射成65534这个用户的uid,65534就是nfsnobody的uid,对于nfsnobody这个用户来讲,它只能去读取这个文件,无法写入;所以能读取到该文件,但是写不了?
有两种方法可以解决上述客户端读写的问题?
第一种就是使用上面的把NFS服务端的共享的/data目录授权为777权限,此种方法从操作系统安全的角度来考虑是不合适的,对权限的控制不够精细,容易造成系统漏洞,比如提权等不安全的事件发生;第二种方法是授权NFS服务端的共享目录/data为nfsnobody用户;
推荐采用第二种方法。
[root@nfs-server ~]# chown -R nfsnobody /data/
[root@nfs-server ~]# ls -ld /data/
drwxr-xr-x 2 nfsnobody root 4096 05-01 15:08 /data/
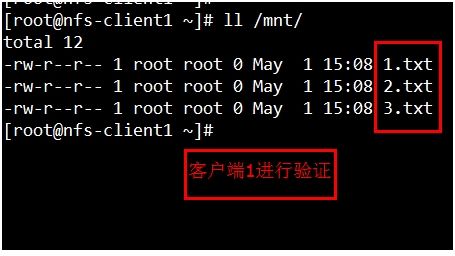
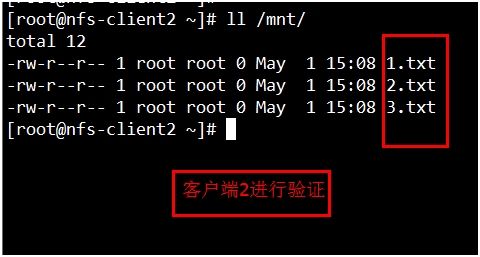
客户端再次进行测试:
实际生产环境的配置参数如下:
[root@nfs-server ~]# vim /etc/exports
 [root@nfs-server ~]# /etc/init.d/nfs reload
[root@nfs-server ~]# cat /etc/exports
#/data/ 192.168.1.0/24(rw,sync)
/data/ 192.168.1.0/24(rw,sync,all_squash)  # all_squash无论客户端是什么用户都压缩为nfsnobody用户来读写文件。
当然了这样做的前提是所有的客户端都拥有同一个uid的用户
[root@nfs-client1 ~]# groupadd nfstest1 -g 1668
[root@nfs-client1 ~]# useradd nfstest1 -u 1668 -g nfstest1
[root@nfs-client1 ~]# tail -1 /etc/passwd
nfstest1:x:1668:1668::/home/nfstest1:/bin/bash
[root@nfs-client1 ~]# id nfstest1
uid=1668(nfstest1) gid=1668(nfstest1) groups=1668(nfstest1) context=root:system_r:unconfined_t:SystemLow-SystemHigh
[root@nfs-client2 ~]# groupadd nfstest1 -g 1668
[root@nfs-client2 ~]# useradd nfstest1 -u 1668 -g nfstest1
[root@nfs-client2 ~]# tail -1 /etc/passwd
nfstest1:x:1668:1668::/home/nfstest1:/bin/bash
[root@nfs-client2 ~]# id nfstest1
uid=1668(nfstest1) gid=1668(nfstest1) groups=1668(nfstest1) context=root:system_r:unconfined_t:SystemLow-SystemHigh
关于NFS服务端认证的万能终极的方法详解:
1、所有的NFS客户端和服务端都建立nfstest1用户及nfstest1组
建立nfstest1组并指定nfstest1的GID为1668客户端也要用同样命令创建
[root@nfs-server ~]# groupadd nfstest1 -g 1668
建立用户nfstest1,指定UID为1668并加入nfstest1组,客户端也用同样命令创建
[root@nfs-server ~]# useradd nfstest1 -u 1668 -g nfstest1
[root@nfs-server ~]# tail -n1 /etc/passwd
nfstest1:x:1668:1668::/home/nfstest1:/bin/bash
[root@nfs-server ~]# id nfstest1
uid=1668(nfstest1) gid=1668(nfstest1) groups=1668(nfstest1) context=root:system_r:unconfined_t:SystemLow-SystemHigh
不要忘记NFS Server本地的文件权限:
/data目录权限 chown -R nfstest1 /data,尽量不要使用chmod -R 777 /data
2、修改/etc/exports文件
/data 192168.1.0/24(rw,sync,all_squash,anonuid=1668,anongid=1668)
3、/etc/init.d/nfsreload
4、客户端主机上,挂载NFS目录
mount -t nfs 192.138.1.50:/data /mnt
5、完整演示
NFS客户端先卸载之前挂载上去的目录
[root@nfs-client1 ~]# umount /mnt/
[root@nfs-client2 ~]# umount /mnt/
NFS服务端操作
[root@nfs-server ~]# vim /etc/exports
[root@nfs-server ~]# cat /etc/exports
#/data/ 192.168.1.0/24(rw,sync)
/nfstest1 192.168.1.0/24(rw,sync,all_squash,anonuid=1668,anongid=1668)
[root@nfs-server ~]# chown -R nfstest1 /nfstest1/
[root@nfs-server ~]# ls -ld /nfstest1 192.168.1.0/24(rw,sync,all_squash,anonuid=1668,anongid=1668)
drwxr-xr-x 2 nfstest1 root 4096 05-01 22:21 /nfstest1/
[root@nfs-server ~]# /etc/init.d/nfs reload #<===服务端重新读取配置文件
客户端挂载
[root@nfs-client1 ~]# showmount -e 192.168.1.50
Export list for 192.168.1.50:
/nfstest1 192.168.1.0/24
[root@nfs-client1 ~]# mount -t nfs 192.168.1.50:/nfstest1 /mnt/
[root@nfs-client1 ~]# df -Th
Filesystem    Type    Size  Used Avail Use% Mounted on
/dev/sda2     ext3     15G  2.3G   12G  17% /
/dev/sda6     ext3    9.5G  151M  8.9G   2% /data
/dev/sda5     ext3    9.5G  151M  8.9G   2% /app
/dev/sda3     ext3    9.5G  151M  8.9G   2% /tools
/dev/sda1     ext3    190M   12M  169M   7% /boot
tmpfs        tmpfs    502M     0  502M   0% /dev/shm
192.168.1.50:/nfstest1
               nfs     15G  2.3G   12G  17% /mnt
[root@nfs-client2 ~]# showmount -e 192.168.1.50
Export list for 192.168.1.50:
/nfstest1 192.168.1.0/24
[root@nfs-client2 ~]# mount -t nfs 192.168.1.50:/nfstest1 /mnt/
[root@nfs-client2 ~]# df -Th
Filesystem    Type    Size  Used Avail Use% Mounted on
/dev/sda2     ext3     15G  2.3G   12G  17% /
/dev/sda6     ext3    9.5G  151M  8.9G   2% /data
/dev/sda5     ext3    9.5G  151M  8.9G   2% /app
/dev/sda3     ext3    9.5G  151M  8.9G   2% /tools
/dev/sda1     ext3    190M   12M  169M   7% /boot
tmpfs        tmpfs    502M     0  502M   0% /dev/shm
192.168.1.50:/nfstest1
               nfs     15G  2.3G   12G  17% /mnt
[root@nfs-server ~]# nl /var/lib/nfs/rmtab
     1  192.168.1.52:/data:0x00000003
     2  192.168.1.51:/data:0x00000001
     3  192.168.1.51:/nfstest1:0x00000001
     4  192.168.1.52:/nfstest1:0x00000001
此文件记录了哪些客户端来访问过NFS服务端共享的哪些目录,一般来讲通过此文件就就可以知道有哪些客户端在挂载我们的NFS服务的共享目录。
设置客户端开机启动挂载
[root@nfs-client1 ~]# which mount
/bin/mount
[root@nfs-client1 ~]# /bin/mount -t nfs 192.168.1.50:/nfstest1 /mnt/
mount.nfs: /mnt is already mounted or busy
[root@nfs-client1 ~]# vim /etc/rc.local
[root@nfs-client1 ~]# tail -n1 /etc/rc.local
/bin/mount -t nfs 192.168.1.50:/nfstest1 /mnt/
[root@nfs-client2 ~]# which mount
/bin/mount
[root@nfs-client2 ~]# vim /etc/rc.local
[root@nfs-client2 ~]# tail -n1 /etc/rc.local
/bin/mount -t nfs 192.168.1.50:/nfstest1 /mnt/
议程2、NFS客户端可挂载的参数
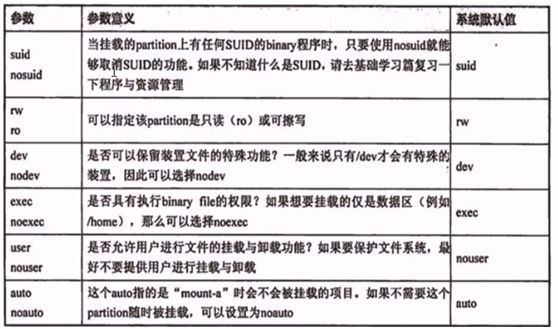
NFS客户端mount挂载参数
一般来说,当NFS服务器提供的只是普通数据(图片,HTML,CSS,js,视频,附件等),应该不需要执行suid,exec等权限,因此在挂载的时候,可以这样执行命令:
mount -t nfs -o nosuid,noexec,rw,192.168.1.50:/data /mnt
这样一来,挂载的这个文件夹系统就只能作为数据存取之用,相对来说,对于客户端比较安全一些。
[root@nfs-client1 ~]# umount /mnt/
 [root@nfs-client1 ~]# mount -t nfs -o nosuid,noexec,nodev,rw,sync 192.168.1.50:/nfstest1 /mnt/
[root@nfs-client1 ~]# df -Th
Filesystem    Type    Size  Used Avail Use% Mounted on
/dev/sda2     ext3     15G  2.3G   12G  17% /
/dev/sda6     ext3    9.5G  151M  8.9G   2% /data
/dev/sda5     ext3    9.5G  151M  8.9G   2% /app
/dev/sda3     ext3    9.5G  151M  8.9G   2% /tools
/dev/sda1     ext3    190M   12M  169M   7% /boot
tmpfs        tmpfs    502M     0  502M   0% /dev/shm
192.168.1.50:/nfstest1
               nfs     15G  2.3G   12G  17% /mnt
[root@nfs-client1 ~]# mkdir /mnt/test`data +%F`
-bash: data: command not found
[root@nfs-client1 ~]# mkdir /mnt/`date +%F`
[root@nfs-client2 ~]# mount -t nfs -o nosuid,noexec,nodev,rw,sync 192.168.1.50:/nfstest1 /mnt/
[root@nfs-client2 ~]# df -Th
Filesystem    Type    Size  Used Avail Use% Mounted on
/dev/sda2     ext3     15G  2.3G   12G  17% /
/dev/sda6     ext3    9.5G  151M  8.9G   2% /data
/dev/sda5     ext3    9.5G  151M  8.9G   2% /app
/dev/sda3     ext3    9.5G  151M  8.9G   2% /tools
/dev/sda1     ext3    190M   12M  169M   7% /boot
tmpfs        tmpfs    502M     0  502M   0% /dev/shm
192.168.1.50:/nfstest1
               nfs     15G  2.3G   12G  17% /mnt
 [root@nfs-client2 ~]# ll /mnt/
total 40
-rw-r--r-- 1 nfstest1 nfstest1    0 May  1 23:22 1.txt
-rw-r--r-- 1 nfstest1 nfstest1    0 May  1 23:23 2.txt
drwxr-xr-x 2 nfstest1 nfstest1 4096 May  1 23:48 2014-05-01
-rw-r--r-- 1 root     root        0 May  1 23:22 3.txt
-rw-r--r-- 1 root     root        0 May  1 23:22 4.txt
-rw-r--r-- 1 root     root        0 May  1 23:22 5.txt
-rw-r--r-- 1 root     root        0 May  1 23:22 6.txt
drwxr-xr-x 2 nfstest1 nfstest1 4096 May  1 23:47 test
mount -t nfs -o nosuid,noexec,nodev,rw,hard,intr,rsize=32768,wsize=32768 192.168.1.50:/nfstest1 /mnt
[root@nfs-client1 ~]# mount -t nfs -o nosuid,noexec,nodev,rw,hard,intr,rsize=32768,wsize=32768 192.168.1.50:/nfstest1 /mnt
[root@nfs-client1 ~]# df -Th
Filesystem    Type    Size  Used Avail Use% Mounted on
/dev/sda2     ext3     15G  2.3G   12G  17% /
/dev/sda6     ext3    9.5G  151M  8.9G   2% /data
/dev/sda5     ext3    9.5G  151M  8.9G   2% /app
/dev/sda3     ext3    9.5G  151M  8.9G   2% /tools
/dev/sda1     ext3    190M   12M  169M   7% /boot
tmpfs        tmpfs    502M     0  502M   0% /dev/shm
192.168.1.50:/nfstest1
               nfs     15G  2.3G   12G  17% /mnt
[root@nfs-client2 ~]# mount -t nfs -o nosuid,noexec,nodev,rw,hard,intr,rsize=32768,wsize=32768 192.168.1.50:/nfstest1 /mnt
[root@nfs-client2 ~]# df -Th
Filesystem    Type    Size  Used Avail Use% Mounted on
/dev/sda2     ext3     15G  2.3G   12G  17% /
/dev/sda6     ext3    9.5G  151M  8.9G   2% /data
/dev/sda5     ext3    9.5G  151M  8.9G   2% /app
/dev/sda3     ext3    9.5G  151M  8.9G   2% /tools
/dev/sda1     ext3    190M   12M  169M   7% /boot
tmpfs        tmpfs    502M     0  502M   0% /dev/shm
192.168.1.50:/nfstest1
               nfs     15G  2.3G   12G  17% /mnt
[root@nfs-client2 ~]# mount -a
[root@nfs-client2 ~]# mount
/dev/sda2 on / type ext3 (rw)
proc on /proc type proc (rw)
sysfs on /sys type sysfs (rw)
devpts on /dev/pts type devpts (rw,gid=5,mode=620)
/dev/sda6 on /data type ext3 (rw)
/dev/sda5 on /app type ext3 (rw)
/dev/sda3 on /tools type ext3 (rw)
/dev/sda1 on /boot type ext3 (rw)
tmpfs on /dev/shm type tmpfs (rw)
none on /proc/sys/fs/binfmt_misc type binfmt_misc (rw)
sunrpc on /var/lib/nfs/rpc_pipefs type rpc_pipefs (rw)
192.168.1.50:/nfstest1 on /mnt type nfs (rw,noexec,nosuid,nodev,hard,intr,rsize=32768,wsize=32768,addr=192.168.1.50)
lips:NFS后续优化1、
NFS后续优化2、修改内核参数
echo 262144>/proc/sys/net/core/rmem_default
echo 262144>/proc/sys/net/core/rmem_max
[root@nfs-client1 ~]# cat /proc/sys/net/core/rmem_default
129024
[root@nfs-client1 ~]# echo 262144  >/proc/sys/net/core/rmem_default
[root@nfs-client1 ~]# cat /proc/sys/net/core/rmem_default
262144
[root@nfs-client1 ~]# cat /proc/sys/net/core/rmem_max
131071
[root@nfs-client1 ~]# echo 262144 >/proc/sys/net/core/rmem_max
[root@nfs-client1 ~]# cat /proc/sys/net/core/rmem_max
262144
[root@nfs-client2 ~]#  echo 262144  >/proc/sys/net/core/rmem_default
[root@nfs-client2 ~]# cat /proc/sys/net/core/rmem_default
262144
[root@nfs-client2 ~]# echo 262144 >/proc/sys/net/core/rmem_max
[root@nfs-client2 ~]# cat /proc/sys/net/core/rmem_max
262144
NFS问题:umount: /mnt: device is busy解决办法
当无法卸载NFS挂载目录时,如下:
[root@nfs-client1 mnt]# umount /mnt/
umount: /mnt: device is busy
umount: /mnt: device is busy
原因及解决方法:
1、可能当前目录就是挂载的NFS目录(/mnt)
解决方法:退出挂载的目录/mnt,再执行umount /mnt卸载
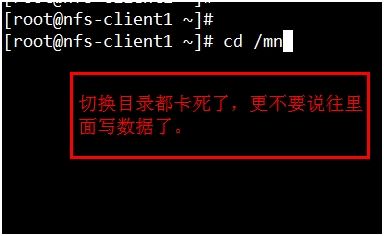
2、比如NFS Server挂了,NFS client会出问题(df -Th 窗口会死掉)
解决方法:采用强制卸载方法umount -lf /mnt
议程3:人为模拟错误的学习方法(重中之重)
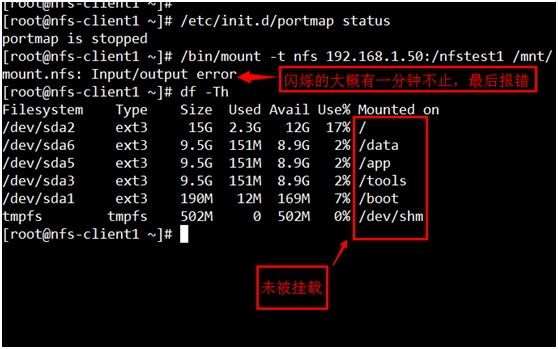
模拟错误(1)、:把NFS client1的portmap服务停掉,然后再client1上,往里面写数据,可以写入吗?如果可以写入数据,那么client2上还可以看到吗?
[root@nfs-client1 ~]# /etc/init.d/portmap  stop
Stopping portmap:                                          [  OK  ]
[root@nfs-client1 ~]# df -Th
Filesystem    Type    Size  Used Avail Use% Mounted on
/dev/sda2     ext3     15G  2.3G   12G  17% /
/dev/sda6     ext3    9.5G  151M  8.9G   2% /data
/dev/sda5     ext3    9.5G  151M  8.9G   2% /app
/dev/sda3     ext3    9.5G  151M  8.9G   2% /tools
/dev/sda1     ext3    190M   12M  169M   7% /boot
tmpfs        tmpfs    502M     0  502M   0% /dev/shm
192.168.1.50:/nfstest1
               nfs     15G  2.3G   12G  17% /mnt
[root@nfs-client1 ~]# cd /mnt/
[root@nfs-client1 mnt]# mkdir test`date +%F`
[root@nfs-client1 mnt]# ll
total 48
-rw-r--r-- 1 nfstest1 nfstest1    0 May  1 23:22 1.txt
-rw-r--r-- 1 nfstest1 nfstest1    0 May  1 23:23 2.txt
drwxr-xr-x 2 nfstest1 nfstest1 4096 May  1 23:48 2014-05-01
-rw-r--r-- 1 root     root        0 May  1 23:22 3.txt
-rw-r--r-- 1 root     root        0 May  1 23:22 4.txt
-rw-r--r-- 1 root     root        0 May  1 23:22 5.txt
-rw-r--r-- 1 root     root        0 May  1 23:22 6.txt
drwxr-xr-x 2 nfstest1 nfstest1 4096 May  1 23:47 test
drwxr-xr-x 2 nfstest1 nfstest1 4096 May  2 00:28 test2014-05-02
[root@nfs-client2 ~]# cd /mnt/
[root@nfs-client2 mnt]# ll
total 48
-rw-r--r-- 1 nfstest1 nfstest1    0 May  1 23:22 1.txt
-rw-r--r-- 1 nfstest1 nfstest1    0 May  1 23:23 2.txt
drwxr-xr-x 2 nfstest1 nfstest1 4096 May  1 23:48 2014-05-01
-rw-r--r-- 1 root     root        0 May  1 23:22 3.txt
-rw-r--r-- 1 root     root        0 May  1 23:22 4.txt
-rw-r--r-- 1 root     root        0 May  1 23:22 5.txt
-rw-r--r-- 1 root     root        0 May  1 23:22 6.txt
drwxr-xr-x 2 nfstest1 nfstest1 4096 May  1 23:47 test
drwxr-xr-x 2 nfstest1 nfstest1 4096 May  2 00:28 test2014-05-02
[root@nfs-server ~]# ll /nfstest1/
总计 48
-rw-r--r-- 1 nfstest1 nfstest1    0 05-01 23:22 1.txt
drwxr-xr-x 2 nfstest1 nfstest1 4096 05-01 23:48 2014-05-01
-rw-r--r-- 1 nfstest1 nfstest1    0 05-01 23:23 2.txt
-rw-r--r-- 1 root     root        0 05-01 23:22 3.txt
-rw-r--r-- 1 root     root        0 05-01 23:22 4.txt
-rw-r--r-- 1 root     root        0 05-01 23:22 5.txt
-rw-r--r-- 1 root     root        0 05-01 23:22 6.txt
drwxr-xr-x 2 nfstest1 nfstest1 4096 05-01 23:47 test
drwxr-xr-x 2 nfstest1 nfstest1 4096 05-02 00:28 test2014-05-02
总结:把NFS client1的portmap服务停掉了,但是已有的服务通信还是正常的呢,这是为什么呢?
当服务端启动完毕之后,客户端的portmap先和服务端的portmap沟通,沟通之后由portmap向我汇报NFS的端口,此时客户端会直接和NFS打交道;此时客户端没有portmap服务也可以,因为在portmap服务在启动的一瞬间它的任务就已经完成了;所以说它能够进行沟通。
但是会有一个问题,放你把NFS卸载之后,[root@nfs-client1 ~]# umount /mnt/
重新挂载,因为portmap服务已经停止运行了,这个时候重新挂载,
当portmap服务开启之后很快就可以挂载了
[root@nfs-client1 ~]# /etc/init.d/portmap start
Starting portmap:                                          [  OK  ]
[root@nfs-client1 ~]# /bin/mount -t nfs 192.168.1.50:/nfstest1 /mnt/
[root@nfs-client1 ~]# mount -a
[root@nfs-client1 ~]# mount
/dev/sda2 on / type ext3 (rw)
proc on /proc type proc (rw)
sysfs on /sys type sysfs (rw)
devpts on /dev/pts type devpts (rw,gid=5,mode=620)
/dev/sda6 on /data type ext3 (rw)
/dev/sda5 on /app type ext3 (rw)
/dev/sda3 on /tools type ext3 (rw)
/dev/sda1 on /boot type ext3 (rw)
tmpfs on /dev/shm type tmpfs (rw)
none on /proc/sys/fs/binfmt_misc type binfmt_misc (rw)
sunrpc on /var/lib/nfs/rpc_pipefs type rpc_pipefs (rw)
192.168.1.50:/nfstest1 on /mnt type nfs (rw,addr=192.168.1.50)
模拟错误(2)、把NFS Server端的portmap服务停掉
客户端采用mount默认卸载参数卸载不掉,需强制卸载才可以哦!
[root@nfs-client1 ~]# umount /mnt/
[root@nfs-client1 ~]# df -Th
Filesystem    Type    Size  Used Avail Use% Mounted on
/dev/sda2     ext3     15G  2.3G   12G  17% /
/dev/sda6     ext3    9.5G  151M  8.9G   2% /data
/dev/sda5     ext3    9.5G  151M  8.9G   2% /app
/dev/sda3     ext3    9.5G  151M  8.9G   2% /tools
/dev/sda1     ext3    190M   12M  169M   7% /boot
tmpfs        tmpfs    502M     0  502M   0% /dev/shm
192.168.1.50:/nfstest1
               nfs     15G  2.3G   12G  17% /mnt
[root@nfs-client1 ~]# umount -lf /mnt/
[root@nfs-client1 ~]# df -Th
Filesystem    Type    Size  Used Avail Use% Mounted on
/dev/sda2     ext3     15G  2.3G   12G  17% /
/dev/sda6     ext3    9.5G  151M  8.9G   2% /data
/dev/sda5     ext3    9.5G  151M  8.9G   2% /app
/dev/sda3     ext3    9.5G  151M  8.9G   2% /tools
/dev/sda1     ext3    190M   12M  169M   7% /boot
tmpfs        tmpfs    502M     0  502M   0% /dev/shm
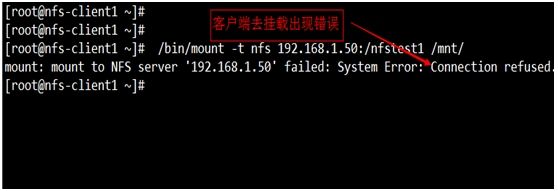
一般出现连接拒绝的原因不外乎是对方的防火墙策略设置、对方的端口和服务没有开启等导致的问题。
[root@nfs-server ~]# /etc/init.d/portmap  start
启动 portmap:                                             [确定]
[root@nfs-client1 ~]#  /bin/mount -t nfs 192.168.1.50:/nfstest1 /mnt/
mount: mount to NFS server '192.168.1.50' failed: RPC Error: Program not registered.
虽然portmap服务已经起来了,但是NFS 向portmap注册的端口信息已经丢失了
[root@nfs-server ~]# rpcinfo -p localhost
   program vers proto   port
    100000    2   tcp    111  portmapper
    100000    2   udp    111  portmapper
当NFS Server 端没注册端口了,NFS client 向NFS Server 要端口的时候,服务端就告诉你,你没向它注册,哈哈!出现这种情况,我们可能就大概知道是服务端的NFS 没向portmap注册。
[root@nfs-server ~]# /etc/init.d/nfs restart
Shutting down NFS mountd:                                  [  OK  ]
Shutting down NFS daemon:                                  [  OK  ]
Shutting down NFS services:                                [  OK  ]
Starting NFS services:                                     [  OK  ]
Starting NFS daemon:                                       [  OK  ]
Starting NFS mountd:                                       [  OK  ]
[root@nfs-server ~]# rpcinfo -p localhost
   program vers proto   port
    100000    2   tcp    111  portmapper
    100000    2   udp    111  portmapper
    100003    2   udp   2049  nfs
    100003    3   udp   2049  nfs
    100003    4   udp   2049  nfs
    100021    1   udp  45436  nlockmgr
    100021    3   udp  45436  nlockmgr
    100021    4   udp  45436  nlockmgr
    100003    2   tcp   2049  nfs
    100003    3   tcp   2049  nfs
    100003    4   tcp   2049  nfs
    100021    1   tcp  49972  nlockmgr
    100021    3   tcp  49972  nlockmgr
    100021    4   tcp  49972  nlockmgr
    100005    1   udp    771  mountd
    100005    1   tcp    774  mountd
    100005    2   udp    771  mountd
    100005    2   tcp    774  mountd
    100005    3   udp    771  mountd
    100005    3   tcp    774  mountd
OK,已经可以成功挂载了
[root@nfs-client1 ~]#  /bin/mount -t nfs 192.168.1.50:/nfstest1 /mnt/
[root@nfs-client1 ~]# df -Th
Filesystem    Type    Size  Used Avail Use% Mounted on
/dev/sda2     ext3     15G  2.3G   12G  17% /
/dev/sda6     ext3    9.5G  151M  8.9G   2% /data
/dev/sda5     ext3    9.5G  151M  8.9G   2% /app
/dev/sda3     ext3    9.5G  151M  8.9G   2% /tools
/dev/sda1     ext3    190M   12M  169M   7% /boot
tmpfs        tmpfs    502M     0  502M   0% /dev/shm
192.168.1.50:/nfstest1
               nfs     15G  2.3G   12G  17% /mnt
模拟错误3、把NFS Server端的NFS服务停掉
因为NFS Server端的NFS服务停止了之后,客户端通过portmap跟NFS服务端的portmap进行沟通之后,服务端的portmap告诉客户端NFS端口,然后客户端跟NFS Server端进行联机交换数据,那么,现在的情况是NFS 挂掉了,自然也就没法交换数据了;
解决方法:另开启一终端,使用下列命令强制卸载
[root@nfs-client1 ~]# umount -lf /mnt
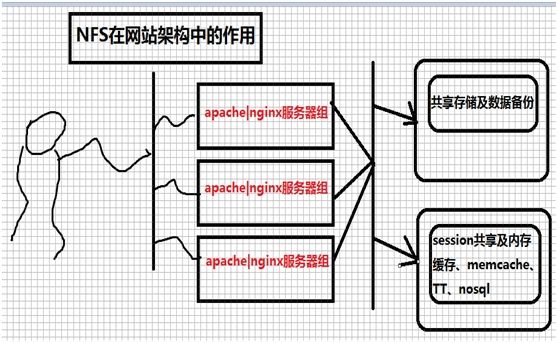
议程4、NFS在网站架构生产环境中的位置
议程5、NFS的优缺点
NFS的优点:
1、简单-->容易上手掌握
2、方便-->部署快速,维护简单
3、可靠-->从软件层面上看,数据可靠性高,经久耐用
NFS的局限:
1、局限性是存在单点故障,如果NFS Server宕机了,所有客户端都不能访问共享目录。
2、在高并发的场合,NFS效率性能有限(一般几千万一下PV的网站不是瓶颈,处分是网站架构太差)
3、客户端认证时基于ip和主机名的,安全性一般(用于内网问题不大)
4、NFS数据是明文的,对数据安全性不作验证
5、多机挂载服务器时,连接管理麻烦。尤其NFS服务端出项问题后,所有客户端都挂掉状态(可使用autofs自动挂载解决)
生产应用场景:
中小型网站(2000W-2500WPV以下)线上使用,都有用武之地。门户网站也会有其他方面的应用,当然未必是线上存储使用。


