* 环境:
Centos 7
openldap版本:
openldap-2.4.40-13.el7.x86_64
openldap-servers-2.4.40-13.el7.x86_64
需要提前同步好时间,配置好主机名。
* 一、安装openldap
1.1 安装软件包
[[email protected] ~]# yum install openldap openldap-servers openldap-clients openldap-devel compat-openldap -y
1.2 生成数据库配置文件
[[email protected] ~] #cp /usr/share/openldap-servers/DB_CONFIG.example /var/lib/ldap/DB_CONFIG
[[email protected] ~]# cd /etc/openldap/
[[email protected] openldap]# cp -r slapd.d /tmp/
[[email protected] openldap]# rm -rf slapd.d/*
1.3 创建数据库初始化配置文件(各项的参数意义,请参考openldap官方文档 http://www.openldap.org/doc/admin24/index.html)
vim slapd.ldif
内容参考链接:https://blog.51cto.com/12113362/2050542
1.4 转换成数据库配置文件
[[email protected] openldap]#cat slapd.ldif | slapadd -v -F /etc/openldap/slapd.d -n 0
1.5 赋予正确的权限
[[email protected] openldap]#chown -R ldap:ldap /etc/openldap/slapd.d
1.6 启动
[[email protected] openldap]#systemctl start slapd
* 二、修改日志等级
2.1 创建日志LDIF文件
[[email protected] openldap]#vim logLevel.ldif
dn: cn=config
changeType: modify
add: olcLogLevel
olcLogLevel: 256
2.2 修改ldap配置文件
[[email protected] openldap]#vim /etc/openldap/ldap.conf
#BASE dc=example,dc=com
BASE dc=test,dc=com
2.3 写入修改到数据库
[[email protected] openldap]#ldapmodify -x -D cn=Manager,cn=config -W -f logLevel.ldif
Enter LDAP Password:
modifying entry "cn=config"
[[email protected] openldap]#vim /etc/rsyslog.d/slapd.conf
local4.* /var/log/slapd/slapd.log
2.4 创建日志目录文件
[[email protected] openldap]#mkdir /var/log/slapd
[[email protected] openldap]#touch /var/log/slapd/slapd.log
[[email protected] openldap]#chown -R ldap:ldap /var/log/slapd
[[email protected] openldap]#systemctl restart rsyslog
* 三、安装phpldapadmin web客户端
3.1 获取epel 源
# wget http://mirror.centos.org/centos/7/extras/x86_64/Packages/epel-release-7-9.noarch.rpm
# rpm -ivh epel-release-7-9.noarch.rpm
3.2 安装phpldapadmin
#yum install phpldapadmin -y
3.3 配置
设置config.php 允许dn登录
vim /usr/share/phpldapadmin/config/config.php
397 $servers->setValue('login','attr','dn');
398 // $servers->setValue('login','attr','uid');
vim /etc/httpd/conf.d/phpldapadmin.conf
#
# Web-based tool for managing LDAP servers
#
Alias /phpldapadmin /usr/share/phpldapadmin/htdocs
Alias /ldapadmin /usr/share/phpldapadmin/htdocs
# Apache 2.4
Require all granted
Require ip 116.213.168.185
# Apache 2.2
Order Deny,Allow
Deny from all
Allow from 127.0.0.1
Allow from ::1
#systemctl restart httpd
#http://ip/ldapadmin/ 进行访问
* 四、创建组织结构
[[email protected] openldap]# vim organization.ldif
dn: dc=test,dc=com
dc: test
objectClass: top
objectClass: domain
dn: o=test,dc=test,dc=com
o: test
objectClass: organization
objectClass: top
dn: ou=rd,o=test,dc=test,dc=com
ou: rd
objectClass: organizationalUnit
objectClass: top
dn: ou=op,o=test,dc=test,dc=com
ou: op
objectClass: top
objectClass: organizationalUnit
[[email protected] openldap]#ldapadd -x -D cn=Manager,dc=test,dc=com -W -f organization.ldif
Enter LDAP Password:
adding new entry "dc=test,dc=com"
adding new entry "o=test,dc=test,dc=com"
adding new entry "ou=rd,o=test,dc=test,dc=com"
adding new entry "ou=op,o=test,dc=test,dc=com"
* 需要自己修改模板的话可以自己修改相应的文件把修改好的模板传到/usr/share/phpldapadmin/templates/creation/下 posixAccount.xml posixGroup.xml
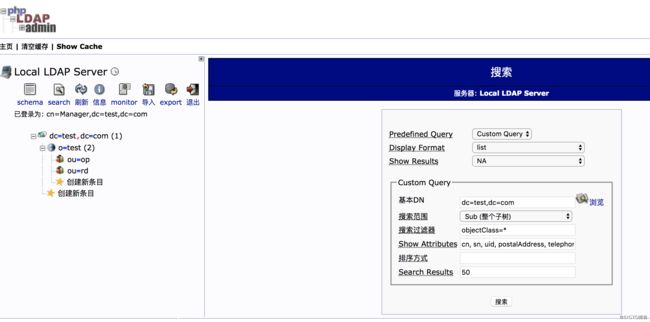
最后生成的界面:
