gridview是asp.net常用的显示数据控件,对于.net开发人员来说应该是非常的熟悉了。gridview自带有许多功能,包括分页,排序等等,但是作为一个.net开发人员来说熟练掌握利用存储过程分页或者第三方自定义分页十分重要,这不仅是项目的需要,也是我们经验能力的提示,下面我就来讲利用存储过程分页实现绑定gridview
1、执行存储过程
网上有许多sql分页存储过程的例子,但是你会发现其中有许多一部分是不能用的,例如有些使用in或者not in来分页效率非常的低,有些sp可以分页但是扩展型非常差,有些效率也比较高,但是不能返回查询记录总数,
例如下面的这个分页,尽管比较简单,但是用not in来分页效率比较低,且查询表已经固定死了,无法扩展,其实是个失败的分页
CREATE PROCEDURE GetProductsByPage
@PageNumber int,
@PageSize int
AS
declare @sql nvarchar(4000)
set @sql = 'select top ' + Convert(varchar, @PageSize) + ' * from test where id not in (select top ' + Convert(varchar, (@PageNumber - 1) * @PageSize) + ' id from test)'
exec sp_executesql @sql
GO
综上我觉得这个分页总体上来说比较好的效率也非常的高且分页只需要执行一次sp,分页支持多表多标间查询
ALTER PROCEDURE [dbo].[Proc_SqlPageByRownumber]
 (
  @tbName VARCHAR(255),   --表名
  @tbGetFields VARCHAR(1000)= '*',--返回字段
  @OrderfldName VARCHAR(255),  --排序的字段名
  @PageSize INT=20,    --页尺寸
  @PageIndex INT=1,    --页码
  @OrderType bit = 0,    --0升序,非0降序
  @strWhere VARCHAR(1000)='',  --查询条件
  @TotalCount INT OUTPUT   --返回总记录数
 )
 AS
 -- =============================================
 -- Author:  allen (liyuxin)
 -- Create date: 2012-03-30
 -- Description: 分页存储过程(支持多表连接查询)
 -- Modify [1]: 2012-03-30
 -- =============================================
 BEGIN
  DECLARE @strSql VARCHAR(5000) --主语句
  DECLARE @strSqlCount NVARCHAR(500)--查询记录总数主语句
  DECLARE @strOrder VARCHAR(300) -- 排序类型

  --------------总记录数---------------
  IF ISNULL(@strWhere,'') <>''
   SET @strSqlCount='Select @TotalCout=count(*) from ' + @tbName + ' where 1=1 '+ @strWhere
  ELSE SET @strSqlCount='Select @TotalCout=count(*) from ' + @tbName

  exec sp_executesql @strSqlCount,N'@TotalCout int output',@TotalCount output
  --------------分页------------
  IF @PageIndex <= 0 SET @PageIndex = 1

  IF(@OrderType<>0) SET @strOrder=' ORDER BY '+@OrderfldName+' DESC '
  ELSE SET @strOrder=' ORDER BY '+@OrderfldName+' ASC '

  SET @strSql='SELECT * FROM
  (SELECT ROW_NUMBER() OVER('+@strOrder+') RowNo,'+ @tbGetFields+' FROM ' + @tbName + ' WHERE 1=1 ' + @strWhere+' ) tb
  WHERE tb.RowNo BETWEEN '+str((@PageIndex-1)*@PageSize+1)+' AND ' +str(@PageIndex*@PageSize)

  exec(@strSql)
  SELECT @TotalCount
 END
2 、封装c#调用语句
我们总是习惯上对代码进行封装,这样可以提高代码的阅读效率,维护起来也更加方便,养成良好的封装代码习惯,我们就从初级步入了中级,其实这只是个习惯而已
public static class PageHelper
{
///
/// 分页数据
///
/// 表明
/// 返回字段
/// 条件
/// 每页记录数
/// 当前页数
/// 总记录数
/// 排序字段
///
/// 执行存储过程,返回DataTable
///
///
///
3、 gridview利用第三方插件实现分页
分页现在比较流行的插件是aspnetpager,这是一个比较成熟的插件,网上也有许多的例子。
1 )、下载aspnetpager插件,然后右键引用。
2 )、 打开工具箱,在选项卡上右键选择项导入插件
3 )、拖控件到页面,设置控件的属性
后台代码
protected void Page_Load(object sender, EventArgs e)
  {
   if (!IsPostBack)
   {
    GridViewBind("");
   }
  }

  private void GridViewBind(string sqlWhere)
  {
   int TotalCount;
   DataTable dt = bll.GetList("stu_score", "code,name,beginTime,endTime,score", "id", this.AspNetPager1.PageSize, this.AspNetPager1.CurrentPageIndex, 1,sqlWhere, out TotalCount);
   this.AspNetPager1.RecordCount = TotalCount;
   this.GridView1.DataSource = dt;
   this.GridView1.DataBind();
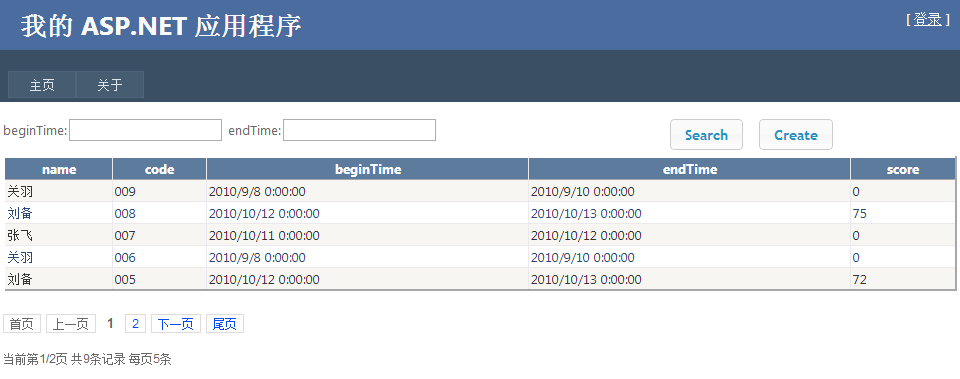
   this.AspNetPager1.CustomInfoHTML = string.Format("当前第{0}/{1}页 共{2}条记录 每页{3}条", new object[] { this.AspNetPager1.CurrentPageIndex, this.AspNetPager1.PageCount, this.AspNetPager1.RecordCount, this.AspNetPager1.PageSize });
  }


//GridView高亮行显示
  protectedvoid GridView1_RowDataBound1(object sender, GridViewRowEventArgs e)
   {
    if (e.Row.RowType == DataControlRowType.DataRow)
    {
      e.Row.Attributes.Add("onmouseover", "c=this.style.backgroundColor,this.style.backgroundColor='#C7DEF3'");
     e.Row.Attributes.Add("onmouseout", "this.style.backgroundColor=c");
    }
   }
前台代码
|
beginTime: |
|
|
|
|
|
|
|
4 、当然你可以对你的gridview进行样式调整,新建gridviewSY.css
.GridViewStyle
{
 border-right: 2px solid #A7A6AA;
 border-bottom: 2px solid #A7A6AA;
 border-left: 2px solid white;
 border-top: 2px solid white;
 padding: 4px;
}
.GridViewStyle a
{
 color: #FFFFFF;
}

.GridViewHeaderStyle th
{
 border-left: 1px solid #EBE9ED;
 border-right: 1px solid #EBE9ED;
}

.GridViewHeaderStyle
{
 background-color: #5D7B9D;
 font-weight: bold;
 color: White;
}

.GridViewFooterStyle
{
 background-color: #5D7B9D;
 font-weight: bold;
 color: White;
}

.GridViewRowStyle
{
 background-color: #F7F6F3;
 color: #333333;
}

.GridViewAlternatingRowStyle
{
 background-color: #FFFFFF;
 color: #284775;
}

.GridViewRowStyle td, .GridViewAlternatingRowStyle td
{
 border: 1px solid #EBE9ED;
}

.GridViewSelectedRowStyle
{
 background-color: #E2DED6;
 font-weight: bold;
 color: #333333;
}

.GridViewPagerStyle
{
 background-color: #284775;
 color: #FFFFFF;
}

.GridViewPagerStyle table /* to center the paging links*/
{
 margin: 0 auto 0 auto;
分页控件也添加样式,当然gridview样式和分页样式在同一个css中了

.paginator { font: 11px Arial, Helvetica, sans-serif;padding:10px 20px

10px 0; margin: 0px;}
.paginator a {padding: 1px 6px; border: solid 1px #ddd; background:

#fff; text-decoration: none;margin-right:2px}
.paginator a:visited {padding: 1px 6px; border: solid 1px #ddd;

background: #fff; text-decoration: none;}
.paginator .cpb {padding: 1px 6px;font-weight: bold; font-size:

13px;border:none}
.paginator a:hover {color: #fff; background: #ffa501;border-

color:#ffa501;text-decoration: none;}
页面最总结果显示样式,
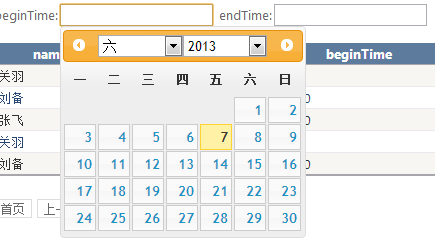
接下来我们给时间添加样式,给时间添加样式普遍选择的是datePicker插件,导入控件所用的js和css
默认时间插件显示的是英文,我们给他汉化
新建initdatepicker_cn.js
function initdatepicker_cn() {
 $.datepicker.regional['zh-CN'] = {
  clearText: '清除',
  clearStatus: '清除已选日期',
  closeText: '关闭',
  closeStatus: '不改变当前选择',
  prevText: '<上月',
  prevStatus: '显示上月',
  prevBigText: '<<',
  prevBigStatus: '显示上一年',
  nextText: '下月>',
  nextStatus: '显示下月',
  nextBigText: '>>',
  nextBigStatus: '显示下一年',
  currentText: '今天',
  currentStatus: '显示本月',
  monthNames: ['一月', '二月', '三月', '四月', '五月', '六月', '七月', '八月', '九月', '十月', '十一月', '十二月'],
  monthNamesShort: ['一', '二', '三', '四', '五', '六', '七', '八', '九', '十', '十一', '十二'],
  monthStatus: '选择月份',
  yearStatus: '选择年份',
  weekHeader: '周',
  weekStatus: '年内周次',
  dayNames: ['星期日', '星期一', '星期二', '星期三', '星期四', '星期五', '星期六'],
  dayNamesShort: ['周日', '周一', '周二', '周三', '周四', '周五', '周六'],
  dayNamesMin: ['日', '一', '二', '三', '四', '五', '六'],
  dayStatus: '设置 DD 为一周起始',
  dateStatus: '选择 m月 d日,DD',
  dateFormat: 'yy-mm-dd',
  firstDay: 1,
  initStatus: '请选择日期',
  isRTL: false
 };
 $.datepicker.setDefaults($.datepicker.regional['zh-CN']);
}
前台页面添加jquery脚本,当然MainContent_txtBeginTime是你时间标签的id,有时候你可能显示不出来,不要着急右键查看源文件就会发现控件的id和html标签的id不一样,我们一定要选择标签的id
效果图:
如果你按照这四步去做的话,一个简单实用的分页显示页面就会展现的你的面前,欢迎大家进行讨论。

