Elasticsearch
安装 elk 先去官网https://www.elastic.co/guide/en/elasticsearch/reference/current/zip-targz.htmlmkdir /{elasticsearch,logstash,kibana}
下载并安装elasticsearch.zip包
#cd /elasticsearch
#wget https://artifacts.elastic.co/downloads/elasticsearch/elasticsearch-6.2.4.zip
下载一个授权包
#wget https://artifacts.elastic.co/downloads/elasticsearch/elasticsearch-6.2.4.zip.sha512
运行这个解压包需要下载一个插件
#yum install perl-Digest-SHA
#shasum -a 512 -c elasticsearch-6.6.1.zip.sha512
#unzip elasticsearch-6.6.1.zip
#cd elasticsearch-6.6.1/
创建elk用户(因为elasticsearch不能用root用户启动)
#useradd elk
#passwd elk
#mkdir /elasticsearch/{data,logs}
去修改es配置文件
#vim /es文件目录下/config/elasticsearch.ym
 path.data=/elasticsearch/data
 path.logs=/elasticsearch/logs
 network.host=ip
 network.port=9200
(ps:安装head插件另外一个笔记有写)
logstash

拉取logstash.tar包
#cd /logstash
#wget https://artifacts.elastic.co/downloads/logstash/logstash-6.2.4.tar.gz
#tar -xvzf logstash-6.2.4.tar.gz
创建文件夹
#mkdir /logstash/{data,logs}
修改配置文件
#vim /logstash文件目录下/config/logstash.yml
path.data: /logstash/data
path.logs: /logstash/logs
#vim config/logstash.conf
input {
  beats {
    port => 5044
    codec => plain {
          charset => "UTF-8"
    }
  }
}

output {
  elasticsearch {
    hosts => "es服务器IP:9200"
    manage_template => false
    index => "%{[@metadata][beat]}-%{+YYYY.MM.dd}"
    document_type => "%{[@metadata][type]}"
  }
}
Kibana
拉取kibana.tar包
#cd /kibana
#wget https://artifacts.elastic.co/downloads/kibana/kibana-6.2.4-linux-x86_64.tar.gz
#tar -xvzf kibana-6.2.4-linux-x86_64.tar.gz
#vim /kibana/kibana-6.2.4-linux-x86_64/config/kibana.yml
server.port:5601
server.host:"本机ip"
elasticsearch.host:["http://es服务器ip:port"]
启动
elasticsearch
#cd /elasticsearch
$su elk
#nohup elasticsearch-6.2.4/bin/elasticsearch &
(ps:nohup 可以把输出内容放到本目录下的nohup.out里 后台运行。建议第一次启动时不要放到后台输出,一般会有报错,报错解决方案下边会列出。)
可能会报以下错误:
1.max file descriptors [4096] for elasticsearch process likely too low, increase to at least [65536]
vim /etc/security/limits.conf
elk soft nofile 65536
elk hard nofile 65536
2.max number of threads [1024] for user [work] likely too low, increase to at least [2048]
vim /etc/security/limits.d/90-nproc.conf
*          soft    nproc     1024
#修改为:
*          soft    nproc     2048
3.max virtual memory areas vm.max_map_count [65530] likely too low, increase to at least [262144]
vim /etc/sysctl.conf
#增加改行配置:
vm.max_map_count=262144
#保存退出后,执行:
sysctl -p
4.Feb 11 09:11:34 cargo elasticsearch[16665]: which: no java in (/usr/local/sbin:/usr/local/bin:/usr/sbin:/usr/bin)
这时需要  建立软连接
[root@elk1 local]# which java
/usr/local/jdk/bin/java
[root@elk1 local]# ln -s /usr/local/jdk/bin/java    /usr/bin/java
5.system call filters failed to install; check the logs and fix your configuration or disable system call filters at your own risk
加两行
#vim /elasticsearch/elasticsearch-6.2.4/config/elasticsearch.yml
-----------Memory---------------
bootstrap.memory_lock: false
bootstrap.system_call_filter: false
logstash
#cd /logstash
#nohup logstash-6.2.4/bin/logstash -f logstash-6.2.4/conf.d/logstash.conf &
kibana
#cd /kibana
#nohup kibana-6.2.4-linux-x86_64/bin/kibana &
查看端口
#ss -tnl
查看5601,5044,9200,9300是否起来
查看elasticsearch状态
#curl -XGET 'http://192.168.2.207:9200/_cluster/state/nodes?pretty'
查看elasticsearch的master
#curl -XGET 'http://192.168.2.207:9200/_cluster/state/master_node?pretty'
#curl -XGET 'http://192.168.2.207:9200/_cat/master?v'
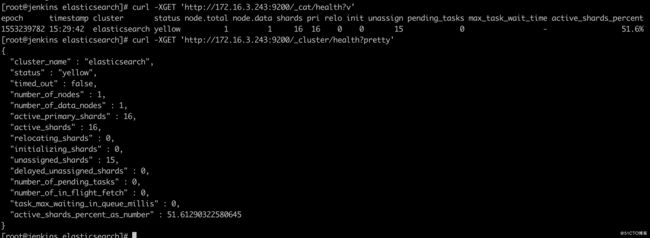
查看健康状态
#curl -XGET 'http://192.168.2.207:9200/_cat/health?v'
#curl -XGET 'http://192.168.2.207:9200/_cluster/health?pretty'
yum安装方式
elk:yum源
rpm --import https://artifacts.elastic.co/GPG-KEY-elasticsearch

#vim /etc/yum.repos.d/elasticsearch.repo
[elasticsearch-6.x]
name=Elasticsearch repository for 6.x packages
baseurl=https://artifacts.elastic.co/packages/6.x/yum
gpgcheck=1
gpgkey=https://artifacts.elastic.co/GPG-KEY-elasticsearch
enabled=1
autorefresh=1
type=rpm-md
yum 安装logstash 启动未找到的问题
#sudo /usr/share/logstash/bin/system-install /etc/logstash/startup.options systemd
汉化Kibana
`汉化软件地址:https://github.com/anbai-inc/Kibana_Hanization
然后 python main.py kibana目录 (/usr/share/kibana)`
Filebeat
去官网下载https://www.elastic.co/downloads/beats/filebeat
放到本地后解压
#mkdir /filebeat
#tar -xvzf ~/filebeat-6.6.2-linux-x86_64.tar.gz -C /filebeat
修改filebeat配置文件
#vim /filebeat/filebeat-6.6.2-linux-x86_64/filebeat.yml
filebeat.prospectors:

- type: log
  tags: ["wechat_log"]
  enabled: true
  paths:
    - /home/ycbeu/ycbeu-wechat/logs/catalina.*
- type: log
  tags: ["execute_log"]
  enabled: true
  paths:
    - /home/ycbeu/ycbeu-execute-1.0.0-SNAPSHOT/logs/*.log*
- type: log
  tags: ["pms_log"]
  enabled: true
  paths:
    - /home/ycbeu/ycbeu-pms/logs/catalina.*

 filebeat.config.modules:
  path: ${path.config}/modules.d/*.yml
  reload.enabled: false

setup.template.settings:
  index.number_of_shards: 3

setup.kibana:
  host: "kibanaIP:5601"

#output.elasticsearch:    //我们输出到logstash,把这行注释掉
  #hosts: ["localhost:9200"]   //这行也注释掉

output.logstash:
  hosts: ["logstashIP:5044"]
启动
#cd /filebeat/
#nohup filebeat-6.6.2-linux-x86_64/filebeat -e -c filebeat.yml &
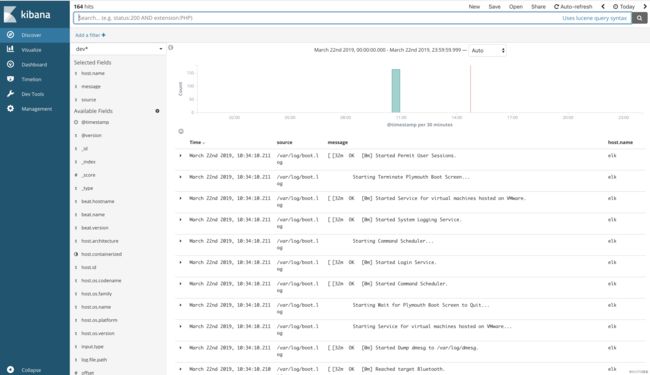
去kibana创建索引
访问kibanIP:5601
点击Management,然后点击Index Patterns,再点击Create index pattern
选择@timestamp,然后点击Create index pattern
创建好后,点击Discover,就可以看到如下图页面的日志内容了
(ps:filebeat配置可以配置很多日志,但是显示出来都到一起了可以用上面的搜索栏搜索)

