下载教程文件**
·····密码: ahgt**
选择对应名称的文件夹下载,内包含一个(开始)和一个(已完成)文件;(开始)文件用来和教程同步操作,(已完成)是最终结果。
An introduction to using Origami Studio. 介绍Origami Studio的使用方法。
Welcome to Origami. We'll be building a simple prototype, and by doing so learn the fundamentals of using Origami as well as importing from design tools such as Sketch. Follow along by downloading the files that accompany this tutorial.
欢迎使用折纸。我们将通过建立一个简单的原型,了解 Origami Studio 的基础知识以及从Sketch等设计工具导入文件。下载好教程文件,按照教程步骤操作。
Copying from Sketch 从Sketch导入
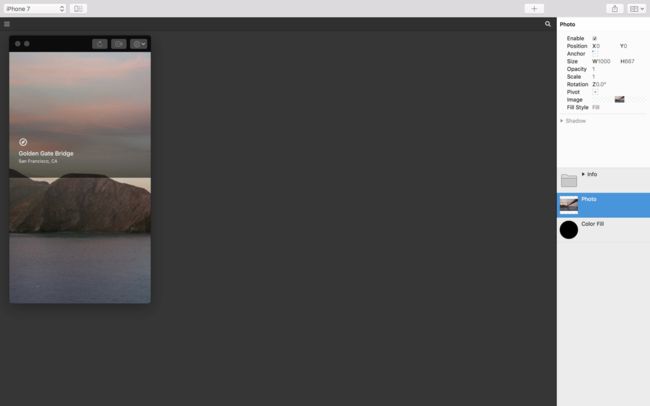
Importing from design tools like Sketch is as simple as copying and pasting. First off, make sure you have the Sketch file from our lessons file open. Next, select the Photo layer (a landscape image of the Golden Gate Bridge), go to Edit > Copy Cmd C. In a new Origami prototype, navigate to Edit > Paste Cmd V.
从Sketch等设计工具导入跟复制粘贴一样简单。首先打开教程文件夹中的 Sketch 文件,选择 Photo 图层,按 Cmd C 复制;打开教程文件夹中的 Origami 文件,按 Cmd V 粘贴。
We can then go back to Sketch and do the same thing with our Info Group, which contains a few text layers, an image, and a gradient. Navigate to to Edit > Copy ⌘C, head back to Origami and navigate to Edit > Paste ⌘V.
回到 Sketch 复制 Info 图层组,里面包含了文本、图标、渐变图层。到 Origami 粘贴。
板栗:粘贴时会弹出一个窗口,选择 OK 任然保留图层和可编辑属性,选择 Paste as Image Instead 则将图层组合并为一张图,不可再编辑。
Origami Studio interface 界面
On the left of the screen is the Viewer; where we see and interact with our prototype. On the right we have our Layers, and our Layer Inspector which lists the properties of the currently-selected layer. The middle area is known as the Patch Editor.
左边的是 查看器 ,是查看原型、和原型交互的通道。右侧有 图层窗口 和图层的 属性窗口,属性窗口列出了当前选中的图层的属性。
Organizing our layers 图层定位
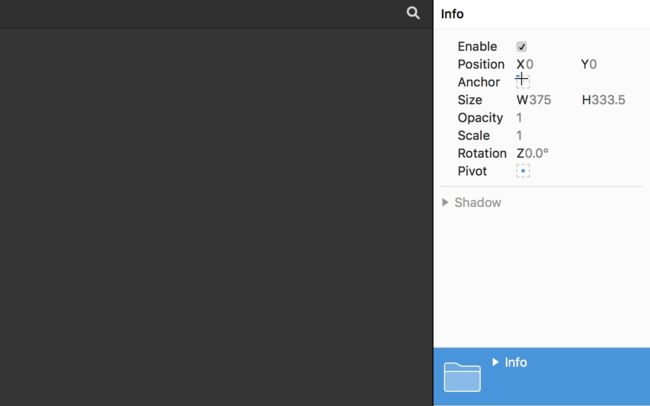
Start by selecting the Photo layer. We'd like this to be centered, so move the Anchor the center. Do the same with our Info Group; change the Anchor so that it sits at the bottom of the screen.
首先选择 Photo 图层。现在看到的图片位置和在 Sketch 中不一样是居左显示的,我们希望居中显示,所以我们将锚点-Anchor 选择为中间的那个。Info 图层组也一样需要调整锚点,将它对齐屏幕的底部。
Adding interaction 添加交互
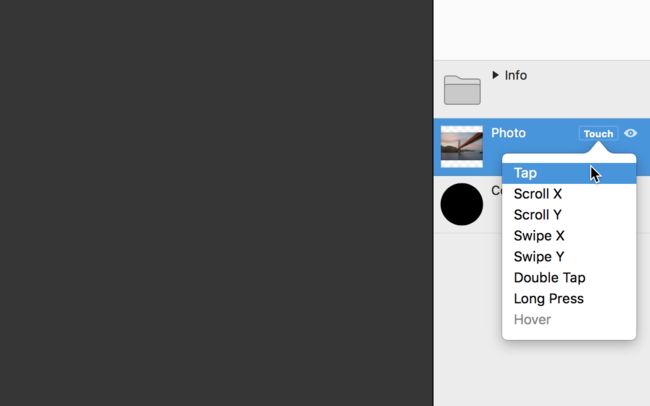
The first thing we want to do is add interaction to the Photo layer. To add interaction to a layer, hover over the layer in the Layers panel, click the Touch menu, and then click Tap.
我们要做的第一件事是添加交互到 Photo 图层。将鼠标悬停在 Photo 图层上,点击 Touch 菜单,再点击 Tap。
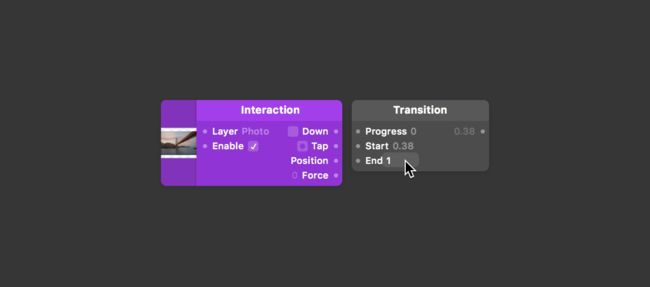
This is our first patch; an Interaction patch. We'll cover patches in detail a little bit later on, but for now, keep an eye on the Down and Tap outputs whilst tapping on Photo in the Viewer. Both of these outputs flash corresponding to when Photo is pressed Down, and when released, which equals a Tap.
现在有了第一个模块 - Interaction 交互(稍后会详细介绍该模块)。现在在查看器中点击照片,请注意看点击模时 Interaction 模块上的 Down 和 Tap 输出口;从两个输出口的闪烁可以观察到,当照片被按下时 Down 闪烁 ,释放时 Tap 闪烁。
Transitioning values 过渡值
We want this to transition between two values of Scale. A Scale of 1 and a Scale of whatever fits in screen, which is about 0.38. The next patch we want to add is a Transition patch, since we are transitioning between two values. Add this patch by double-clicking on the Patch Editor Cmd Enter , beginning to type 'transition', followed by Return Enter.
如何实现在两个值之间放大和缩小呢?假设两个 Scale 值一个为原始值 1 ,一个为适应屏幕大小的值 0.38。所以下一个要添加的模块是 Transition 模块,因为我们要在两个值之间切换。双击编辑窗口或按 Cmd Enter 打开模块库 → 输入名称 Transition → 按 Enter 添加,或按 T 添加。
Make the Start input on the Transition patch equal 0.38 by typing 0.38 into the Start input field. Change the End input value to 1, since we know that's the Scale we want Photo to end at.
Transition 模块的 Start 接口值填写为 0.38,End 接口的值填写为1,这是照片要缩放的范围值。
Connecting patches 连接模块
Connect the Down output of our purple Interaction patch to the Progress input of the Transition patch. Do this by clicking and dragging from the Down output into the Progress input of the Transition patch.
连接 Interaction 模块的 Down 输出口到 Transition 模块的 Progress 输入口。通过点击,从“Down”输出传递到“Transition”模块的“Progress”输入口来执行此操作。
Connecting patches to layer properties 连接到图层属性
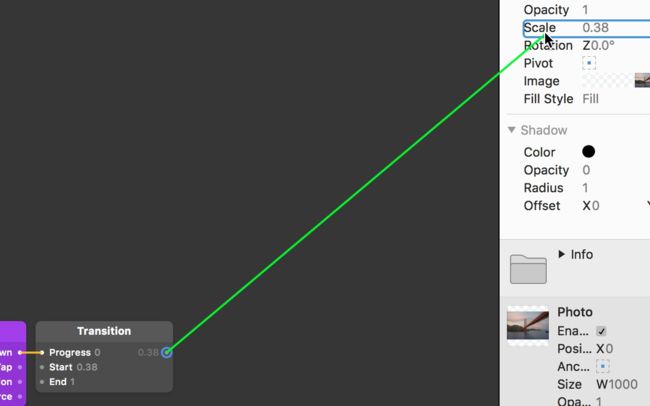
We need to connect the Transition output to the Photo layer's Scale property. Like we did with connecting Down to Progress, we can make connections from patches to layer properties.
把 Transition 模块的输出口连接到 Photo 图层的缩放属性 - Scale。跟上一步连接 Down 和 Progress 接口时一样,这样就能让模块和图层属性产生连接。
Click and drag on the Transition output and connect it to the Scale property of Photo, this time directly in the Layers panel. You should now see that pressing Down on Photo causes the Transition to occur instantly between 0.38 and 1.
按住 Transition 模块的输出口并拖动到 Photo 图层属性窗口的 “Scale” 这个名称上(要先选中 Photo 图层,属性窗口才会显示 Photo 图层的属性),会自动生成一个又 Scale 属性的 Photo 模块。现在点击下照片,可以看到看 Transition 在0.38 和 1 之间立即发生变化。
Adding animation 添加动画
The next thing we want to do is add animation. Double-click on the Patch Editor Cmd Return and begin to type 'animation'. Press Return when Pop Animation appears.
下一步要加动画了。添加一个 Pop Animation 模块。
板栗:添加方法就不老式重复了,快捷键 A。
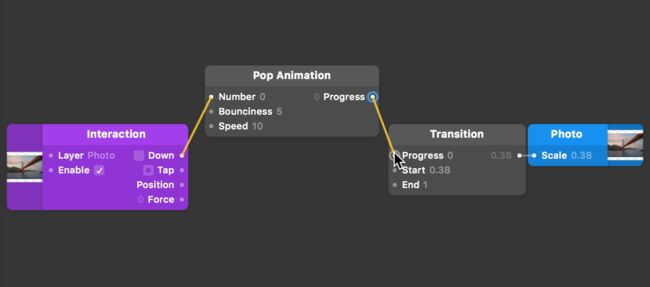
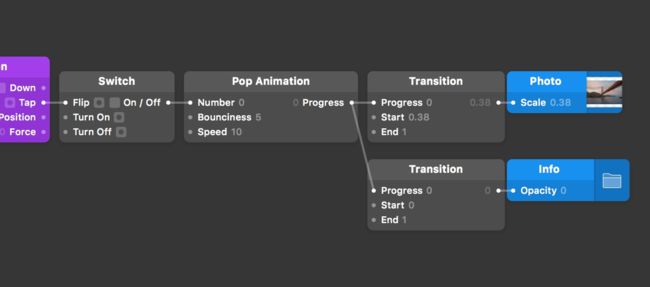
Insert the Pop Animation patch between the two existing patches by connecting the Down output of the Interaction patch to the Number input of the Pop Animation patch, and then the Progress output of the Pop Animation patch to the Progress input of the Transition patch.
把 Pop Animation 模块添加到 Interaction 和 Transition 模块中间。Down 接口改为连接到 Pop Animation 的 Number 接入口,Pop Animation 的输出口 Progress 连接到 Transition 的 Progress 输入口。
板栗:先点一下 Down 或 Progress 接口,中间的线变成黄色了再按 A 可以快速的将 Pop Animation 添加到两个模块中间。这是在两个模块中间快速插入模块的方法。
Left-to-right flow 从左至右的流程
You might start to see that everything in the Patch Editor flows from left to right. Now when I tap and hold Down on Photo, this Transition is eased — or animated.
模块编辑器中的所有内容都从左到右流动。
当我点击或按住照片时,这个过渡就会启动-恢复或保持在启动状态。
Tap states 点击状态
We would like this Transition to occur when we tap on Photo, not just when we press Down. Try connecting the Tap output of the Interaction patch to the Number input of the Pop Animation patch.
现在需要点击的时候激活过渡,现在是在按下的时候就激活了。试着将 Interaction 模块的 Tap 输出口连接到 Pop Animation 模块的 Number 接口。
板栗:前面说过了 Down 和 Tap 的区别,前者是指鼠标或手指按下时,后者是指鼠标或手指松开时。
You might see that it is triggering but not holding that state. That is because a Tap only lasts for one frame, and triggers when you release your finger.
再点击图片式一下,现在触发但不持续该状态。因为 Tap 只有最后一帧,在松开鼠标或手指时触发。
Switching states 开关状态
We need to add a Switch patch to our Patch Editor. Double-click on the Patch Editor ⌘⏎ and begin to type 'switch'. Press Return ⏎ when Switch appears.
现在在 Interaction 和 Pop Animation 之间添加一个 Switch 模块,按 Shift S。
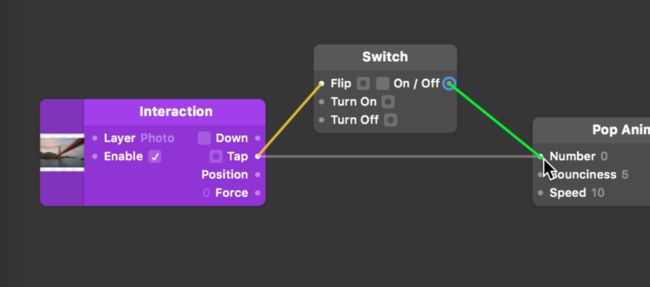
Like we did with the Pop Animation, insert this patch between the Interaction patch and Pop Animation patch. Connect the Tap output of the Interaction patch into the Flip input of our Switch patch. Finally, connect the output of the Switch patch into the Number input of our Pop Animation patch.
就跟添加 Pop Animation 时一样,并改接口连接。
板栗:用了前面说的快速插模块方法没,用了的话接口就自动改好了。
Now a Tap will trigger a Flip on the Switch patch, which is sent onwards to the Pop Animation, and then to the Transition patch. That value will remain until we Flip the Switch back by tapping on Photo.
现在点击 Photo 触发脉冲从 Switch 模块上的 Flip,到 Pop Animation 模块,再到 Transition 模块启动。直到下次点击 Photo 翻转开关前,该值将保持不变。
Multiple transitions 多次转换
Interaction, Switch, Pop Animation, and Transition make up the bulk of your prototyping in Origami. Mostly because they can be re-used and extended upon for other interactions.
大部分原型都可以通过 Interaction,Switch,Pop Animation,和 Transition 这几个模块实现。主要因为它们可以重复使用,并可扩展到其他交互上。
We know that we want our Text layers to hide and show, as well as the background Color Fill to change colors. All of this should be happening within the same physical interaction to our Photo changing in Scale.
让 Text 图层隐藏和显示,或通过 Color Fill 图层改变背景颜色,原型都和刚刚控制图片缩放的一样。
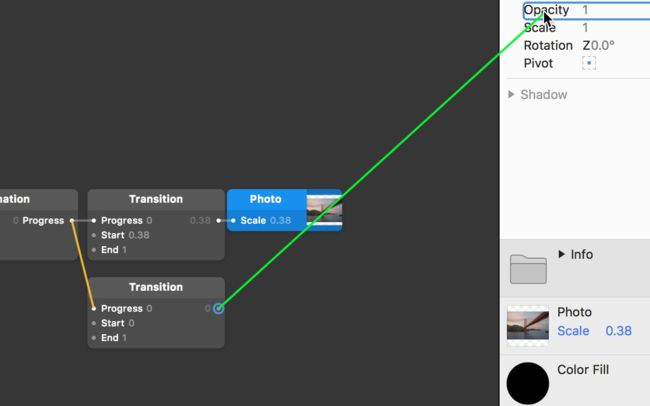
Double-click on the Patch Editor Cmd Return and begin to type 'transition'. Press Return when Transition appears. Connect the existing output of the Pop Animation patch into the Progress input of this new Transition patch.
再添加一个 Transition 模块。Pop Animation 的输出口连接到刚刚新加的 Transition 模块的 Progress 输入口。
Finish by clicking and dragging from the output of the new Transition patch to the Layer Inspector of the Info Group, and connecting to the Opacity property.
点击并拖动输出口到 Info 图层组的不透明度属性 Opacity 上创建一个又 Opacity 属性的 Info 模块。
We want our Info to start at an Opacity of 0 and end at on Opacity of 1 , so we don't need to make any changes to the default inputs of this Transition patch.
现在希望图片缩小时信息消失,图片放大时信息显示。所以连接到 Info 的 Transition 模块 Start 应为 0,End 应为 1,不需要做出任何改变。
Changing transition type 更改过渡类型
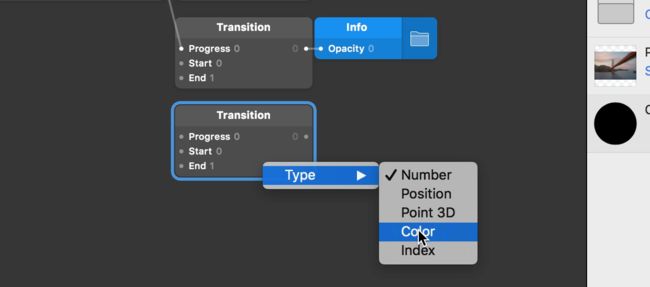
Lastly, add one more Transition patch to the Patch Editor. Right-click or Control-click this Transition patch and change the Type to Color in the drop-down menu.
最后,再添加一个 Transition 模块。右键或按住 Control 单击 Transition 模块,把 Type 下拉菜单中的 Number 改为 Color。
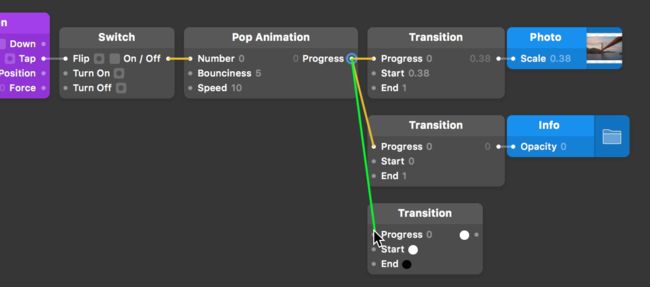
We want the starting fill color to be white, and the end to be black. Like before, connect the output of the Pop Animation Progress into the Progress input of the new Transition patch.
要把开始颜色设置为白色,结束颜色设置为黑色。像前面的 Transition 一样将 Pop Animation 的输出口连接到 Progress 输入口。
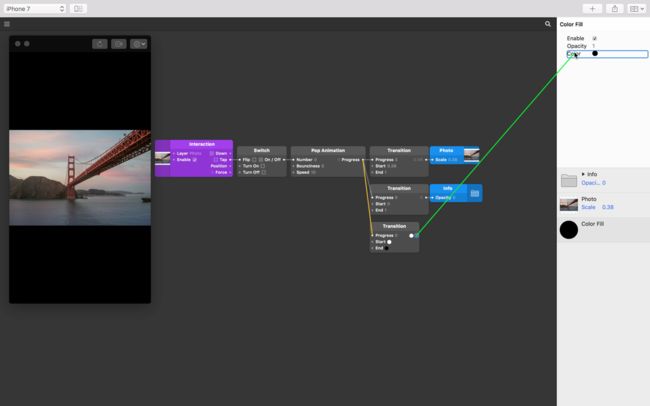
Finally, connect the output of our Transition patch to the Color property of the Color Fill layer.
最后,连接 Transition 模块的 输出口到 Color Fill 图层的 Color 属性。
Now when we interact with the prototype, the Color Fill layer transitions from a white fill color when Photo is scaled down (zoomed out), to a black fill color when Photo is scaled up (zoomed in).
现在与原型进行交互,当照片被缩小(1 - 0.38)时,背景颜色从黑变白,照片放大时(0.38 - 1)背景颜色从白变黑。
相关案例
4. Photo Zoom 照片缩放
点击在两个状态之间切换的动画。
11. Messenger Home
滚动对话列表。
18. Instagram Boomerang
Transition between screens and scrolls in Boomerang.
相关模块
Pop Animation Switch Transition Interaction
相关图层
Group Image File Color Fill
NEXT UP
Previewing and Sharing 预览和分享
在模拟器和设备上预览原型。


