iOS开发实战——CollectionView点击事件与键盘隐藏结合案例
在我们的实际开发中,CollectionView是一种非常实用而又稍难的控件,如果想要在复杂的场景下使用,则需要考虑的比较全面。如果又在CollectionView添加其他的控件,比如在cell里面再添加一个按钮,那么点击触发的事件前后顺序就非常重要了。再者,如果一个界面中包含了一个输入控件,需要弹出键盘时,键盘遮挡对于界面上的其他控件的使用就会造成较大的影响。今天我的案例具体需求描述下:界面中有一个TextField,点击输入的时候弹出键盘,并且整个界面向上移动,让键盘不遮挡其他控件。并且在点击界面背景、CollectionView空白部分,cell,和cell上面的按钮的时候可以收回键盘。并且在点击cell的时候可以触发didSelected方法,点击cell上面的按钮触发另一个点击方法。案例代码已经上传至 https://github.com/chenyufeng1991/ShowHiddenKeyboard 。欢迎大家下载使用。如果想对CollectionView有更为复杂的用法,可以移步这里 https://github.com/chenyufeng1991/CollectionView 。还有就是项目中使用Masonry来进行自动布局,Masonry的使用可以参考这篇博客《Autolayout第三方库Masonry的入门与实践》 。
(1)首先在AppDelegate.h中定义一些全局变量
//定义宏,用于block
#define WeakSelf(weakSelf) __weak __typeof(&*self)weakSelf = self;

typedef NS_ENUM(NSInteger,KeyBoardState){

    KeyboardHidden = 0,
    KeyboardShowing
};下面的枚举是键盘的两种状态,显示或者隐藏。
(2)我要实现的UI效果图如下:
其中黄色部分是一个ImageView,背景设置了黄色。绿色部分是一个TextField。下面带图片的黑色部分是一个CollectionView,那张图片就是一个cell。我使用Masonry来
实现下面的UI。
先声明下属性:
@property (nonatomic, strong) UIView *contentView;
@property (nonatomic, strong) UIImageView *topImageView;
@property (nonatomic, strong) UITextField *inputField;
@property (nonatomic, strong) UICollectionView *collectionView;
@property (nonatomic, strong) NSMutableArray *collArr;

@property (nonatomic, assign) KeyBoardState status;
布局:
// 包容整个界面的容器View

    CGRect tureFame = self.view.frame;
    tureFame.origin.y = 64;// 获取剔除导航栏后的真正y位置

    self.contentView = [[UIView alloc] init];
    self.contentView.backgroundColor = [UIColor whiteColor];
    self.contentView.frame = tureFame;
    self.contentView.autoresizingMask = UIViewAutoresizingFlexibleWidth | UIViewAutoresizingFlexibleHeight;
    [self.view addSubview:self.contentView];

    // 顶部图片
    WeakSelf(weakSelf);
    self.topImageView = [[UIImageView alloc] init];
    self.topImageView.backgroundColor = [UIColor yellowColor];
    [self.contentView addSubview:self.topImageView];
    [self.topImageView mas_makeConstraints:^(MASConstraintMaker *make) {
        make.top.equalTo(weakSelf.contentView);
        make.left.equalTo(weakSelf.contentView);
        make.right.equalTo(weakSelf.contentView);
        make.height.equalTo(@50);
    }];

    // 文本输入框
    self.inputField = [[UITextField alloc] init];
    self.inputField.text = @"请输入";
    self.inputField.backgroundColor = [UIColor colorWithRed:0.507 green:1.000 blue:0.520 alpha:1.000];
    [self.contentView addSubview:self.inputField];
    [self.inputField mas_makeConstraints:^(MASConstraintMaker *make) {

        make.top.equalTo(weakSelf.topImageView.mas_bottom);
        make.left.equalTo(weakSelf.contentView);
        make.right.equalTo(weakSelf.contentView);
        make.height.equalTo(@150);
    }];

    // CollectionView
    self.collArr = [[NSMutableArray alloc] initWithObjects:[UIImage imageNamed:@"beauty"], nil];

    UICollectionViewFlowLayout *flowLayout = [[UICollectionViewFlowLayout alloc] init];
    [flowLayout setScrollDirection:UICollectionViewScrollDirectionHorizontal];

    self.collectionView = [[UICollectionView alloc] initWithFrame:CGRectMake(0, 0, 320, 70) collectionViewLayout:flowLayout];
    [self.collectionView registerClass:[CustomCollectionViewCell class] forCellWithReuseIdentifier:@"CollectionCell"];
    self.collectionView.delegate = self;
    self.collectionView.dataSource = self;
    [self.contentView addSubview:self.collectionView];
    [self.collectionView mas_makeConstraints:^(MASConstraintMaker *make) {
        make.top.equalTo(self.inputField.mas_bottom).offset(20);
        make.left.equalTo(self.contentView);
        make.right.equalTo(self.contentView);
        make.height.equalTo(@70);
    }];

    UITapGestureRecognizer *tap = [[UITapGestureRecognizer alloc] initWithTarget:self
                                                                          action:@selector(clickCollectionView:)];
//    tap.cancelsTouchesInView = NO;
    [self.collectionView addGestureRecognizer:tap];
(3)由于要监听键盘显示或者隐藏事件,那么我使用Notification来监听,注意在界面消失的时候要进行移除:
- (void)viewWillAppear:(BOOL)animated
{
    [super viewWillAppear:animated];

    [[NSNotificationCenter defaultCenter] addObserver:self
                                             selector:@selector(keyboardWillShow)
                                                 name:UIKeyboardWillShowNotification
                                               object:nil];

    [[NSNotificationCenter defaultCenter] addObserver:self
                                             selector:@selector(keyboardWillHide)
                                                 name:UIKeyboardWillHideNotification
                                               object:nil];
}

- (void)viewWillDisappear:(BOOL)animated
{
    [super viewWillDisappear:animated];

    [[NSNotificationCenter defaultCenter] removeObserver:self
                                                    name:UIKeyboardWillShowNotification
                                                  object:nil];

    [[NSNotificationCenter defaultCenter] removeObserver:self
                                                    name:UIKeyboardWillHideNotification
                                                  object:nil];
}#pragma mark - 键盘处理事件
- (void)keyboardWillShow
{
self.status = KeyboardShowing;
CGRect frame = self.contentView.frame;
frame.origin.y = self.contentView.frame.origin.y - 50;
self.contentView.frame = frame;
}
- (void)keyboardWillHide
{
self.status = KeyboardHidden;
CGRect frame = self.contentView.frame;
frame.origin.y = self.contentView.frame.origin.y + 50;
self.contentView.frame = frame;
}因为点击背景可以使键盘隐藏,所以我需要重写touchesEnded方法:
- (void)touchesEnded:(NSSet *)touches withEvent:(UIEvent *)event
{
    [self hideKeyboard];
}
实现hideKeyboard方法:
- (void)hideKeyboard
{
    [self.inputField endEditing:YES];// 这里会阻断响应链
}
对一个输入控件比如TextField,endEditing置为YES表示编辑结束,键盘隐藏。当然其实这里也可以使用resignFirstResponder放弃第一响应者来隐藏键盘。
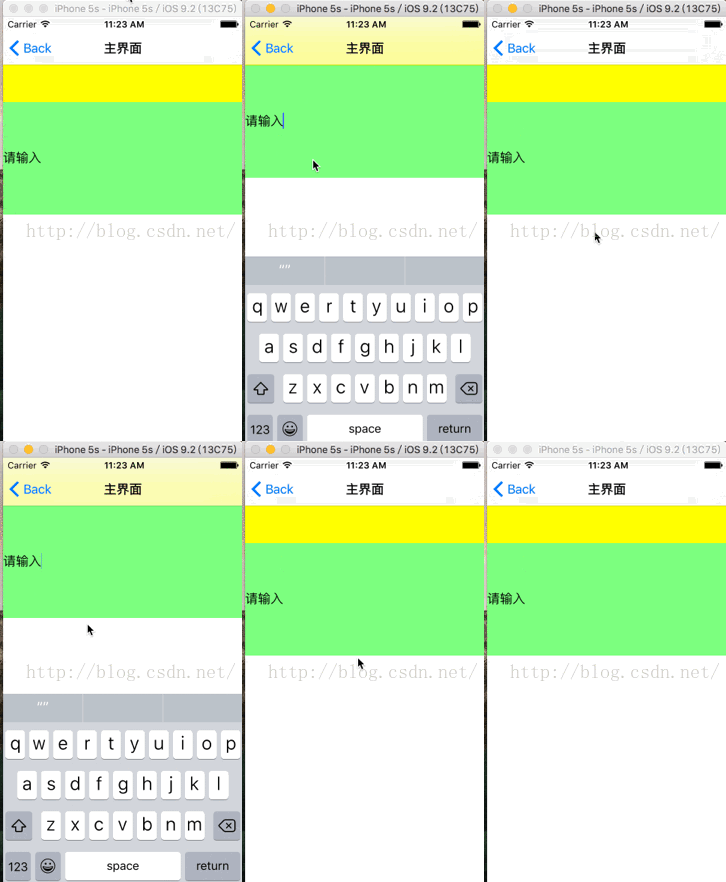
完成上述代码后实现动图效果如下:
有了以上这样的设置方法之后,如果键盘弹起会遮挡一些UI,这样的bug是不是也会修复了呢?哈哈。
(5)好了,下面要开始来研究CollectionView了。可能这里有些奇怪,为什么要把键盘和CollectionView(其实TableView也一样)来一起讲呢?这里是有原因的。因为CollectionView里面的点击事件更为复杂,比如你可以点击在CollectionView的空白区域,或者是在某个Cell上,或者是Cell上面的某个按钮。其实处理方法都是有所不同的,再结合键盘的回收,那么就更有意思了。
下面先来自定义一个cell,取名为CustomCollectionViewCell,继承自UICollectionViewCell:
CustomCollectionViewCell.h文件如下:
@interface CustomCollectionViewCell : UICollectionViewCell

@property (nonatomic, strong) UIImageView *imageView;
@property (nonatomic, strong) UIButton *button;

@end
CustomCollectionViewCell.m文件如下:
@implementation CustomCollectionViewCell

- (instancetype)initWithFrame:(CGRect)frame
{
    self = [super initWithFrame:frame];
    if (self)
    {
        self.imageView = [[UIImageView alloc] initWithFrame:CGRectMake(0, 0, 60, 60)];
        [self.imageView setUserInteractionEnabled:YES];
        [self addSubview:self.imageView];

        self.button = [[UIButton alloc] initWithFrame:CGRectMake(40, 0, 20, 20)];
        [self.button setImage:[UIImage imageNamed:@"close"] forState:UIControlStateNormal];
        [self addSubview:self.button];
    }
    return self;
}


@end
然后在ViewController中实现CollectionView的代理方法和数据源:
#pragma mark - UICollectionViewDelegate
- (void)collectionView:(UICollectionView *)collectionView didSelectItemAtIndexPath:(NSIndexPath *)indexPath
{
    NSLog(@"CollectionView中的Cell被点击了:%ld",(long)indexPath.row);
}

#pragma mark - UiCollectionViewDataSource
- (NSInteger)collectionView:(UICollectionView *)collectionView numberOfItemsInSection:(NSInteger)section
{
    return self.collArr.count;
}

- (UICollectionViewCell *)collectionView:(UICollectionView *)collectionView cellForItemAtIndexPath:(NSIndexPath *)indexPath
{
    CustomCollectionViewCell *cell = [collectionView dequeueReusableCellWithReuseIdentifier:@"CollectionCell" forIndexPath:indexPath];
    cell.imageView.image = self.collArr[indexPath.row];
    [cell.button addTarget:self
                    action:@selector(clickCloseButton:)
          forControlEvents:UIControlEventTouchUpInside];


    return cell;
}

#pragma mark - UICollectionViewDelegateFlowLayout
- (CGSize)collectionView:(UICollectionView *)collectionView layout:(UICollectionViewLayout*)collectionViewLayout sizeForItemAtIndexPath:(NSIndexPath *)indexPath
{
    return CGSizeMake(60, 60);
}

- (UIEdgeInsets)collectionView:(UICollectionView *)collectionView layout:(UICollectionViewLayout*)collectionViewLayout insetForSectionAtIndex:(NSInteger)section
{
    return UIEdgeInsetsMake(0, 5, 0, 5);
}
实现以上代码后,整个UI的布局就完成了,如下图所示:
为了和背景白色区分,这里CollectionView的背景设置为了黑色,这个黑色部分也就是没有cell的区域。
(6)在我上面初始化CollectionView的时候,可以看到我为这个CollectionView添加了一个手势:
    UITapGestureRecognizer *tap = [[UITapGestureRecognizer alloc] initWithTarget:self
                                                                          action:@selector(clickCollectionView:)];
//    tap.cancelsTouchesInView = NO;
    [self.collectionView addGestureRecognizer:tap];
其中注释了一行cancelsTouchesInView代码,对,这里暂时先注释这行代码,先不用管,后面我们会再用到它的。为了能在点击CollectionView的空白区域有响应,我不得不加这个手势。否则点击空白区域不会有任何响应。这里需要实现clickCollectionView:方法,点击空白区域和cell的操作都在该方法里面实现。
- (void)clickCollectionView:(id)sender
{
    CGPoint pointTouch = [sender locationInView:self.collectionView];
    NSIndexPath *indexPath = [self.collectionView indexPathForItemAtPoint:pointTouch];
    if (indexPath != nil)
    {
        [self collectionView:self.collectionView didSelectItemAtIndexPath:indexPath];
    }

    [self hideKeyboard];
}
为什么点击cell都要在我的这个clickCollectionView:方法里面来进行操作呢?这里有个触发优先级的问题。由于我给整个CollectionView添加了一个Tap手势,该手势会屏蔽cell的点击事件didSelectItem方法,导致不会自动调用delegate中的这个方法,所以我必须要手工来进行操作。
CGPoint是为了获取在CollectionView中的点击位置。NSIndexPath是为了获取该位置是在CollectionView中的哪一个cell,如果NSIndePath为nil,表示点击位置在空白区域,否则就是某个具体cell,然后就去手动调用didSelectItem方法。最后再去隐藏键盘。
那么对于cell中的按钮点击如何处理呢?可以看到在cellForItem方法中我为cell中的button添加了一个target,并去触发一个clickCloseButton:方法,该方法的实现如下:
- (void)clickCloseButton:(id)sender
{
    CustomCollectionViewCell *cell = (CustomCollectionViewCell *)[sender superview];
    NSIndexPath *indexPath = [self.collectionView indexPathForCell:cell];
    NSLog(@"关闭按钮被点击:%ld",(long)indexPath.row);

    [self hideKeyboard];

    // 如果想要在点击关闭按钮的时候也调用didSelected方法,可以在这里手动调用;我先默认不调用;
#if 0
    if (indexPath != nil)
    {
        [self collectionView:self.collectionView didSelectItemAtIndexPath:indexPath];
    }
#endif
}
其实代码写到这里的时候,问题来了。当我点击cell中的按钮时候,到底是去触发CollectionView的tap手势呢还是去触发按钮的target方法?经过实际测试,是去调用target方法,而不是collectionView的手势。其实,这也正是我们想要的。
这里通过[sender superview]来获取按钮的父view,这个父View就是容纳它的cell,然后就可以获取这个cell的NSIndexPath了。这里我首先要说明一下sender到底是什么东西,英文意思是发送者。其实很容易理解,当我点击按钮,那么这个sender就是那个按钮。而在tap手势中,sender就是UIGestureRecognizer.。上面我用#if 0...#end禁掉了几行代码,如果你有特殊需求,在点击button的时候要触发didSelectItem,同样可以手动调用。
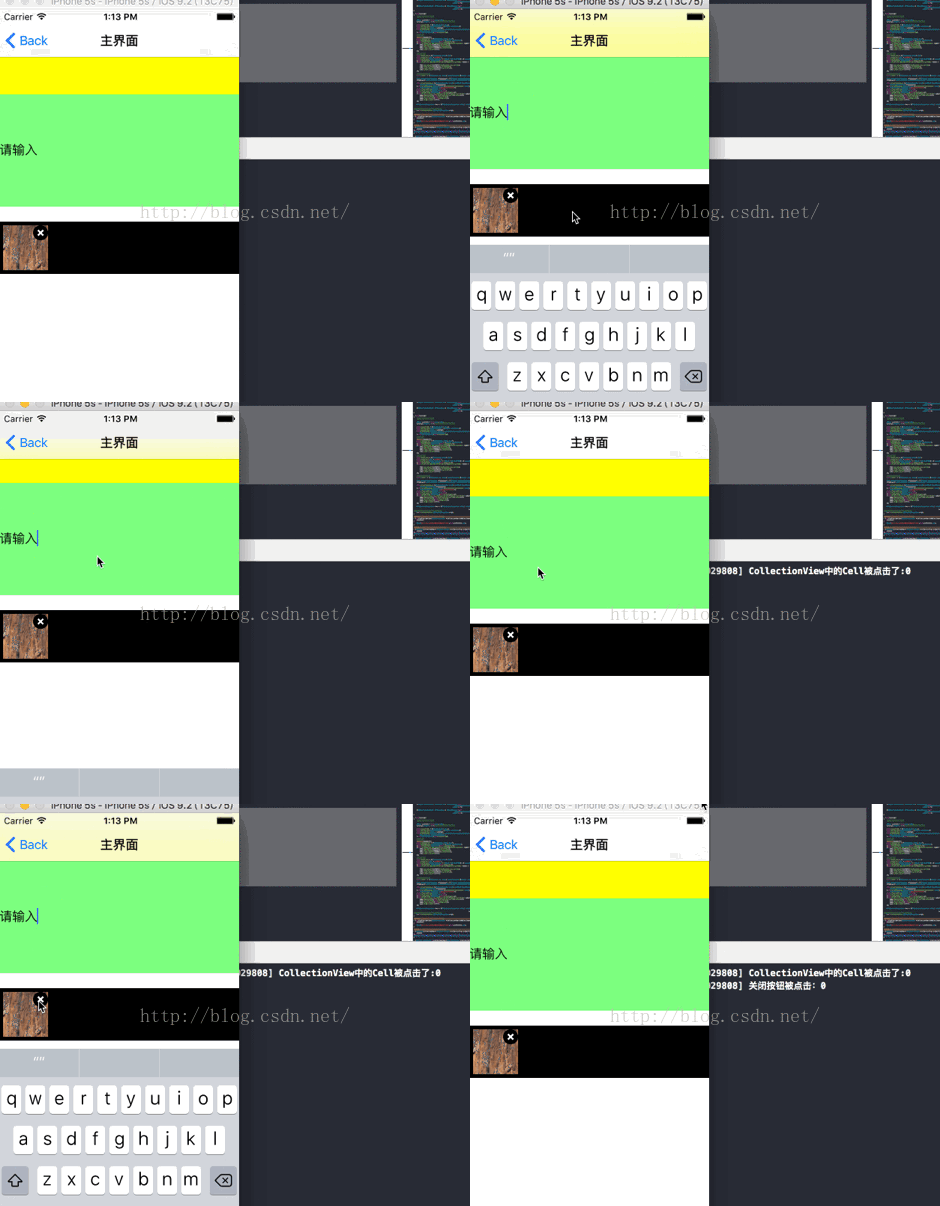
走了这么远,我们不要忘了为什么而出发。记住我们的需求是点击CollectionView的空白区域能隐藏键盘;点击cell的时候调用didSelectItem方法,同时隐藏键盘;点击cell中按钮的时候调用按钮点击方法clickCloseButton:方法,同时隐藏键盘。最重要的是,在点击cell和按钮的时候我要获取NSIndexPath,以保证我后面的其他业务逻辑可以进行。经过测试,可以成功实现。测试如下:
(7)还记不记得上面在添加手势时我们注释了一行代码:
// tap.cancelsTouchesInView = NO;默认这个参数是YES,现在我们把代码打开,设置为NO。运行后可以发现,此时当触发手势操作后,响应链不会中断,会继续下发。在实际需求中可能会遇到,也算是一个坑。在该案例中,大家也可以去尝试下会出现什么情况,仔细研究其实还是会有不少问题。这里就不再详细说明了。
手势操作,Target-Action等事件响应机制要讲解的内容还是比较多的,我们只能在平时的实际开发中不断去实践,试错,积累,才会不断的进步。后续相关文章,会继续和大家分享。


