深度学习之常用的优化算法
前天写过一些内容,但是我这老年机,在我写到一半的时候卡死了···· 今天回来看,以为会有自动保存的!然而!也没有!!!自动保存去哪里了!!!!!
算了,再重新记录吧~
吴恩达老师的深度学习课程第二课中介绍了深度学习的常见的优化算法,包括基于梯度下降的,还有基于指数加权的~~ 一个一个记录
梯度下降法的优化(Mini-Batch gradient decent)
梯度下降法,是当今最流行的优化(optimization)算法,亦是至今最常用的优化神经网络的方法。包括了 批量梯度下降,小批量梯度下降以及随机梯度下降,他们的区别在于每次用于参数更新的数据量的大小。
批量梯度下降(Batch Gradient Descent):
最常见的批量梯度下降是将全部训练集作为一个子集,用于计算损失函数 J(θ )并用其计算 梯度(偏导)从而用梯度下降法进行参数更新,
批量梯度下降代码:
代码来自吴恩达coursera《deep learning》的课后作业
X = data_input
Y = labels
parameters = initialize_parameters(layers_dims)
for i in range(0, num_iterations):
    # Forward propagation
    a, caches = forward_propagation(X, parameters)
    # Compute cost.
    cost = compute_cost(a, Y)
    # Backward propagation.
    grads = backward_propagation(a, caches, parameters)
    # Update parameters.
    parameters = update_parameters(parameters, grads)
由于批量梯度下降法,每次更新我们都需要在整个数据集上求出所有的偏导数。因此批量梯度下降法的速度会比较慢,甚至对于较大的、内存无法容纳的数据集,该方法都无法被使用。同时,梯度下降法不能以「在线」的形式更新我们的模型,也就是不能再运行中加入新的样本进行运算。批量梯度下降法很容易使目标函数先入局部最小值。
基于此,对批量梯度下降进行优化,有以下两种方法:SGD, mini_batch GD
随机梯度下降法(Stochastic Gradient Descent)
随机梯度下降发中,每次取一个样本传入神经网络中,计算损失函数和梯度,然后更新参数,也就是说,SGD的一次迭代会更新m(样本数)次参数,因而它的运行速度被大大加快,同时也能够「在线」学习。
相比批量梯度下降法的收敛会使目标函数落入一个局部极小值,SGD 收敛过程中的波动,会帮助目标函数跳入另一个可能的更小的极小值。另一方面,这最终会让收敛到特定最小值的过程复杂化,因为该方法可能持续的波动而不停止。但是,当我们慢慢降低学习率的时候,SGD 表现出了与批量梯度下降法相似的收敛过程,也就是说,对非凸函数和凸函数,必然会分别收敛到它们的极小值和最小值。
SGD代码:相对于BGD只是增加了一个循环用于遍历所有的样本
X = data_input
Y = labels
parameters = initialize_parameters(layers_dims)
for i in range(0, num_iterations):
    for j in range(0, m):
        # Forward propagation
        a, caches = forward_propagation(X[:,j], parameters)
        # Compute cost
        cost = compute_cost(a, Y[:,j])
        # Backward propagation
        grads = backward_propagation(a, caches, parameters)
        # Update parameters.
        parameters = update_parameters(parameters, grads)
小批量梯度下降(Mini_batch gradient decent)
小批量梯度下降法集合了上述两种方法的优势,mini_batch指的是将m个数据样本分为大小为 mini_batch 的 n 个子集,每次用一个样本(规模为mini_batch)传入网络中,计算损失函数 J(θ),并对相应的参数求导,用于更新参数。
代码如下:
minibatches中保存着不同的子集,大小相同
X = data_input
Y = labels
parameters = initialize_parameters(layers_dims)
for i in range(0, num_iterations):
     for minibatch in minibatches:
        # Select a minibatch
        (minibatch_X, minibatch_Y) = minibatch
        # Forward propagation
        a3, caches = forward_propagation(minibatch_X, parameters)
        # Compute cost
        cost = compute_cost(a3, minibatch_Y)
        # Backward propagation
        grads = backward_propagation(minibatch_X, minibatch_Y, caches)
        # Update parameters.
        parameters = update_parameters_with_gd(parameters, grads, learning_rate)
附上mini_batch 数据划分的代码:
# GRADED FUNCTION: random_mini_batches
def random_mini_batches(X, Y, mini_batch_size = 64, seed = 0):
    np.random.seed(seed)            # To make your "random" minibatches the same as ours
    m = X.shape[1]                  # number of training examples
    mini_batches = []
    # Step 1: Shuffle (X, Y)
    permutation = list(np.random.permutation(m))
    shuffled_X = X[:, permutation]
    shuffled_Y = Y[:, permutation].reshape((1,m))
    # Step 2: Partition (shuffled_X, shuffled_Y). Minus the end case.
    num_complete_minibatches = math.floor(m/mini_batch_size) # number of mini batches of size mini_batch_size in your partitionning
    for k in range(0, num_complete_minibatches):
        mini_batch_X = shuffled_X[:, mini_batch_size*k : mini_batch_size*(k+1)]
        mini_batch_Y = shuffled_Y[:, mini_batch_size*k : mini_batch_size*(k+1)]
        mini_batch = (mini_batch_X, mini_batch_Y)
        mini_batches.append(mini_batch)
    # Handling the end case (last mini-batch < mini_batch_size)
    if m % mini_batch_size != 0:
        mini_batch_X = shuffled_X[:, mini_batch_size*num_complete_minibatches : m]
        mini_batch_Y = shuffled_Y[:, mini_batch_size*num_complete_minibatches : m]
        mini_batch = (mini_batch_X, mini_batch_Y)
        mini_batches.append(mini_batch)
    return mini_batches
除了梯度下降的优化外,还有基于指数加权平均的优化,比梯度下降更快,先来介绍下指数加权平均
指数加权平均
其实我的理解是,指数加权平均其实就是利用已知的历史数据,预测接下来的数据应该取什么值,可以理解为一种拟合的方法,公式为:
Vt=βVt−1+(1−β)θt V t = β V t − 1 + ( 1 − β ) θ t
其中 Vt−1 V t − 1 是第 t - 1时刻拟合值(例如数据按时间排序), Vt V t 是当前 t 时刻的拟合值, θt θ t 是当前时刻 t 的真实数据, β β 是权重,代表了历时数据对当前数据的影响程度, 因此 1−β 1 − β 就是当前的真实数据对数据拟合的贡献程度。
那么最少需要多少个历史数据才能比较准确的拟合当前时刻的值呢?答案是至少需要 ∗∗1/(1−β)∗∗ ∗ ∗ 1 / ( 1 − β ) ∗ ∗ 个历史数据。
证明如下:
将指数加权公式展开得:
vt =(1−β)(θt+βθt−1+β2θt−2+β3θt−3+β4θt−4+⋯)
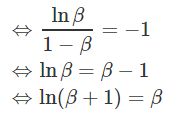
因为 β 是小于1的数,所以随着指数的增大,越趋近于0,而一般认为当指数项衰减到 1e 就可以忽略不计。所以,只需要证明 β11−β=1e β 1 1 − β = 1 e 成立即可。
β11−β=1e β 1 1 − β = 1 e

即为 ln(x+1) 在 x=0 处的一阶泰勒展开,所以原等式成立。
常用的值有:
β=0.9 时,β10=1e
β=0.98 时,β50=1e
由于前期V0 = 0, 数据会比较小,经过加权平均后会偏离真实值(eg, V1=0.9V0+0.1θ1 V 1 = 0.9 V 0 + 0.1 θ 1 会将真实的 θ1 θ 1 缩小十倍,因此为了减小这种误差,可以引入偏差修正
偏差修正
只需要引入偏差修正量即可。
对 Vt V t 进行修正, 使 Vt=Vt1−βt V t = V t 1 − β t , 随着 t 的增大 ,拟合值越接近真实值,需要修正的量也越小,所以需要修正的量会随时间变小 。
Momentum
由于使用小批量梯度下降法后,每个子集计算得到的梯度下降方向会有波动,并不会只朝一个方向下降,但总体的下降趋势是一致的,如下图: 蓝色的折线是小批量梯度下降时的路径,波动较大

而红色的下降路径就是使用Momentum 方法后的下降路径,明显下降速度变快了很多。
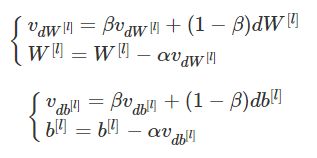
Momentum 的基本思想就是计算梯度的指数加权平均数,并利用该梯度来更新权重。梯度更新公式为:

假设图中横纵轴分别为W,b。我们指数加权平均更新dw和db,然后再更新w和b。这样就可以减少梯度下降的幅度。也就是说,每次进行梯度更新时,不直接使用梯度,将过去的梯度下降考虑在内,用于平滑当前的梯度dw, db(用了 1 - β ),使其变化变缓,然后用 v|l|dW,v|l|db v d W | l | , v d b | l | 更新参数。
momentum算法的名称由来如下:想象你有一个碗,有一个球从碗的边缘滚下去,微分给了这个碗加速度,球因为加速度会越滚越快。β比一小,表现出一些摩擦力。因为向下获得动量,所以称之为momentum。
代码:
def update_parameters_with_momentum(parameters, grads, v, beta, learning_rate):
    """
    Update parameters using Momentum

    Arguments:
    parameters -- python dictionary containing your parameters:
                    parameters['W' + str(l)] = Wl
                    parameters['b' + str(l)] = bl
    grads -- python dictionary containing your gradients for each parameters:
                    grads['dW' + str(l)] = dWl
                    grads['db' + str(l)] = dbl
    v -- python dictionary containing the current velocity:
                    v['dW' + str(l)] = ...
                    v['db' + str(l)] = ...
    beta -- the momentum hyperparameter, scalar
    learning_rate -- the learning rate, scalar
    Returns:
    parameters -- python dictionary containing your updated parameters
    v -- python dictionary containing your updated velocities
    """
    L = len(parameters) // 2 # number of layers in the neural networks
    # Momentum update for each parameter
    for l in range(L):
        # compute velocities
        v["dW" + str(l+1)] = beta*v["dW" + str(l+1)]+(1-beta)*grads["dW" + str(l+1)]
        v["db" + str(l+1)] =beta*v["db" + str(l+1)]+(1-beta)*grads["db" + str(l+1)]
        # update parameters
        parameters["W" + str(l+1)] = parameters["W" + str(l+1)]-learning_rate*v["dW" + str(l+1)]
        parameters["b" + str(l+1)] = parameters["b" + str(l+1)]-learning_rate*v["db" + str(l+1)]
    return parameters, v
RMSprop算法(root mean square prop)
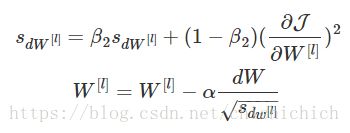
与前一个算法的目的相同,我们想减少纵轴上的震荡,同时增大横纵上的收敛速度。我们推出跟前一个类似的公式:

如图所示,绿色线条是RMSprop 的下降效果,蓝色的是直接使用SGD的下降曲线。你想减缓纵轴方向的学习率,然后加速横轴方向的学习率。这里,所不同的是我们使用 Sdw=β2Sdw+(1−β)d2w S d w = β 2 S d w + ( 1 − β ) d w 2 微分平方的加权平均数, 使下降速度变快。RMSporp的作用就是让那些抖动十分剧烈的部分变得平缓一些。(注意!! 此处的 β2 β 2 是为了与Momentum中的区别开来
参数更新公式:

Sdw=β2Sdw+(1−β)d2w S d w = β 2 S d w + ( 1 − β ) d w 2
w:=w−αdwsdw+ε√ w := w − α d w s d w + ε
Sdb=β2Sdb+(1−β)d2b S d b = β 2 S d b + ( 1 − β ) d b 2
b:=b−αdbsdb+ε√ b := b − α d b s d b + ε
另外在实际情况中为了不让分母为0,所以我们加上一个十分十分小的数ε,这个数具体是多少没有关系,它的作用是保证整体的稳定性。
Adam算法
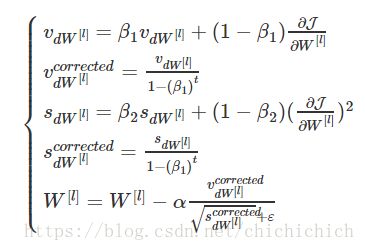
该算法是前两种算法的结合版本。公式如下:

- L is the number of layers
- β1 and β2 are hyperparameters that control the two exponentially weighted averages. 一般来说β1=0.9 β2 =0.999我们的目标不是来调整这两个参数的。
- α is the learning rate
- ε is a very small number to avoid dividing by zero 一般设为 10−8 10 − 8
代码:
def update_parameters_with_adam(parameters, grads, v, s, t, learning_rate = 0.01,
                                beta1 = 0.9, beta2 = 0.999,  epsilon = 1e-8):
    """
    Update parameters using Adam

    Arguments:
    parameters -- python dictionary containing your parameters:
                    parameters['W' + str(l)] = Wl
                    parameters['b' + str(l)] = bl
    grads -- python dictionary containing your gradients for each parameters:
                    grads['dW' + str(l)] = dWl
                    grads['db' + str(l)] = dbl
    v -- Adam variable, moving average of the first gradient, python dictionary
    s -- Adam variable, moving average of the squared gradient, python dictionary
    learning_rate -- the learning rate, scalar.
    beta1 -- Exponential decay hyperparameter for the first moment estimates
    beta2 -- Exponential decay hyperparameter for the second moment estimates
    epsilon -- hyperparameter preventing division by zero in Adam updates

    Returns:
    parameters -- python dictionary containing your updated parameters
    v -- Adam variable, moving average of the first gradient, python dictionary
    s -- Adam variable, moving average of the squared gradient, python dictionary
    """
    L = len(parameters) // 2                 # number of layers in the neural networks
    v_corrected = {}                         # Initializing first moment estimate, python dictionary
    s_corrected = {}                         # Initializing second moment estimate, python dictionary
    # Perform Adam update on all parameters
    for l in range(L):
        # Moving average of the gradients. Inputs: "v, grads, beta1". Output: "v".
        v["dW" + str(l+1)] = beta1*v["dW" + str(l+1)]+(1-beta1)*grads["dW" + str(l+1)]
        v["db" + str(l+1)] = beta1*v["db" + str(l+1)]+(1-beta1)*grads["db" + str(l+1)]
        # Compute bias-corrected first moment estimate. Inputs: "v, beta1, t". Output: "v_corrected".
        ### START CODE HERE ### (approx. 2 lines)
        v_corrected["dW" + str(l+1)] =  v["dW" + str(l+1)]/(1-np.power(beta1,t))
        v_corrected["db" + str(l+1)] = v["db" + str(l+1)]/(1-np.power(beta1,t))
        # Moving average of the squared gradients. Inputs: "s, grads, beta2". Output: "s".
        s["dW" + str(l+1)] =  beta2*s["dW" + str(l+1)]+(1-beta2)*grads["dW" + str(l+1)]*grads["dW" + str(l+1)]
        s["db" + str(l+1)] =beta2*s["db" + str(l+1)]+(1-beta2)*grads["db" + str(l+1)]*grads["db" + str(l+1)]
        # Compute bias-corrected second raw moment estimate. Inputs: "s, beta2, t". Output: "s_corrected".
        s_corrected["dW" + str(l+1)] = s["dW" + str(l+1)]/(1-np.power(beta2,t))
        s_corrected["db" + str(l+1)] = s["db" + str(l+1)]/(1-np.power(beta2,t))
        # Update parameters. Inputs: "parameters, learning_rate, v_corrected, s_corrected, epsilon". Output: "parameters".
        parameters["W" + str(l+1)] = parameters["W"+str(l+1)]-learning_rate*v_corrected["dW"+str(l+1)]/(np.sqrt(s_corrected["dW"+str(l+1)])+epsilon)
        parameters["b" + str(l+1)] = parameters["b"+str(l+1)]-learning_rate*v_corrected["db"+str(l+1)]/(np.sqrt(s_corrected["db"+str(l+1)])+epsilon)
    return parameters, v, s
动量下降通常是有帮助的,但是如果使用了小的学习速率和简单的数据集,它的影响微乎其微。Adma的内存需求较低,工作性能也很好。实际中我们常用这种作为调优方式。
另外,学习率的衰减也对训练效果有很大的影响
学习率衰减
学习率的设置方法很多,我们需要在刚开始使学习率较大,能更快收敛,而在训练后期应该使学习率变小,使其能收敛到最小值。因此,学习率的大小应该是随训练时间不断减小的变化值。
常用的学习率衰减函数为:

其中decay-rate称为衰减率,这个也是我们需要调整的超参数。从图中我们可以看到,如果decay-rate的值是1,随着epoch-num的数值不断增加,学习率在不断下降。
除此之外,还有别的方法,只要能使学习率不断减小就行。这个比较简单,不过多介绍了,这个参数是个超参数,需要不断的改变大小使模型最优。