finetune
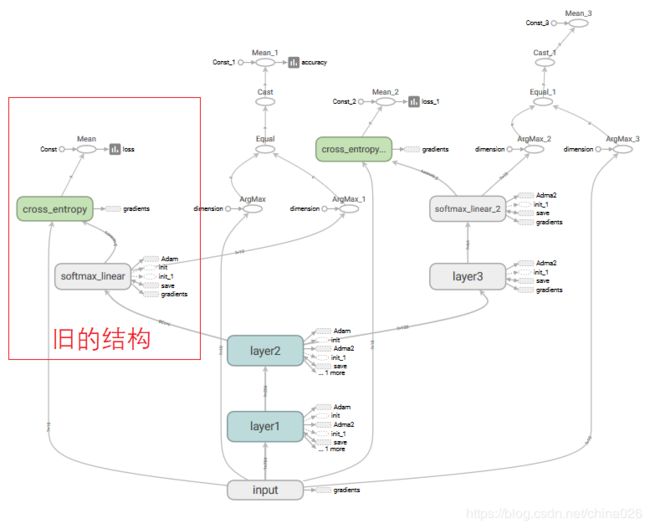
finetune的含义是获取预训练好的网络的部分结构和权重,与自己新增的网络部分一起训练。下面介绍几种finetune的方法。
完整代码:https://github.com/toyow/learn_tensorflow/tree/master/finetune
一,如何恢复预训练的网络
方法一:
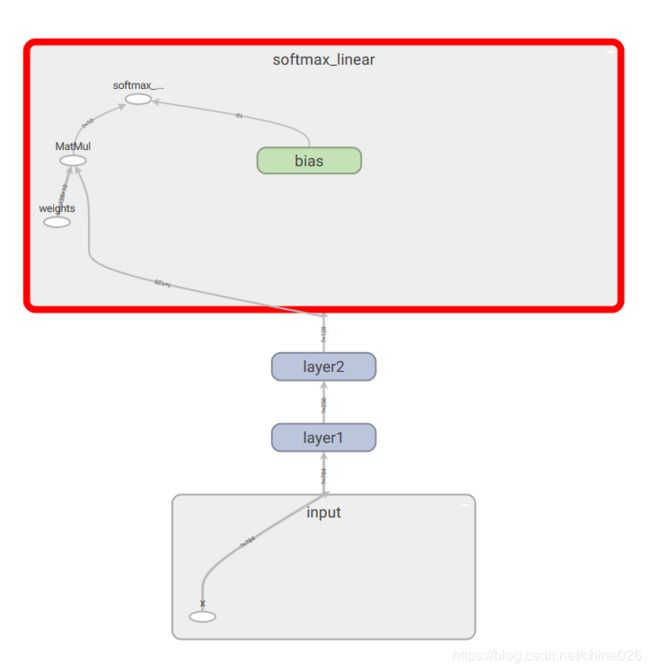
思路:恢复原图所有的网络结构(op)以及权重,获取中间层的tensor,自己只需要编写新的网络结构,然后把中间层的tensor作为新网络结构的输入。
存在的问题:
1.这种方法是把原图所有结构载入到新图中,也就是说不需要的那部分也被载入了,浪费资源。
2.在执行优化器操作的时候,如果不锁定共有的结构(layer2=tf.stop_gradient(layer2,name='layer2_stop')),会导致重名提示报错,因为原结构已经有一个优化器操作了,你再优化一下就重名了。
核心代码:
1.把原网络加载到新图里
def train():
#恢复原网络的op tensor
    with tf.Graph().as_default() as g:
        saver=tf.train.import_meta_graph('./my_ckpt_save_dir/wdy_model-15.meta')#把原网络载入到图g中
2.获取原图中间层tensor作为新网络的输入
        x_input=g.get_tensor_by_name('input/x:0')#恢复原op的tensor
        y_input = g.get_tensor_by_name('input/y:0')
        layer2=g.get_tensor_by_name('layer2/layer2:0')
        #layer2=tf.stop_gradient(layer2,name='layer2_stop')#layer2及其以前的op均不进行反向传播

        softmax_linear=inference(layer2)#继续前向传播
        cost=loss(y_input,softmax_linear)

        train_op=tf.train.AdamOptimizer(0.001,name='Adma2').minimize(cost)#重名,所以改名

 3.恢复所有权重
        saver.restore(sess,save_path=tf.train.latest_checkpoint('./my_ckpt_save_dir/'))
方法二:
思路:重新定义网络结构,保持共有部分与原来同名。在恢复权重时,只恢复共有部分。
1.自定义网络结构
def inference(x):
    with tf.variable_scope('layer1') as scope:
        weights=weights_variabel('weights',[784,256],0.04)
        bias=bias_variabel('bias',[256],tf.constant_initializer(0.0))
        layer1=tf.nn.relu(tf.add(tf.matmul(x,weights),bias),name=scope.name)
    with tf.variable_scope('layer2') as scope:
        weights=weights_variabel('weights',[256,128],0.02)
        bias=bias_variabel('bias',[128],tf.constant_initializer(0.0))
        layer2=tf.nn.relu(tf.add(tf.matmul(layer1,weights),bias),name=scope.name)
        # layer2=tf.stop_gradient(layer2,name='layer2_stop')#layer2及其以前的op均不进行反向传播
    with tf.variable_scope('layer3') as scope:
        weights=weights_variabel('weights',[128,64],0.001)
        bias=bias_variabel('bias',[64],tf.constant_initializer(0.0))
        layer3=tf.nn.relu(tf.add(tf.matmul(layer2,weights),bias),name=scope.name)
    with tf.variable_scope('softmax_linear_1') as scope:
        weights = weights_variabel('weights', [64, 10], 0.0001)
        bias = bias_variabel('bias', [10], tf.constant_initializer(0.0))
        softmax_linear = tf.add(tf.matmul(layer3, weights), bias,name=scope.name)
    return softmax_linear


2.恢复指定的权重
        variables_to_restore = tf.get_collection(tf.GraphKeys.TRAINABLE_VARIABLES)[:4]#这里获取权重列表,只选择自己需要的部分
        saver = tf.train.Saver(variables_to_restore)

    with tf.Session(graph=g) as sess:
        #恢复权重
        saver.restore(sess,save_path=tf.train.latest_checkpoint('./my_ckpt_save_dir/'))#这个时候就是只恢复需要的权重了
二,如何获取锁层部分的变量名称,如何避免名称不匹配的问题。
   锁住了也可以显示所有变量。
   params_1=slim.get_model_variables()#放心大胆地获取纯净的参数变量,包括batchnorm

   params_2 = slim.get_variables_to_restore()  # 包含优化函数里面定义的动量等等变量,exclude       只能写全名。
   params_2 = [val for val in params_2 if 'Logits' not in val.name]#剔除含有这个字符的变量

   锁住了(trianable=False)就不显示。
   params_3 = tf.get_collection(tf.GraphKeys.TRAINABLE_VARIABLES)
   params_4 = tf.trainable_variables()
   # 不包含优化器参数
解决方法,利用slim.get_variables_to_restore(),紧跟在原网络结构后面。之后再写自己定义的操作。
三,如何给不同层设置不同的学习率
思路:minizie()函数实际由compute_gradients()和apply_gradients()两个步骤完成。
compute_gradients()返回的是(gradent,varibel)元组对的列表,把这个列表varibel对应的gradent乘以学习率,再把新列表传入apply_gradients()就搞定了。
核心代码:
softmax_linear=inference(x_input)#继续前向传播
cost=loss(y_input,softmax_linear)
train_op=tf.train.AdamOptimizer()
grads=train_op.compute_gradients(cost)#返回的是(gradent,varibel)元组对的列表
variables_low_LR = tf.get_collection(tf.GraphKeys.TRAINABLE_VARIABLES)[:4]#获取低学习率的变量列表
low_rate=0.0001
high_rate=0.001
new_grads_varible=[]#新的列表
for grad in grads:#对属于低学习率的变量的梯度,乘以一个低学习率
    if grad[1] in variables_low_LR:
        new_grads_varible.append((low_rate*grad[0],grad[1]))
    else:
        new_grads_varible.append((high_rate * grad[0], grad[1]))
apply_gradient_op = train_op.apply_gradients(new_grads_varible)sess.run(apply_gradient_op,feed_dict={x_input:x_train_batch,y_input:y_train_batch})三,关于PB文件
一,保存:
ckpt类型文件,是把结构(mate)与权重(checkpoint)分开保存,恢复的时候也是可以单独恢复。而PB文件是把结构与权重保存进了一个文件里。其中权重被固化成了常量,无法进行再次训练了。
可以看到,我指定保存最后一个tensor。只保存了之前的结构和权重,甚至y都没保存。
核心代码:
graph = convert_variables_to_constants(sess,sess.graph_def,['softmax_linear/softmax_linear'])
tf.train.write_graph(graph,'.','graph.pb',as_text=False)
二,恢复
恢复的思路跟ckpt恢复网络结构类似,不过因为只保存了我指定tensor之前的结构,所以自然也只能恢复保存了的网络结构。
with tf.Graph().as_default() as g:
    x_place = tf.placeholder(tf.float32, shape=[None, 784], name='x')
    y_place = tf.placeholder(tf.float32, shape=[None, 10], name='y')
    with open('./graph.pb','rb') as f:
        graph_def = tf.GraphDef()
        graph_def.ParseFromString(f.read())
        tf.import_graph_def(graph_def, name='')
#恢复tensor
        graph_op = tf.import_graph_def(graph_def,name='',input_map={'input/x:0':x_place},
                                       return_elements=['layer2/layer2:0','layer1/weights:0'])
或者可以用
# x_place = g.get_tensor_by_name('input/x:0')
 #y_place = g.get_tensor_by_name('input/y:0')
 #layer2 = g.get_tensor_by_name('layer2/layer2:0')


