Android 8.0 通知适配
不知不觉Android9都出来了,需要学的东西太多。。。。。。。
今天总结一下Android8.0的通知适配问题,随着Android8.0的手机陆续登场,好多人发现了通知栏的显示报错,同样的我也遇到了,遇到了就只能解决了,今天把总结写在这里。
从Android 8.0系统开始,Google引入了通知渠道这个概念。
什么是通知渠道呢?顾名思义,就是每条通知都要属于一个对应的渠道。每个App都可以自由地创建当前App拥有哪些通知渠道,但是这些通知渠道的控制权都是掌握在用户手上的。用户可以自由地选择这些通知渠道的重要程度,是否响铃、是否振动、或者是否要关闭这个渠道的通知。
拥有了这些控制权之后,用户就再也不用害怕那些垃圾推送消息的打扰了,因为用户可以自主地选择自己关心哪些通知、不关心哪些通知。举个具体的例子,我希望可以即时收到支付宝的收款信息,因为我不想错过任何一笔收益,但是我又不想收到支付宝给我推荐的周围美食,因为我没钱只吃得起公司食堂。这种情况,支付宝就可以创建两种通知渠道,一个收支,一个推荐,而我作为用户对推荐类的通知不感兴趣,那么我就可以直接将推荐通知渠道关闭,这样既不影响我关心的通知,又不会让那些我不关心的通知来打扰我了。
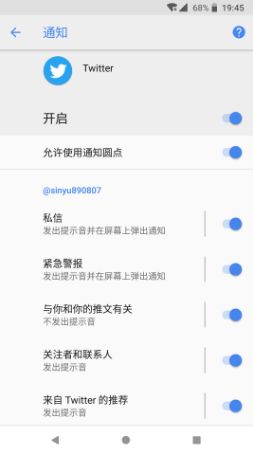
对于每个App来说,通知渠道的划分是非常需要仔细考究的,因为通知渠道一旦创建之后就不能再修改了,因此开发者需要仔细分析自己的App一共有哪些类型的通知,然后再去创建相应的通知渠道。这里我们来参考一下Twitter的通知渠道划分:
可以看到,Twitter就是根据自己的通知类型,对通知渠道进行了非常详细的划分,这样用户的自主选择性就比较高了,也就大大降低了用户不堪其垃圾通知的骚扰而将App卸载的概率。
以前我们基本都这样写:
 private void sendNotification(){
        NotificationManager notificationManager= (NotificationManager) getSystemService(NOTIFICATION_SERVICE);
        Notification.Builder builder=new Notification.Builder(getApplicationContext());
        builder.setSmallIcon(R.mipmap.ic_launcher);//设置小图标
        builder.setLargeIcon(BitmapFactory.decodeResource(getResources(),R.mipmap.ic_launcher));//设置大图标
        builder.setAutoCancel(true);//设置点击后自动消失
        builder.setContentTitle("这里是题目");//设置标题
        builder.setContentText("这里是内容");//设置内容
        builder.setWhen(System.currentTimeMillis());//设置显示当前事件
        builder.setDefaults(Notification.DEFAULT_VIBRATE);//
        Intent intent=new Intent(this,SecondActivity.class);
        PendingIntent pendingIntent=PendingIntent.getActivity(this,PENDING_INTENT_REQUEST_CODE,intent,PendingIntent.FLAG_UPDATE_CURRENT);
        builder.setContentIntent(pendingIntent);//设置一个点击意图

        notificationManager.notify(id,builder.build());
    }
然后跑在Android8的手机上通知就会不显示,报错提示的是没有notificationChannel
所以我们修改代码如下:
private  void sendNotification(){
        NotificationManager notificationManager= (NotificationManager) getSystemService(NOTIFICATION_SERVICE);
        if (Build.VERSION.SDK_INT >= Build.VERSION_CODES.O){
            //26及以上
            NotificationChannel notificationChannel=new NotificationChannel("id","name", IMPORTANCE_DEFAULT);
            notificationChannel.canBypassDnd();//可否绕过请勿打扰模式
            notificationChannel.canShowBadge();//桌面lanchener显示角标
            notificationChannel.enableLights(true);//闪光
            notificationChannel.shouldShowLights();//闪光
            notificationChannel.setLockscreenVisibility(VISIBILITY_SECRET);//锁屏显示通知
            notificationChannel.enableVibration(true);//是否允许震动
            notificationChannel.setVibrationPattern(new long[]{100,100,200});//设置震动方式(事件长短)
            notificationChannel.getAudioAttributes();//获取系统响铃配置
            notificationChannel.getGroup();//获取消息渠道组
            notificationChannel.setBypassDnd(true);
            notificationChannel.setDescription("description");
            notificationChannel.setLightColor(Color.GREEN);//制定闪灯是灯光颜色
            notificationChannel.setShowBadge(true);
            notificationManager.createNotificationChannel(notificationChannel);

            Notification.Builder builder=new Notification.Builder(getApplicationContext(),"id");
            builder.setSmallIcon(R.mipmap.ic_launcher);
            builder.setAutoCancel(true);
            builder.setChannelId("id");
            builder.setWhen(System.currentTimeMillis());
            builder.setContentTitle("题目");
            builder.setContentText("内容");
            builder.setNumber(3);
            Intent intent=new Intent(this,SecondActivity.class);
            PendingIntent pendingIntent=PendingIntent.getActivity(this,PENDING_INTENT_REQUEST_CODE,intent,PendingIntent.FLAG_UPDATE_CURRENT);
            builder.setContentIntent(pendingIntent);

            notificationManager.notify(2,builder.build());
        }else {
            NotificationCompat.Builder builder=new NotificationCompat.Builder(getApplicationContext());
            builder.setSmallIcon(R.mipmap.ic_launcher);
            builder.setAutoCancel(true);
            builder.setWhen(System.currentTimeMillis());
            builder.setContentTitle("题目");
            builder.setContentText("内容");
            Intent intent=new Intent(this,SecondActivity.class);
            PendingIntent pendingIntent=PendingIntent.getActivity(this,PENDING_INTENT_REQUEST_CODE,intent,PendingIntent.FLAG_UPDATE_CURRENT);
            builder.setContentIntent(pendingIntent);
            notificationManager.notify(2,builder.build());
        }

    }
如上,基本就可以解决问题了,但是这里要拓展一点,从两点来扩展,第一,通知使用自定义布局,第二,实现下载时候的进度更新效果,为了方便,这里直接写了一个NotificationUtils类,来方便管理。
使用自定义布局还是比较容易的,这里需要使用RemoteView,具体什么是RemoteView,大家可自行百度,这里不多说,先看一下RemoteView的布局文件:
里边放了一个图片作为一个icon,然后有标题、内容,进度条,及进度数字显示,然后看一下它是如何使用的:
 final Notification.Builder builder=getChannelNotification(R.mipmap.ic_launcher,"這是通知頭","這是內容",pendingIntent);
            builder.setDefaults(Notification.FLAG_ONLY_ALERT_ONCE);//仅响一次,不会一直叮咚响
            final RemoteViews contentView=new RemoteViews(getPackageName(),R.layout.layout_remote);
            contentView.setTextViewText(R.id.remote_title,"题目");
            contentView.setTextViewText(R.id.remote_content,"内容");
            contentView.setOnClickPendingIntent(R.id.remote_icon,pendingIntent);
            builder.setCustomContentView(contentView);
            notificationManager.notify(1,builder.build());
它使用的方法比较特殊,比如咱们一直使用的setText()等方法,在这里使用就是setTextViewText(),还有点击事件setOnClickListener(),在这里使用的是setOnClickPendingIntent(),这些方法里第一个参数都是对应的view的ID,后边是设置的值。下边看一下这个工具类,代码全部贴出来了:
/**
 * 一个生成通知的类
 */
public class NotificationUtils extends ContextWrapper{
    /** 通知管理对象 */
    private NotificationManager notificationManager;
    /** channel的ID */
    public static final String id = "channel_1";
    /** channel的名称 */
    public static final String name = "channel_name_1";

    /** 通知生成类的构造方法 */
    public NotificationUtils(Context context) {
        super(context);
    }

    /**
     * 创建NotificationChannel
     */
    public void createNotificationChannel(){
        NotificationChannel notificationChannel=new NotificationChannel(id,name,NotificationManager.IMPORTANCE_DEFAULT);
        notificationChannel.canBypassDnd();//可否绕过请勿打扰模式
        notificationChannel.canShowBadge();//桌面lanchener显示角标
        notificationChannel.enableLights(true);//闪光
        notificationChannel.shouldShowLights();//闪光
        notificationChannel.setLockscreenVisibility(VISIBILITY_SECRET);//锁屏显示通知
        notificationChannel.enableVibration(true);//是否允许震动
        notificationChannel.setVibrationPattern(new long[]{100,100,200});//设置震动方式(事件长短)
        notificationChannel.getAudioAttributes();//获取系统响铃配置
        notificationChannel.getGroup();//获取消息渠道组
        notificationChannel.setBypassDnd(true);
        notificationChannel.setDescription("description");
        notificationChannel.setLightColor(Color.GREEN);//制定闪灯是灯光颜色
        notificationChannel.setShowBadge(true);
        getNotificationManager().createNotificationChannel(notificationChannel);
    }

    /**
     * 获取通知管理者对象
     * @return
     */
    public NotificationManager getNotificationManager(){
        if (notificationManager==null){
            notificationManager= (NotificationManager) getSystemService(NOTIFICATION_SERVICE);
        }
        return notificationManager;
    }

    /**
     * 对应Android8.0生成notification的方法,通过此方法获取notification
     * @param iconRes
     * @param title
     * @param content
     * @param pendingIntent
     * @return
     */
    public Notification.Builder getChannelNotification(int iconRes, String title, String content, PendingIntent pendingIntent){
        Notification.Builder builder=new Notification.Builder(getApplicationContext(),id);
        builder.setSmallIcon(iconRes);
        builder.setAutoCancel(true);
        builder.setChannelId(id);
        builder.setWhen(System.currentTimeMillis());
        builder.setContentTitle(title);
        builder.setContentText(content);
        builder.setNumber(3);
        builder.setContentIntent(pendingIntent);

        return builder;
    }

    /**
     * 对应Android8.0以下的notification对象
     * @param iconRes
     * @param title
     * @param content
     * @param pendingIntent
     * @return
     */
    public NotificationCompat.Builder getNotificationAPI25(int iconRes,String title,String content,PendingIntent pendingIntent){
        NotificationCompat.Builder builder=new NotificationCompat.Builder(getApplicationContext());
        builder.setSmallIcon(iconRes);
        builder.setAutoCancel(true);
        builder.setWhen(System.currentTimeMillis());
        builder.setContentTitle(title);
        builder.setContentText(content);
        builder.setContentIntent(pendingIntent);

        return builder;
    }

    /**
     * 模拟发送一个普通通知
     * @param iconRes
     * @param title
     * @param content
     * @param pendingIntent
     */
    public void sendNotification(int iconRes,String title,String content,PendingIntent pendingIntent){
        if (Build.VERSION.SDK_INT >= Build.VERSION_CODES.O){
            //26及以上
            createNotificationChannel();
            Notification notification=getChannelNotification(iconRes,title,content,pendingIntent).build();
            notificationManager.notify(2,notification);
        }else {
            Notification notification=getNotificationAPI25(iconRes,title,content,pendingIntent).build();
            notificationManager.notify(2,notification);
        }
    }

    /**
     * 模拟一个显示进度条的通知
     * @param iconRes
     * @param title
     * @param content
     * @param pendingIntent
     */
    public   void sendProgressNotification(int iconRes,String title,String content,PendingIntent pendingIntent){
        if (Build.VERSION.SDK_INT >= Build.VERSION_CODES.O){
            createNotificationChannel();
            final Notification.Builder builder=getChannelNotification(R.mipmap.ic_launcher,"這是通知頭","這是內容",pendingIntent);
            builder.setDefaults(Notification.FLAG_ONLY_ALERT_ONCE);//仅响一次,不会一直叮咚响
            final RemoteViews contentView=new RemoteViews(getPackageName(),R.layout.layout_remote);
            contentView.setTextViewText(R.id.remote_title,"题目");
            contentView.setTextViewText(R.id.remote_content,"内容");
            contentView.setOnClickPendingIntent(R.id.remote_icon,pendingIntent);
            builder.setCustomContentView(contentView);
            notificationManager.notify(1,builder.build());

            new Thread(new Runnable() {
                @Override
                public void run() {
                    for (int i=0;i<101;i++) {
                        builder.setDefaults(Notification.FLAG_ONLY_ALERT_ONCE);
                        builder.setProgress(100, i, false);
                        contentView.setProgressBar(R.id.remote_progress,100,i,false);
                        contentView.setTextViewText(R.id.remote_number,i+"%");
                        builder.setCustomContentView(contentView);
                        notificationManager.notify(1,builder.build());
                        try {
                            Thread.sleep(1000);
                        } catch (InterruptedException e) {
                            e.printStackTrace();
                        }
                    }
                }
            }).start();
        }else {
            NotificationCompat.Builder builder=getNotificationAPI25(R.mipmap.ic_launcher,"這是通知頭","這是內容",pendingIntent);
            builder.setDefaults(Notification.FLAG_ONLY_ALERT_ONCE);//仅响一次,不会一直叮咚响
            notificationManager.notify(1,builder.build());
        }
    }
}
在activity中调用如下:
 /**
     * 发送一个显示进度的通知
     */
    private  void sendProgressNotification(){
        NotificationUtils utils=new NotificationUtils(getApplicationContext());
        Intent intent=new Intent(this,SecondActivity.class);
        PendingIntent pendingIntent=PendingIntent.getActivity(this,0,intent,PendingIntent.FLAG_UPDATE_CURRENT);
        utils.sendProgressNotification(R.mipmap.ic_launcher,"這是通知頭","這是內容",pendingIntent);
    }
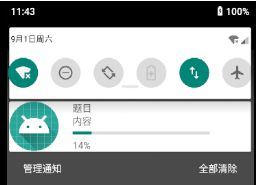
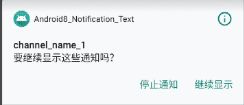
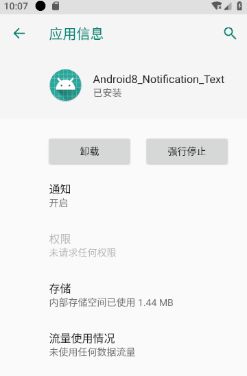
对了,下边贴几张效果图吧:
在通知界面,滑动相应的通知,会有一个设置图标和一个时间的图标,在这里我们可以进行设置,在时间那里可以推迟其发送:
更高大上的可以参考郭霖的博客:讲的更明白的


