djangorestframework 的使用 入门级 helloworld
前言
django 使用restful风格设计web-api,最近使用了djangorestframework框架,官方的教程看的是稀里糊涂的,经过自己研究,最终搭建好了自己的接口网站
准备
pip install virtualenv
...active virtualenv...
...
pip install djangorestframework
pip install markdown       # Markdown support for the browsable API.
pip install django-filter  # Filtering support
pip install django-rest-framework-docs
过程
疑问
- setting.py 如何设置
INSTALLED_APPS = (
    'django.contrib.admin',
    'django.contrib.auth',
    'django.contrib.contenttypes',
    'django.contrib.sessions',
    'django.contrib.messages',
    'django.contrib.staticfiles',
    'testapi',
    'rest_framework',
    'rest_framework_docs',
    'rest_framework.authtoken' # token 认证
)

REST_FRAMEWORK = {
    # Use Django's standard `django.contrib.auth` permissions,
    # or allow read-only access for unauthenticated users.
    'DEFAULT_PERMISSION_CLASSES': (
    # 这句话能够使认证生效,否则直接请求就回返回结果
        'rest_framework.permissions.IsAuthenticated',
    ),
    'DEFAULT_AUTHENTICATION_CLASSES': (
 # 这里是支持缓存,用户名密码,token 三个认证
 'rest_framework.authentication.SessionAuthentication',
        'rest_framework.authentication.BasicAuthentication',
  # 使用token是必须要有下面这句话
 'rest_framework.authentication.TokenAuthentication',
    ),
    'PAGE_SIZE': 10
}
经过上面设置,接口可以支持token认证,支持用户名密码认证
* urls.py设置
* 工程目录的urls.py
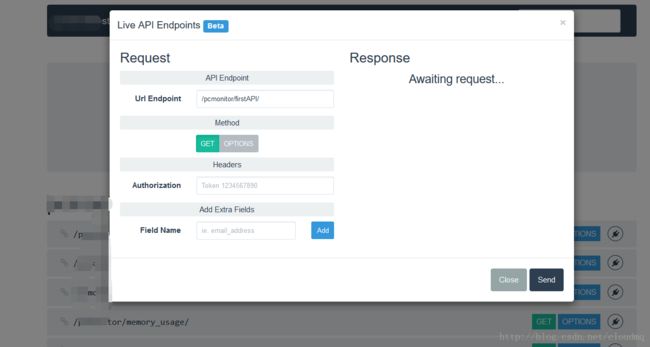
# 下面是,使用docs文档,可以直接测试接口的一个网页
    url(r'^$', include('rest_framework_docs.urls')),
    # 通过username/password获取token
    url(r'^api-auth/', include('rest_framework.urls', namespace='rest_framework')),
    # app的urls
    url(r'testapi/',include('testapi.urls')),
url(r'^admin/', admin.site.urls),- 如何自定义DjangoRESTframework的默认页面
工程目录下,添加templates/rest_framework文件夹,然后把安装目录下的html文件,按照需要拷贝到templates/rest_framework目录下,在setting.py下面,添加templates模板目录,例如
TEMPLATES = [
    {
        'BACKEND': 'django.template.backends.django.DjangoTemplates',
        # 添加templates(里面的内容为从pip安装djangorestframework后,rest的安装目录下的部分所需html文件)
        'DIRS': ['templates',],
        'APP_DIRS': True,
        'OPTIONS': {
            'context_processors': [
                'django.template.context_processors.debug',
                'django.template.context_processors.request',
                'django.contrib.auth.context_processors.auth',
                'django.contrib.messages.context_processors.messages',
            ],
        },
    },
]
* 如何分类显示所有结果,自定义docs
官方插件django-restframe-docs里面官方的痕迹太深,我们必须要自定义页面,对于这个docs插件,定义起来很容易,步骤如下:
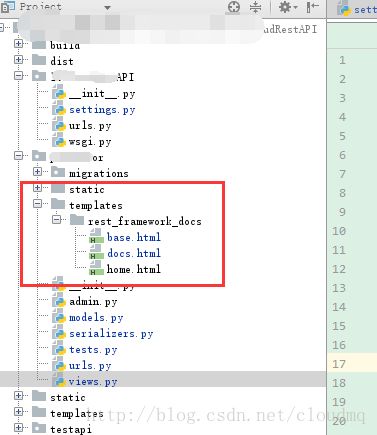
1. 在app的目录下,添加templates/rest_framework_docs目录(注意,目录名称必须是这个,否则会找不到)
2. 拷贝安装目录下的html到此目录,大功告成。看下图:

* 核心部分代码
这里以返回helloworld为例子
* serializers.py文件
我们这里不需要在里面添加任何内容,因为只返回一个字符串
啥米也不需要写models.py文件
因为需要使用token,所以得为每个用户添加token认证
from django.db import models

# Create your models here.

from django.conf import settings
from django.db.models.signals import post_save
from django.dispatch import receiver
from rest_framework.authtoken.models import Token
from django.contrib.auth.models import User
# 为每个用户添加token验证
@receiver(post_save, sender=settings.AUTH_USER_MODEL)
def create_auth_token(sender, instance=None, created=False, **kwargs):
    if created:
        token = Token.objects.create(user=instance)
        print token.key
views.py文件
1. 需要把django.http 的 Response弃用,改为使用rest_framework的Response,否则接受不到响应结果
from django.contrib.auth.models import User
from rest_framework.response import Response
from rest_framework.views import APIView
# 返回整数,例如 1.1 为 1.1%
class firstAPI( APIView ):
# 下面这句话对我们没什么用,但是框架必须得用queryset,不得已使用了这句话
    queryset = User.objects.all()
    # 这里是一个get请求
    def get(self, request, *args, **kwargs):
        return Response("Hello World!")
testapi的url.py
from django.conf.urls import url
from rest_framework.authtoken import views

from views import *


urlpatterns = [
    url(r'^firstAPI/', firstAPI.as_view()),
    url(r'^api-token-auth/', views.obtain_auth_token),
]
总结
- 没有使用任何的序列化的内容,对于刚刚接触这个框架的开发者来说,比较容易接受
- 结合了token认证,结合了用户名密码认证
- 自定义框架页面和docs页面
- 完成了一个简单的,发送请求,返回helloworld的功能
# 请求返回token
curl -X GET http://127.0.0.1:8000/testapi/api-token-auth/ -u demo:123456
# 使用token请求接口
curl -X GET http://127.0.0.1:8000/testapi/firstAPI/ -H 'Authorization: Token 177d9b2db9da2ffb77c37c01ebc3007116fd9031'
# 使用用户名密码请求
curl -X GET http://127.0.0.1:8000/testapi/firstAPI/ -u demo:123456