springBoot(七)整合之整合spring Security理解
权限部分是一个后台系统必备的部分,之前spring的操作,我基本是利用shiro配置整合,也有尝试其他的权限框架,自己也写过自己的权限部分,主要是利用拦截器和http的组合操作达成权限控制的效果。那么话不多说,现在是讲讲springBoot的部分,最近用到了springboot整合权限框架部分的内容.
这边单纯利用jsp,不使用模板类型,主要是便于理解,网上的模板类通常都是一半代码,一半靠猜,精彩部分就脱身而去。怪坑的、屁话不说,代码解析一波
参考链接:https://www.cnblogs.com/davidwang456/p/4549344.html?utm_source=tuicool
简单例子与介绍
spring security3 这本书简介了整个过程
主要来说,整个过程都是基于过滤器拦截并将请求封装 成为一个验证信息,给验证管理者验证,通过后为此请求认证并通过访问。否则抛出认证异常。
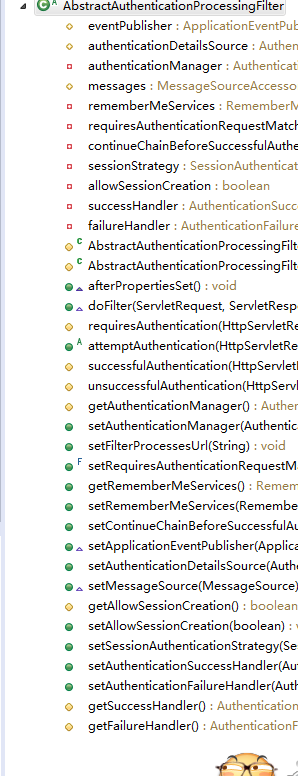
AbstractAuthenticationProcessingFilter这个过滤器是符合springSecurity的一个过滤器,内部包含了一堆对请求的处理方法
AuthenticationManager 这个接口显然是验证管理者,旗下仅有个ProviderManager方法
这里有个权限验证列表,显然这是用来管理谁来管理权限的,这个才是真正的认证决策的方法
内部包含获取权限,详情,是否验证等一系列方法
Object getPrincipal() 返回安全实体的唯一标识(如,一个用户名)
Object getCredentials() 返回安全实体的凭证信息
List getAuthorities() 得到安全实体的权限集合,根据认证信息的存储决定的。
Object getDetails() 返回一个跟认证提供者相关的安全实体细节信息
boolean isAuthenticated () 是否认证成功
void setAuthenticated(boolean paramBoolean) throws IllegalArgumentException; 设置认证状态
Object getDetails() 返回一个跟认证提供者相关的安全实体细节信息
boolean isAuthenticated () 是否认证成功
void setAuthenticated(boolean paramBoolean) throws IllegalArgumentException; 设置认证状态
然后最基本的一个方法就实现了
/**
	* @ClassName: AuthenticationExample
	* @Description: 简单例子
	* @author linge
	* @date 2017年12月4日 上午10:28:18
	*
	*/
	public class AuthenticationExample {
		//设置简单的认证管理,继承了AuthenticationManager
		  private static AuthenticationManager am = new SampleAuthenticationManager();
		  public static void main(String[] args) throws Exception {
			  //相当于无限获取验证信息
		    BufferedReader in = new BufferedReader(new InputStreamReader(System.in));
		    while(true) {
		      System.out.println("Please enter your username:");
		      String name = in.readLine();
		      System.out.println("Please enter your password:");
		      String password = in.readLine();
		      try {
		    	  //模拟请求,执行登录的过滤器
		        Authentication request = new UsernamePasswordAuthenticationToken(name, password);
		        Authentication result = am.authenticate(request);
		        //用于保存到全局中就像我们做登陆时候用的session一样,用来存储当前登陆的用户信息,
				/* 个请求一个的话,如何保证下一个请求,还能保留住上次的session,其实这个过滤器在清除SecurityContextHolder之前,
				        先把SecurityContext拷贝出来放到session中,使用session的名称是HttpSessionSecurityContextRepository.
				   SPRING_SECURITY_CONTEXT_KEY(“SPRING_SECURITY_CONTEXT”)。
				   下次请求来的时候,会先读session中这个值,如果没有的话才会创建新的,否则就使用session中的。
				*/
		        SecurityContextHolder.getContext().setAuthentication(result);
		        break;
		      } catch(AuthenticationException e) {
		        System.out.println("Authentication failed: " + e.getMessage());
		      }
		    }
		    System.out.println("Successfully authenticated. Security context contains: " +
		              SecurityContextHolder.getContext().getAuthentication());
		  }
		}
		//验证管理器
		class SampleAuthenticationManager implements AuthenticationManager {
			//设置认证状态,赋予权限
		  static final List AUTHORITIES = new ArrayList();
		  static {
		    AUTHORITIES.add(new SimpleGrantedAuthority("ROLE_USER"));
		  }
		  public Authentication authenticate(Authentication auth) throws AuthenticationException {
		    if (auth.getName().equals(auth.getCredentials())) {  //验证信息
		    	//赋予权限与认证
		      return new UsernamePasswordAuthenticationToken(auth.getName(),
		        auth.getCredentials(), AUTHORITIES);  //这里直接获取权限
		      }
		      throw new BadCredentialsException("Bad Credentials");
		  }
		}
实例介绍
使用官方 WebSecurityConfigurerAdapter 修改
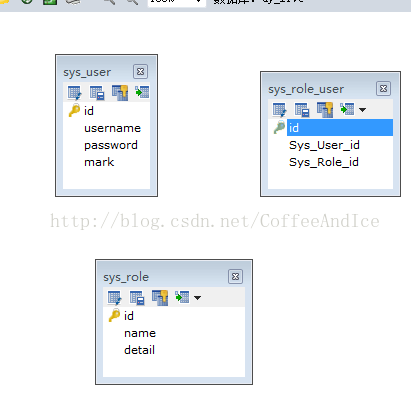
1、数据库结构
2、sql
CREATE TABLE `sys_role` (
  `id` int(11) NOT NULL AUTO_INCREMENT,
  `name` varchar(30) DEFAULT NULL,
  `detail` varchar(30) DEFAULT NULL COMMENT '详情',
  PRIMARY KEY (`id`)
) ENGINE=InnoDB AUTO_INCREMENT=8 DEFAULT CHARSET=utf8
CREATE TABLE `sys_role_user` (
`id` int(11) NOT NULL AUTO_INCREMENT COMMENT '主键',
`Sys_User_id` int(11) DEFAULT NULL,
`Sys_Role_id` int(11) DEFAULT NULL,
PRIMARY KEY (`id`),
UNIQUE KEY `Sys_User_id` (`Sys_User_id`,`Sys_Role_id`)
) ENGINE=InnoDB AUTO_INCREMENT=38 DEFAULT CHARSET=utf8
CREATE TABLE `sys_user` (
  `id` int(11) NOT NULL AUTO_INCREMENT COMMENT '主键',
  `username` varchar(20) DEFAULT NULL COMMENT '用户名',
  `password` varchar(20) DEFAULT NULL COMMENT '密码',
  `mark` varchar(20) DEFAULT NULL COMMENT '备注',
  PRIMARY KEY (`id`),
  UNIQUE KEY `username` (`username`)
) ENGINE=InnoDB AUTO_INCREMENT=27 DEFAULT CHARSET=utf8
表数据根据自己喜好填写
3、pom.xml
            org.springframework.boot
            spring-boot-starter-security
4、取代默认访问页面
/**
* @ClassName: WebMvcConfig
* @Description: 用于配置默认登录界面
* @author linge
* @date 2017年10月10日 上午9:15:21
*
*/
@Configuration

public class WebMvcConfig extends WebMvcConfigurerAdapter{
//	springMVC 配置,注册访问 /login 转向 login.html 页面
    @Override
    public void addViewControllers(ViewControllerRegistry registry) {
        registry.addViewController("/login").setViewName("login");
    }
}
5、取代默认登入,如果是默认情况,在启动项目的时后会在下方显示出密码。
/**
* @ClassName: WebSecurityConfig
* @Description: 校验
* @author linge
* @date 2017年10月10日 上午9:15:10
*
*/
@Configuration
@EnableWebSecurity
@EnableGlobalMethodSecurity(securedEnabled= true)
public class WebSecurityConfig extends WebSecurityConfigurerAdapter {


    @Bean
    UserDetailsService customUserService(){ //注册UserDetailsService 的bean
        return new CustomUserService();
    }
    @Override
    protected void configure(AuthenticationManagerBuilder auth) throws Exception {
        auth.userDetailsService(customUserService()); //user Details Service验证

    }
    /*忽略的请求*/
    @Override
    public void configure(WebSecurity web) throws Exception {
        web.ignoring().antMatchers("/photo/**","/js/**","/include/**","/images/**","/assets/**","/upload/**");
    }
    @Override
    protected void configure(HttpSecurity http) throws Exception {
    	 http.csrf().disable().authorizeRequests()//这个不加进不去,登录验证的时候是post请求
                .anyRequest().authenticated() //任何请求,登录后可以访问
                .and()
                .formLogin()
                .loginPage("/login")
                .successForwardUrl("/")
                .failureUrl("/login?error")
                .permitAll() //登录页面用户任意访问
                .and()
                .headers().frameOptions().disable()//开启允许iframe
                .and()
                .logout().permitAll(); //注销行为任意访问
    }
}
注册认证服务的类
/**
* @ClassName: CustomUserService
* @Description: TODO(这里用一句话描述这个类的作用)
* @author linge
* @date 2017年9月30日 下午12:17:52
*
*/
@Service
@Transactional
public class CustomUserService implements UserDetailsService { //自定义UserDetailsService 接口

    @Autowired
    UserDao userDao;

    @Override
    public UserDetails loadUserByUsername(String username) { //重写loadUserByUsername 方法获得 userdetails 类型用户

        SysUser user = userDao.findByUserName(username);
        if(user == null){
            throw new UsernameNotFoundException("用户名不存在");
        }
        List authorities = new ArrayList<>();
        //用于添加用户的权限。只要把用户权限添加到authorities 就万事大吉。
        for(SysRole role:user.getRoles())
        {
            authorities.add(new SimpleGrantedAuthority(role.getName()));
            System.out.println(role.getName());
        }
        return new org.springframework.security.core.userdetails.User(user.getUsername(),
                user.getPassword(),
                true,//是否可用
                true,//是否过期
                true,//证书不过期为true
                true,//账户未锁定为true;这4个参数可省略
                authorities);
    }
页面放置
application.properties
spring.mvc.view.prefix=/WEB-INF/jsp/
spring.mvc.view.suffix=.jsp
如果有不理解和不正确的地方,请麻烦指出一下,大家共同进步,剩下的,结合之前的springBoot基础搭建的内容就能跑通了


