使用opnalpr训练目标检测级联分类器
1.环境
windows7 , opencv3.0 , python-2.6 , PIL-1.1.6.win32-py2.6.exe
2.安装python2.6和PIL
3.下载openalpr的train-detector-master
3.修改prep.py文件,可以直接复制以下代码,修改OPENCV_DIR和BASE_DIR为你自己的目录即可
#!/usr/bin/python

import os
import Image
import uuid
import shutil

import sys

#修改成你需要检测目标的宽度和高度
WIDTH=136
HEIGHT=36
#这个目录里面需要放你的正样本
COUNTRY='china'

#WIDTH=52
#HEIGHT=13
#COUNTRY='eu'

#constants,需要填写你的opencv安装目录,注意这里制定x64位,使用32位可能在训练的时候回出现分配内存不足的情况
OPENCV_DIR= 'D:\\software\\opencv\\opencv_300\\opencv\\build\\x64\\vc11\\bin'
SAMPLE_CREATOR = OPENCV_DIR + '\\opencv_createsamples'

#指定prep.py文件所在的目录即可
BASE_DIR            = 'E:\\PlateRec\\train-detector-master\\train-detector-master\\'

#训练的模型输出目录
OUTPUT_DIR          = BASE_DIR + "out\\"
#负样本放置目录
INPUT_NEGATIVE_DIR  = BASE_DIR + 'raw-neg\\'
#正样本放置目录
INPUT_POSITIVE_DIR  = BASE_DIR + COUNTRY + '\\'
#初始状态目录为空,在运行prep.py neg后,这个目录会有内容
OUTPUT_NEGATIVE_DIR  = BASE_DIR + 'negative\\'
OUTPUT_POSITIVE_DIR  = BASE_DIR + 'positive\\'


POSITIVE_INFO_FILE  = OUTPUT_POSITIVE_DIR + 'positive.txt'
NEGATIVE_INFO_FILE  = OUTPUT_NEGATIVE_DIR + 'negative.txt'
VEC_FILE            = OUTPUT_POSITIVE_DIR + 'vecfile.vec'


vector_arg = '-vec %s' % (VEC_FILE)
width_height_arg = '-w %d -h %d' % (WIDTH, HEIGHT)


def print_usage():
    print ("Usage: prep.py [Operation]")
    print ("   -- Operations --")
    print ("  neg        -- Prepares the negative samples list")
    print ("  pos        -- Copies all the raw positive files to a opencv vector")
    print ("  showpos    -- Shows the positive samples that were created")
    print ("  train      -- Outputs the command for the Cascade Training algorithm")

def file_len(fname):
    with open(fname) as f:
        for i, l in enumerate(f):
            pass
    return i + 1


command=""

if command != "":
    pass
elif len(sys.argv) != 2:
    print_usage()
    exit()
else:
    command = sys.argv[1]


if command == "neg":
    print ("Neg")

    # Get rid of any spaces
    for neg_file in os.listdir(INPUT_NEGATIVE_DIR):
        if " " in neg_file:
            fileName, fileExtension = os.path.splitext(neg_file)

            newfilename =  str(uuid.uuid4()) + fileExtension
            #print "renaming: " + files + " to "+ root_dir + "/" + str(uuid.uuid4()) + fileExtension
            os.rename(INPUT_NEGATIVE_DIR + neg_file, INPUT_POSITIVE_DIR + newfilename)


    f = open(NEGATIVE_INFO_FILE,'w')
    ## Write a list of all the negative files
    for neg_file in os.listdir(INPUT_NEGATIVE_DIR):
        if os.path.isdir(INPUT_NEGATIVE_DIR + neg_file):
            continue

        shutil.copy2(INPUT_NEGATIVE_DIR + neg_file, OUTPUT_NEGATIVE_DIR + neg_file )

        f.write(OUTPUT_NEGATIVE_DIR + neg_file + "\n")


    f.close()

elif command == "pos":
    print ("Pos")
    info_arg = '-info %s' % (POSITIVE_INFO_FILE)

    # Copy all files in the raw directory and build an info file

    ## Remove all files in the output positive directory
    for old_file in os.listdir(OUTPUT_POSITIVE_DIR):
        os.unlink(OUTPUT_POSITIVE_DIR + old_file)

    ## First, prep the sample filenames (make sure they have no spaces)
    for files in os.listdir(INPUT_POSITIVE_DIR):
        if os.path.isdir(INPUT_POSITIVE_DIR + files):
            continue

        # Rename the file if it has a space in it
        newfilename = files
        if " " in files:
            fileName, fileExtension = os.path.splitext(files)

            newfilename =  str(uuid.uuid4()) + fileExtension
            #print "renaming: " + files + " to "+ root_dir + "/" + str(uuid.uuid4()) + fileExtension
            os.rename(INPUT_POSITIVE_DIR + files, INPUT_POSITIVE_DIR + newfilename)

		# Copy from the raw directory to the positive directory
        shutil.copy2(INPUT_POSITIVE_DIR + newfilename, OUTPUT_POSITIVE_DIR + newfilename )


    total_pics = 0
    ## Create the positive.txt input file
    f = open(POSITIVE_INFO_FILE,'w')
    for filename in os.listdir(OUTPUT_POSITIVE_DIR):
        if os.path.isdir(OUTPUT_POSITIVE_DIR + filename):
            continue

        if filename.endswith(".txt"):
            continue
        try:
            img = Image.open(OUTPUT_POSITIVE_DIR + filename)

            # get the image's width and height in pixels
            width, height = img.size
            f.write(filename + " 1 0 0 " + str(width) + " " + str(height) + '\n')

            total_pics = total_pics + 1
        except IOError:
            print ("Exception reading image file: " + filename)

    f.close()


    # Collapse the samples into a vector file
    execStr = '%s\\opencv_createsamples %s %s %s -num %d' % (OPENCV_DIR, vector_arg, width_height_arg, info_arg, total_pics )
    print (execStr)

    os.system(execStr)
    #opencv_createsamples -info ./positive.txt -vec ../positive/vecfile.vec -w 120 -h 60 -bg ../negative/PentagonCityParkingGarage21.jpg -num 100


elif command == "showpos":
    print ("SHOW")
    execStr = '%s\\opencv_createsamples -vec %s -w %d -h %d' % (OPENCV_DIR, VEC_FILE, WIDTH, HEIGHT )
    print (execStr)
    os.system(execStr)
    #opencv_createsamples -vec ../positive/vecfile.vec -w 120 -h 60
elif command == "train":
    print ("TRAIN")

    data_arg = '-data %s\\' % (OUTPUT_DIR)
    bg_arg = '-bg %s' % (NEGATIVE_INFO_FILE)

    try:
        num_pos_samples = file_len(POSITIVE_INFO_FILE)
    except:
	    num_pos_samples = -1
    num_neg_samples = file_len(NEGATIVE_INFO_FILE)

    execStr = '%s\\opencv_traincascade %s %s %s %s -numPos %d -numNeg %d -maxFalseAlarmRate 0.45 -featureType LBP -numStages 13' % (OPENCV_DIR, data_arg, vector_arg, bg_arg, width_height_arg, num_pos_samples, num_neg_samples )

    print ("Execute the following command to start training:")
    print (execStr)
	#D:\software\opencv\opencv_300\opencv\build\x64\vc11\bin\opencv_traincascade -data E:\PlateRec\train-detector-master\train-detector-master\out\ -vec E:\PlateRec\train-detector-master\train-detector-master\positive\vecfile.vec -bg E:\PlateRec\train-detector-master\train-detector-master\negative\negative.txt -w 136 -h 36 -numPos 1600 -numNeg 6000 -minHitRate 0.99 -maxFalseAlarmRate 0.45 -featureType LBP -numStages 20
    #opencv_traincascade -data ./out/ -vec ./positive/vecfile.vec -bg ./negative/negative.txt -w 120 -h 60 -numPos 99 -numNeg 5  -featureType LBP -numStages 20
elif command == "SDFLSDFSDFSDF":

    root_dir = '/home/mhill/projects/anpr/AlprPlus/samples/svm/raw-pos'
    outputfilename = "positive.txt"


else:
    print_usage()
    exit()
4.将正样本放在INPUT_POSITIVE_DIR中,负样本放在raw-neg目录中
5.执行以下命令
prep.py neg
prep.py pos
D:\software\opencv\opencv_300\opencv\build\x64\vc11\bin\opencv_traincascade -data E:\PlateRec\train-detector-master\train-detector-master\out\ -vec E:\PlateRec\train-detector-master\train-detector-master\positive\vecfile.vec -bg E:\PlateRec\train-detector-master\train-detector-master\negative\negative.txt -w 45 -h 15 -numPos 1500 -numNeg 4500 -minHitRate 0.99 -maxFalseAlarmRate 0.45 -featureType LBP -numStages 16 -precalcValBufSize 5 -precalcIdxBufSize 100注意第三个命令很关键,第一个路径是你安装的opencv包含opencv_traincascade.exe文件的目录
-minHitRate 表示每个分类器最多有1600*(1-0.99)个正样本被分类成负样本,下级取正样本的时候需要多取这么多正样本
-maxFalseAlarmRate 表示最大虚警率,每级,最多将6000*0.45个样本分类成正样本
-data 后面是模型输出目录
-vec 后面是执行prep.py pos后生成的vecfile.vec文件目录,其实就在positive目录中
-bg 后面是执行prep.py neg生成negative.txt文件目录,其实就是在negative目录中
-numPos 表示每个弱分类器使用的正样本数,而不是你拥有的正样本的总数
计算公式:正样本总数 >= (numPos + (numStages-1) * (1 - minHitRate) * numPos)
-numNeg 同样表示的是每个弱分类器使用的负样本数,但是这个值可以直接使用你负样本的总个数
-precalcValBufSize 表示每个样本提取的特征使用多大单位为MB,如果不设置默认为1024MB也就是1G,这很大,可能会导致训练到某一stage的时候分配空间失败,所以建议使用小一点的值我这里使用的LBP特征
-precalcIdxBufSize 表示什么索引的buf大小,据说这个值越大训练的越快,但是我为了保险起见别训练个十几个小时又分配内存不足,所以使用的是100MB,默认也是1024MB
ps:我使用1925个正样本,4706个负样本,发现使用上面这个命令参数训练没有问题,而且训练出来的检测效果不错,可能正样本更多一些,比如倾斜着的车牌,负样本更丰富一些比如栅栏,栏杆等容易被识别成车牌的加入到负样本中,效果会更好一些。注意那个w和h不一定就是你的正样本的宽度和高度,可以是等比例缩小的,实际上我试过就是样本136*36这么大的,识别不到目标。
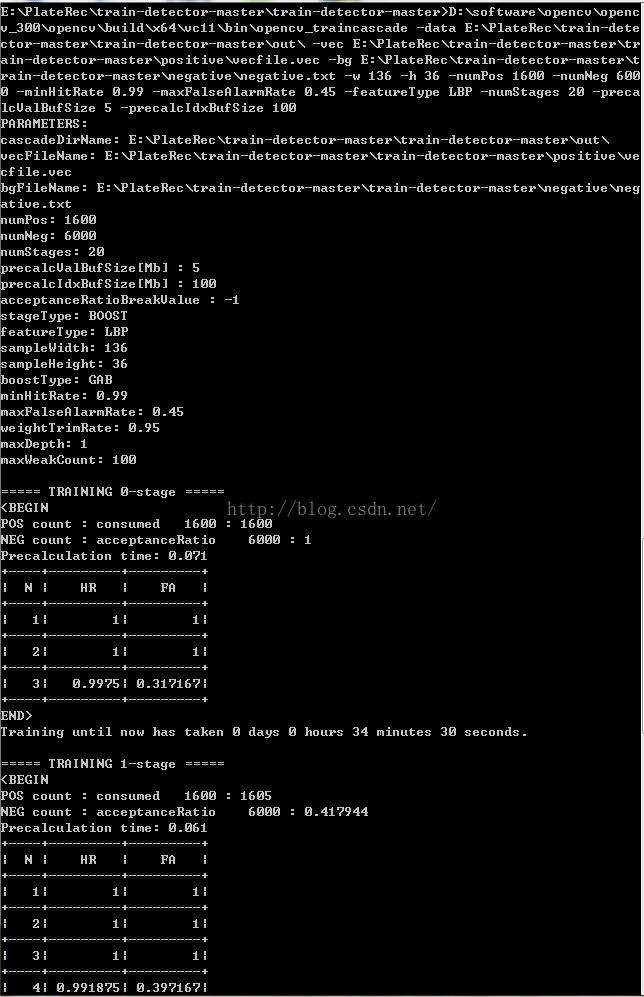
6.开始训练之后如下图所示
