OSVR接入HMD设备
推荐一本书<<金字塔原理>>,本文按照书中说提的“是什么,为什么,怎么做”,来说明如何把HMD设备接入到OSVR上。
为什么要做OSVR插件
对于我们来说,后续要制作的产品是头盔,对于头盔设备通过插件接入OSVR优点如下:
- 硬件插件,接入OSVR后,直接玩OSVR上的游戏,而不需要单独跟游戏公司来做联调,不会陷入先有鸡还是先有蛋的困境。
- 分析插件,接入OSVR后,可以使单独的硬件功能更加丰富,如计步器,手势识别。
- 提供丰富的参考资源(Ocluars,HTC,OSVR等),平台调试工具(BasicServer,vrpn_print_devices,Distortionizer等)。
如果没有OSVR平台,每个设备都需要适配每个平台,如果有M台设备,有N个平台,那么他们之间的关系就有MXN种,维持这样的关系是极其麻烦的,设备和VR应用之间的关系如下图所示:

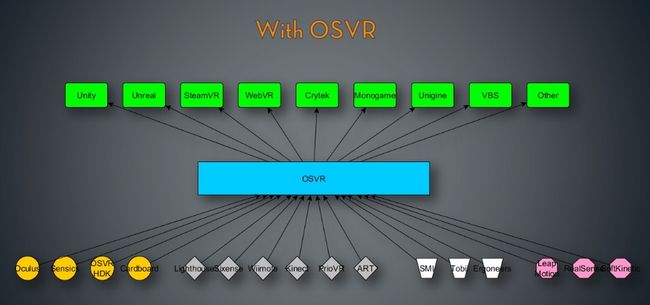
如果设备和应用程序都接入到OSVR上,那么设备只需要接入到OSVR中即可,而不要考虑具体的平台和应用,同样应用不需要考虑每一个设备的情况,它按照统一的接口获取设备的数据,对于设备来说他们只需要制作自己接入OSVR的插件即可,应用程序也只要使用OSVR的插件就可以正常工作了,关系如下图所示:
OSVR插件是什么
OSVR插件,为上层应用程序提供数据,包含2类插件:分析插件和设备插件
分析插件:用于把底层上报的原始数据,解析、处理成上层需要的。例如,一个手势识别的插件,可以底层上报的XYZ坐标轴的值,转换、识别成具体的手势。
设备插件:用来接入具体的物理设备,用来为上层提供各种类型的数据。例如,VR眼镜的插件可以提供显示相关的参数,以及追踪器的坐标轴数据。
OSVR插件怎么做
如果HMD只是作为显示,则只需要修改json文件即可(json文档说明),如果需要提供追踪器数据,手势识别等功能,则需要制作插件。
以手上我们自己做得头显设备(此设备能够通过USB主动上报传感器的值即可)为例,来制作一个能够使此HMD接入OSVR-Core的插件。
加载插件
- 拷贝demo源代码作为初始代码:”OSVR-Core\examples\plugin\selfcontained”,这里将拷贝后的文件夹命名为”osvr_plugin_oueh”,如下图所示:

- 将”com_osvr_example_selfcontained.cpp”文件重命名为”com_osvr_oueh_plugin.cpp”,将”com_osvr_example_selfcontained.json”文件重命名为”com_osvr_oueh_plugin.json”:

- 将“com_osvr_oueh_plugin.cpp”代码里,修改头文件,json配置以及OSVR_PLUGIN,代码修改如下:


同时添加一行”Hello World”打印信息:

- 修改CMake编译文件,修改内容如下:

- 修改CMake编译文件,修改内容如下:
制作带读取分析HMD数据的插件
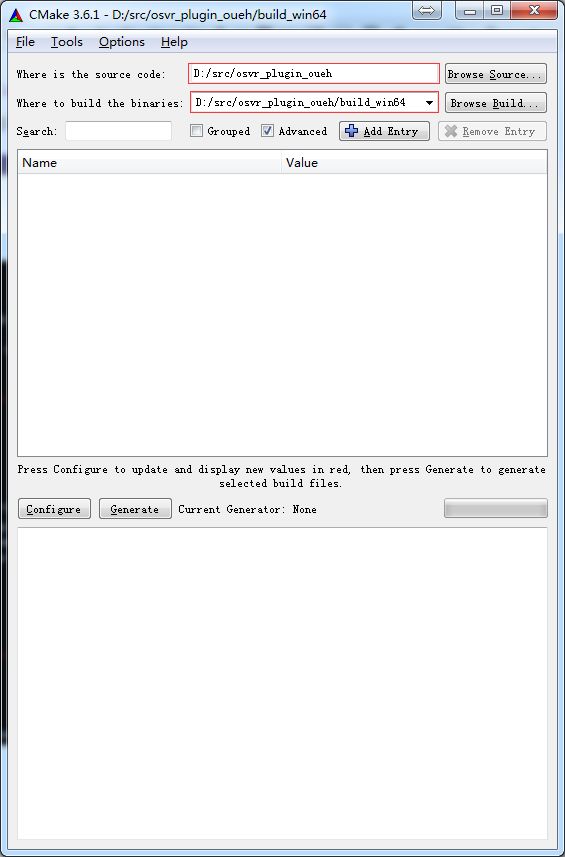
- 打开CMake,选择源文件路径以及编译生成路径:
- 添加CMAKE_PREFIX_PATH变量:点击”Add Entry”按钮。在弹出的窗口中“Name”字段,输入“CMAKE_PREFIX_PATH”,在“Type”字段选择PATH。

- 然后点击”Value”字段的”…”,弹出文件夹选择窗口, 选择官方下载的运行环境包—这个文件夹包括bin,lib等目录。点击“OK”确认文件夹,然后再点击“OK”,完成添加,(此工具可以已传微云网盘)。

- 此时,你将返回到CMake的主界面,如下图所示(红色不是表示错误,表示修改的部分):

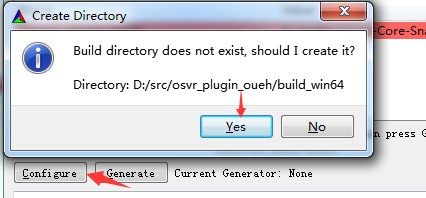
- 点击“Configure” 按键,点击“yes”生成目标文件夹,同时选择编译环境,我这里安装的是VS2015的update3,然后点击按钮”Finish”:

- Configure之后,点击”Generate”,生成.sln文件:


- 双击sln文件,选择relase版本,然后点击菜单”Build”—“Build solution”:

编译成功后,即生成你的插件文件(com_osvr_oueh_plugin.dll):

源文件修改补丁:点击这里获取
测试插件
CMD里运行BasicServer(此程序通过编译OSVR-core获得,这里上传一份我编译),来测试插件:

测试OK。
如果要被osvr_core加载,将此dll放入到D:\src\OSVR-Core\build_win64\bin\osvr-plugins-0\Release文件夹下,然后运行“osvr_server.exe osvr_server_config.json” 即可。
读取HMD上的传感器数据
HMD与PC用USB线连接,PC通过USB来读取HMD上的所有数据(包括加速度、陀螺仪、磁力计、手势坐标等),这里我们使用一个开源库:HIDAPI库,来读取HMD的数据。
HIDAPI获取、编译点击这里。拷贝出”hidapi.h“,”hidapi.lib“,”hidapi.dll”这3个文件。
将HIDAPI库文件导入我们的工程,“com_osvr_oueh_plugin.cpp”文件添加:

同时,将”hidapi.h”、”hidapi.lib”文件拷贝到“com_osvr_oueh_plugin.cpp”文件的当前目录下。打开“com_osvr_oueh_plugin.cpp”文件,在“HardwareDetection”类中添加,通过HID接口读取HMD设备信息的代码:

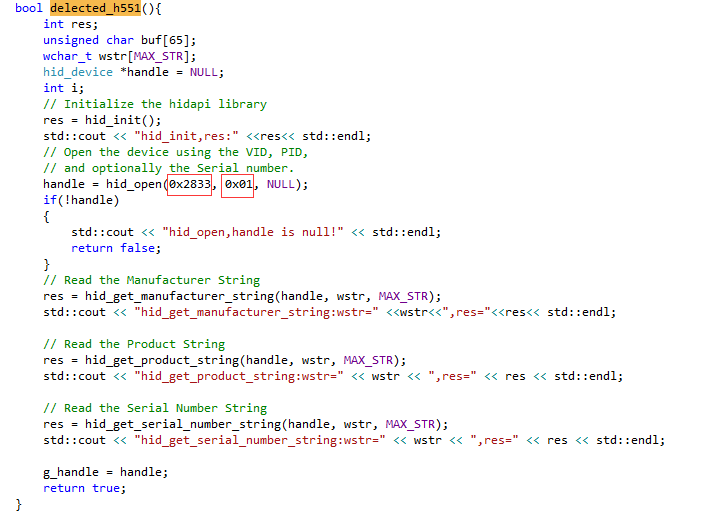
OSVR-Core会调用插件的operator方法,来检测设备是否连接。
上面hid_open参数需要替换成你的设备的VID和PID,到这步就能够读取到HMD的设备基本信息。
对于HMD设备,需要不断上报传感器数据,插件里AnalogExampleDevice类的update方法会被循环调用,我们可以在这里添加读取数据的代码:
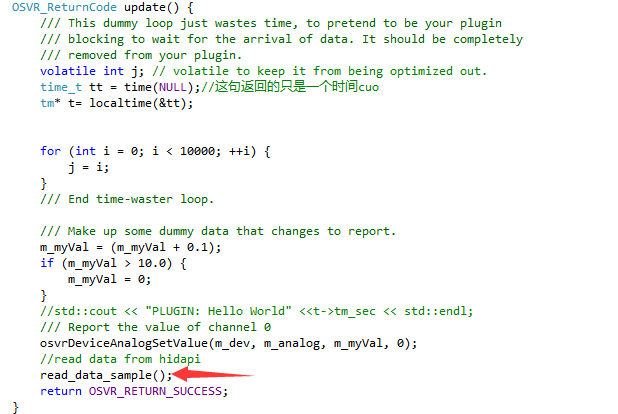
读取函数:
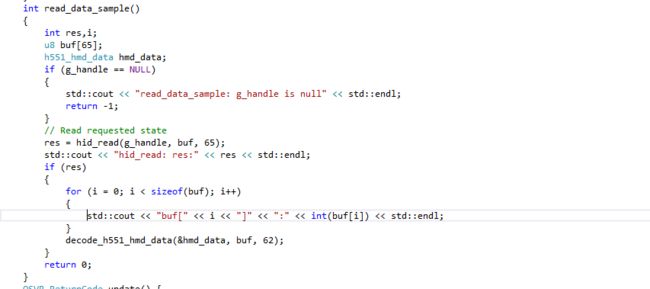
如果HMD持续输出数据,这里就能读取到数据,将数据实时打出。
添加数据解析
上面已经能够将数据读出,我们这里将进一步对读出的数据进行解析。这里手上设备是以Oculars协议来传递追踪器数据,就以这个协议做解析获取追踪器数据,Oculars协议点击这里获取。
定义数据解析结构体:

协议解析函数:
int decode_h551_hmd_data(h551_hmd_data *hmd_data, u8 *buf, int size)
    {
        u8 pos = 0;
        int temp[2];
        //for test
        //buf[8] = 255;buf[9] = 251;buf[10] = 176;buf[11] = 0;buf[12] = 181;buf[13] = 0;buf[14] = 31;buf[15] = 121;
        hmd_data->ReportID = buf[pos++];
        hmd_data->SampleCount = buf[pos++];
        hmd_data->Timestamp = buf[pos] + (buf[pos+1]<<8);
        pos += 2;
        //temp[0] = 0x4030201;
        //memcpy(&buf[8], (u8 *)&temp[0],4);
        //std::cout << "decode_h551_hmd_data: "<< "buf[8]:" <<int(buf[8])<<",buf[9]:" << int(buf[9])<<",buf[10]:" << int(buf[10]) << ",buf[11]:" << int(buf[11]) << std::endl;
        hmd_data->LastCommandID = buf[pos] + (buf[pos+1] << 8);
        pos += 2;
        hmd_data->Temperature = buf[pos] + (buf[pos+1] << 8);
        pos += 2;
        //memcpy((u8 *)temp,&buf[pos],8);
        //std::cout << "decode_h551_hmd_data: temp[0]=" << temp[0] << ",temp[1]:" <1]<<",pos="<<int(pos)<< std::endl;
        hmd_data->accel_X = buf[pos] | (buf[pos + 1] << 8) | ((buf[pos + 2] & 0x1F) << 16);
        hmd_data->accel_Y = ((buf[pos + 2] & 0xE0) >> 5) | (buf[pos + 3] << 3) | (buf[pos + 4] << 11) | ((buf[pos + 5] & 0x03) << 19);
        hmd_data->accel_Z = (buf[pos + 5] & 0xFC) >> 2 | (buf[pos + 6] << 6) | (buf[pos + 7] << 14);
        pos += 8;
        //memcpy((u8 *)temp, &buf[pos], 8);
        //hmd_data->gyro_X = temp[0] & 0x001FFFFF;
        //hmd_data->gyro_Y = (temp[0] << 20) + ((temp[1] & 0x000003FF) << 11);
        //hmd_data->gyro_Z = temp[1] << 9;
        hmd_data->gyro_X = buf[pos] | (buf[pos + 1] << 8) | ((buf[pos + 2] & 0x1F) << 16);
        hmd_data->gyro_Y = ((buf[pos + 2] & 0xE0) >> 5) | (buf[pos + 3] << 3) | (buf[pos + 4] << 11) | ((buf[pos + 5] & 0x03) << 19);
        hmd_data->gyro_Z = (buf[pos + 5] & 0xFC) >> 2 | (buf[pos + 6] << 6) | (buf[pos + 7] << 14);
        pos += 8;
        //only use sampe[0] data,not use sample[1] sample[2]
        pos += 2 * 16;
        hmd_data->MagX = buf[pos] + buf[pos+1] << 8;
        pos += 2;
        hmd_data->MagY = buf[pos] + buf[pos+1] << 8;
        pos += 2;
        hmd_data->MagZ = buf[pos] + buf[pos+1] << 8;
        pos += 2;
        //debug
        //std::cout << "decode_h551_hmd_data: pos= " << int(pos) << std::endl;
        std::cout << "ReportID=" << int(hmd_data->ReportID) << ",SampleCount=" << int(hmd_data->SampleCount) << ",Timestamp=" << hmd_data->Timestamp <<",LastCommandID=" << hmd_data->LastCommandID << ",Temputure=" << hmd_data->Temperature
            << ",accel_X=" << hmd_data->accel_X << ",accel_Y=" << hmd_data->accel_Y << ",accel_Z=" << hmd_data->accel_Z
            << ",gyro_x=" << hmd_data->gyro_X << ",gyro_z=" << hmd_data->gyro_Z    << ",gyro_Z=" << hmd_data->gyro_Z
            << ",MagX=" << hmd_data->MagX << ",MagY=" << hmd_data->MagY << ",MagZ=" << hmd_data->MagZ << std::endl;
        return 0;
    }
修改后的代码获取点击这里
编译后生成插件。
测试
将生成的插件文件(“com_osvr_oueh_plugin.dll”),拷贝到路径“OSVR-Core\build_win64\bin\osvr-plugins-0\Release”下
将”hidapi.dll”文件,拷贝到”OSVR-Core\build_win64\bin\Release”路径下,运行”osvr_server.exe osvr_server_config.json”,可以获取到HMD的数据如下:
