Android 自定义数字键盘(一)

看了一个自定义键盘的Demo感觉比网上那种自己绘制的那种要方便很多,就学习了一下,刚开始觉得应该挺麻烦的,还继承一个KeyBoardView,不过学习完了觉得还好,至少还能看懂,另外感觉收获还是挺多的。
自定义键盘
键盘布局
先从简单的可以理解的看吧,循序渐进
horizontalGap:按键间的水平间隔
keyHeight:按键高度以%或者%p结尾
keyWidth:按键宽度,”33.33333%p”(3列你懂得)
verticalGap:按键间的垂直间隔
codes:可以是系统给的固定值也可以是自定义的值
<Keyboard xmlns:android="http://schemas.android.com/apk/res/android"
    android:horizontalGap="1dp"
    android:keyHeight="8%p"
    android:keyWidth="33.33333%p"
    android:verticalGap="1dp">
    <Row>
        <Key
            android:codes="49"
            android:keyLabel="1">Key>
        <Key
            android:codes="50"
            android:keyLabel="2">Key>
        <Key
            android:codes="51"
            android:keyLabel="3">Key>
    Row>
    <Row>
        <Key
            android:codes="52"
            android:keyLabel="4">Key>
        <Key
            android:codes="53"
            android:keyLabel="5">Key>
        <Key
            android:codes="54"
            android:keyLabel="6">Key>
    Row>
    <Row>
        <Key
            android:codes="53"
            android:keyLabel="7">Key>
        <Key
            android:codes="54"
            android:keyLabel="8">Key>
        <Key
            android:codes="55"
            android:keyLabel="9">Key>
    Row>
    <Row>
        <Key
            android:codes="-10"
            android:keyLabel="">Key>
        <Key
            android:codes="48"
            android:keyLabel="0">Key>
        <Key
            android:codes="-5"
            android:keyIcon="@color/colorPrimary">Key>
    Row>
Keyboard>
继承keyboardview
这里主要就是3个点:1、获取按键布局(setkeyboard)2、绘制空白键跟删除键(onDraw)3、设置回调(OnKeyPressListener)。
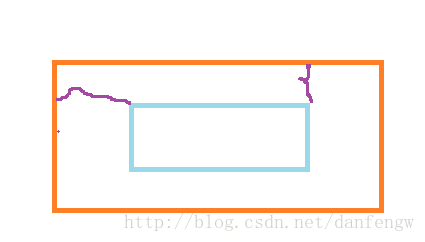
删除按钮我做了一点处理,因为直接使用获取的dp(intrinsicWidth)的话图片会比较大,不是很好看,为了协调一点我宽高各自除了个6,然后计算了上下左右的边距(widthInterval,heightInterval),再进行的绘制。大体是这个意思,如图
紫色线就是我计算的间隔

这里用了自定义的属性展示在这里:
 <declare-styleable name="NumKeyView">
        <attr name="gbColor" format="color|reference">attr>
        <attr name="deleteDrawable" format="reference">attr>
    declare-styleable>
NumKeyView
public class NumKeyView extends KeyboardView implements OnKeyboardActionListener {
    //用于区分左下角空白按键,(要与xml里设置的数值相同)
    private int KEYCODE_EMPTY=-10;
    //删除按键背景图片
    private Drawable mDeleteDrawable;
    //最下面两个灰色的按键(空白按键跟删除按键)
    private int mBgColor;


    public NumKeyView(Context context, AttributeSet attrs) {
        super(context, attrs);
        init(context,attrs,0);
    }

    public NumKeyView(Context context, AttributeSet attrs, int defStyleAttr) {
        super(context, attrs, defStyleAttr);
        init(context, attrs, defStyleAttr);
    }

    private void init(Context context, AttributeSet attrs, int defStyleAttr) {
        TypedArray ta=context.obtainStyledAttributes(attrs, R.styleable.NumKeyView);
        mBgColor=ta.getColor(R.styleable.NumKeyView_gbColor, Color.RED);
        mDeleteDrawable=ta.getDrawable(R.styleable.NumKeyView_deleteDrawable);
        ta.recycle();
        //获取xml中的按键布局
        Keyboard keyboard=new Keyboard(context,R.xml.numkeyview);
        setKeyboard(keyboard);
        setEnabled(true);
        setPreviewEnabled(false);
        setOnKeyboardActionListener(this);
        }

    @Override
    public void onDraw(Canvas canvas) {
        super.onDraw(canvas);
        List keys=getKeyboard().getKeys();
        for (Keyboard.Key key:keys){
            //绘制空白键
            if (key.codes[0]==KEYCODE_EMPTY){
                drawKeyBackGround(key,canvas);
            }else if (key.codes[0]==Keyboard.KEYCODE_DELETE){
                //绘制删除键背景
                drawKeyBackGround(key,canvas);
                //绘制按键图片
                drawkeyDelete(key,canvas);
            }
        }
    }
    private void drawKeyBackGround(Keyboard.Key key, Canvas canvas) {
        ColorDrawable colordrawable=new ColorDrawable(mBgColor);
        colordrawable.setBounds(key.x,key.y,key.x+key.width,key.y+key.height);
        colordrawable.draw(canvas);
    }
    private void drawkeyDelete(Keyboard.Key key, Canvas canvas) {
        int intrinsicWidth=mDeleteDrawable.getIntrinsicWidth();
        int intrinsicHeight=mDeleteDrawable.getIntrinsicHeight();
        int drawWidth=key.width;
        int drawHeight=key.height;
        if(drawWidth6;
        drawHeight=drawHeight/6;
        int widthInterval=(key.width-drawWidth)/2;
        int heightInterval=(key.height-drawHeight)/2;

        mDeleteDrawable.setBounds(key.x+widthInterval,key.y+heightInterval,key.x+widthInterval+drawWidth,key.y+heightInterval+drawHeight);
        mDeleteDrawable.draw(canvas);
    }
    //回调接口
    public interface OnKeyPressListener{
        //添加数据回调
        void onInertKey(String text);
        //删除数据回调
        void onDeleteKey();
    }
    private OnKeyPressListener mOnkeyPressListener;
    public void setOnKeyPressListener(OnKeyPressListener li){
        mOnkeyPressListener=li;
    }
    @Override
    public void onKey(int i, int[] ints) {
            if (i==Keyboard.KEYCODE_DELETE&&mOnkeyPressListener!=null){
                //添加数据回调
                mOnkeyPressListener.onDeleteKey();
            }else if (i!=KEYCODE_EMPTY){
                //删除数据回调
                mOnkeyPressListener.onInertKey(Character.toString((char) i));
            }
    }
    @Override
    public void onPress(int i) {

    }

    @Override
    public void onRelease(int i) {

    }


    @Override
    public void onText(CharSequence charSequence) {

    }

    @Override
    public void swipeRight() {
        super.swipeRight();
    }

    @Override
    public void swipeDown() {
        super.swipeDown();
    }

    @Override
    public void swipeLeft() {
        super.swipeLeft();
    }

    @Override
    public void swipeUp() {
        super.swipeUp();
    }
}
调用
因为使用了自定义属性(AS)所以注意添加下面一行代码
xmlns:app="http://schemas.android.com/apk/res-auto"布局(包名+类名)
"http://schemas.android.com/apk/res/android"
    xmlns:app="http://schemas.android.com/apk/res-auto"
    android:orientation="vertical"
    android:layout_width="match_parent"
    android:layout_height="wrap_content">
  <com.efly.map.keydemo.mytest.NumKeyView
        android:id="@+id/keyboardview"
        android:layout_width="match_parent"
        android:layout_height="wrap_content"
        android:focusable="true"
        android:focusableInTouchMode="true"
        android:keyBackground="@color/colorAccent"
        app:gbColor="#eeeeee"
        app:deleteDrawable="@drawable/keyboard_backspace"
        />
其他部分
上面按键部分就做好了,下面看下自定义按键的中上面的接口回调
public class KeyDemo extends AppCompatActivity {
    private EditText mEditText;
    private NumKeyView mKeyView;
    private Button mButton;
    private LinearLayout mLinearlayout;
    private PopupWindow mPop;
    private LinearLayout mProgressBarLn;
    private View mPopView;
    private Handler mhandler=new Handler(){
        @Override
        public void handleMessage(Message msg) {
            super.handleMessage(msg);
            mPop.dismiss();
            mKeyView.setVisibility(View.VISIBLE);
            mProgressBarLn.setVisibility(View.INVISIBLE);
            mButton.setText("完成");
        }
    };
    @Override
    protected void onCreate(@Nullable Bundle savedInstanceState) {
        super.onCreate(savedInstanceState);
        setContentView(R.layout.activity_keyboard);
        init();
        mButton.setOnClickListener(new View.OnClickListener() {
            @Override
            public void onClick(View view) {
                //点击按钮显示键盘
                mPop.showAtLocation(mLinearlayout, Gravity.BOTTOM,0,0);
            }
        });
        //设置回调,并进行文本的插入与删除
        mKeyView.setOnKeyPressListener(new NumKeyView.OnKeyPressListener() {
            @Override
            public void onInertKey(String text) {
                if(mEditText.getText().length()<6){
                    mEditText.append(text);
                    //文本长度为6时隐藏键盘,显示进度条,一段时间后pop消失
                    if (mEditText.getText().length()==6){
                        mKeyView.setVisibility(View.INVISIBLE);
                        mProgressBarLn.setVisibility(View.VISIBLE);
                        mhandler.sendEmptyMessageDelayed(0x11,4000);
                    }
                }
            }

            @Override
            public void onDeleteKey() {
                int last=mEditText.getText().length();
                if (last>0){
                    //删除最后一位
                mEditText.getText().delete(last-1,last);
                }
            }
        });

    }

    private void init() {
        mEditText= (EditText) findViewById(R.id.et);
        mButton= (Button) findViewById(R.id.bt);
        mLinearlayout= (LinearLayout) findViewById(R.id.ln);
        mPop=new PopupWindow();
        mPopView=LayoutInflater.from(getApplicationContext()).inflate(R.layout.keyboard_pop,null);
        mPop.setContentView(mPopView);
        mPop.setTouchable(true);
        mPop.setFocusable(true);
        mPop.setBackgroundDrawable(new ColorDrawable());
        mPop.setWidth(ViewGroup.LayoutParams.MATCH_PARENT);
        mPop.setHeight(ViewGroup.LayoutParams.WRAP_CONTENT);
        mPop.setAnimationStyle(R.style.PopWindowstyle);
        mProgressBarLn= (LinearLayout) mPopView.findViewById(R.id.progressbar_ln);
        mKeyView= (NumKeyView) mPopView.findViewById(R.id.keyboardview);
    }
}
布局
主布局
<LinearLayout xmlns:android="http://schemas.android.com/apk/res/android"
    xmlns:app="http://schemas.android.com/apk/res-auto"
    android:id="@+id/ln"
    android:orientation="vertical"
    android:layout_width="match_parent"
    android:layout_height="match_parent">

    <EditText
        android:id="@+id/et"
        android:layout_width="match_parent"
        android:layout_height="wrap_content" />
    <Button
        android:id="@+id/bt"
        android:layout_width="match_parent"
        android:layout_height="wrap_content"
        android:text="点击弹出弹出窗"/>

LinearLayout>
Pop布局
<FrameLayout xmlns:android="http://schemas.android.com/apk/res/android"
    xmlns:app="http://schemas.android.com/apk/res-auto"
    android:orientation="vertical"
    android:layout_width="match_parent"
    android:layout_height="wrap_content">

    <com.efly.map.keydemo.mytest.NumKeyView
        android:id="@+id/keyboardview"
        android:layout_width="match_parent"
        android:layout_height="wrap_content"
        android:focusable="true"
        android:focusableInTouchMode="true"
        android:keyBackground="@color/colorAccent"
        app:gbColor="#eeeeee"
        app:deleteDrawable="@drawable/keyboard_backspace"
        />
    <LinearLayout
        android:id="@+id/progressbar_ln"
        android:orientation="vertical"
        android:layout_width="match_parent"
        android:layout_height="match_parent"
        android:visibility="invisible"
        >
        <View
            android:layout_width="match_parent"
            android:layout_height="2px"
            android:background="#000000"
            >View>
        <ProgressBar
            android:layout_width="match_parent"
            android:layout_height="match_parent"
            android:layout_gravity="center"
            android:layout_margin="20dp"
            style="@android:style/Widget.Holo.ProgressBar.Large"
            />
    LinearLayout>

FrameLayout>
Pop动画
弹出
<set xmlns:android="http://schemas.android.com/apk/res/android">
    <translate
        android:fromXDelta="0"
        android:fromYDelta="100%"
        android:toXDelta="0"
        android:toYDelta="0"
        android:duration="1000"
        >translate>

set>
消失
<set xmlns:android="http://schemas.android.com/apk/res/android">
<translate
    android:toXDelta="0"
    android:fromXDelta="0"
    android:fromYDelta="0"
    android:toYDelta="100%"
    android:duration="1000"
    >translate>
set>
定义动画