关于ViewDragHelper通过addView动态修改UI的坑
ViewDragHelper是用来处理触摸滑动操作的一个很强大的帮助类。最近我在用它做一个类似365日历的时候,碰到了一个坑,特意写出来免得有更多的人跳进去 
来看看一个demo
先来写一个简单的 ScrollLayout 可以让内部的控件进行上下滑动,先来看看整体的布局
<RelativeLayout xmlns:android="http://schemas.android.com/apk/res/android"
    xmlns:tools="http://schemas.android.com/tools"
    android:layout_width="match_parent"
    android:layout_height="match_parent"
    android:paddingBottom="@dimen/activity_vertical_margin"
    android:paddingLeft="@dimen/activity_horizontal_margin"
    android:paddingRight="@dimen/activity_horizontal_margin"
    android:paddingTop="@dimen/activity_vertical_margin"
    tools:context="com.haibuzou.viewdragheiper.MainActivity">

    <com.haibuzou.viewdragheiper.ScrollLayout
        android:layout_width="match_parent"
        android:layout_height="wrap_content">

        <LinearLayout
            android:id="@+id/content_layout"
            android:layout_width="match_parent"
            android:layout_height="wrap_content"
            android:orientation="vertical">

            <TextView
                android:id="@+id/top_text"
                android:layout_width="wrap_content"
                android:layout_height="wrap_content"
                android:text="\n\n\n\n\n\n\n\n\n\n\n\n\n\n\n" />

            <Button
                android:id="@+id/button"
                android:layout_width="match_parent"
                android:layout_height="wrap_content"
                android:text="点我刷新" />

            <TextView
                android:id="@+id/bottom_text"
                android:layout_width="wrap_content"
                android:layout_height="wrap_content"
                android:text="\n\n\" />

        LinearLayout>

    com.haibuzou.viewdragheiper.ScrollLayout>
RelativeLayout>
ScrollLayout中放入一个子layout:content_layout,滑动的操作主要通过操作content_layout来完成,content_layout内部的top_text和bottom_text主要用来占位方便实现滑动的效果,没有其他的功用。这里我准备响应button的点击事件,对content_layout进行addView()操作来动态的修改UI。
ScrollLayout
接下来就是用于实现滑动的ScrollLayout,滑动的实现由ViewDragHelper 来完成
public class ScrollLayout extends FrameLayout {

    //button上方的占位TextView
    TextView topTxt;
    Button btn;
    //整体的Layout
    LinearLayout contentLayout;
    ViewDragHelper viewDragHelper;
    int layoutTop;

    public ScrollLayout(Context context) {
        this(context, null);
    }

    public ScrollLayout(Context context, AttributeSet attrs) {
        this(context, attrs, 0);
    }

    public ScrollLayout(final Context context, AttributeSet attrs, int defStyleAttr) {
        super(context, attrs, defStyleAttr);
        viewDragHelper = ViewDragHelper.create(this, new ViewDragHelper.Callback() {
            @Override
            public boolean tryCaptureView(View child, int pointerId) {
                //操作的View是contentLayout才准许滑动
                return child == contentLayout;
            }

            @Override
            public int clampViewPositionVertical(View child, int top, int dy) {
                //限制向上的滑动最多只能让button滑动到顶部
                if (top <= -topTxt.getHeight()) {
                    return -topTxt.getHeight();
                //限制在回到初始的位置时不能再向下滑动
                } else if (top >= 0) {
                    return 0;
                }
                return top;
            }
        });
    }

    @Override
    public boolean onInterceptTouchEvent(MotionEvent ev) {
        return viewDragHelper.shouldInterceptTouchEvent(ev);
    }

    @Override
    public boolean onTouchEvent(MotionEvent event) {
        viewDragHelper.processTouchEvent(event);
        return true;
    }

    @Override
    protected void onFinishInflate() {
        super.onFinishInflate();
        contentLayout = (LinearLayout) findViewById(R.id.content_layout);
        topTxt = (TextView)findViewById(R.id.top_text);
        btn = (Button)findViewById(R.id.button);
    }
}
初始操作都很简单,唯一要注意的就是在clampViewPositionVertical()方法中限制了滑动的范围向上能让button滑到顶部,也就是topText已经完全划出屏幕 top <= -topTxt.getHeight(),向下只能滑到原来的位置。
MainActivity
public class MainActivity extends AppCompatActivity {

    Button btn;
    LinearLayout contentLayout;

    @Override
    protected void onCreate(Bundle savedInstanceState) {
        super.onCreate(savedInstanceState);
        setContentView(R.layout.activity_main);
        btn = (Button) findViewById(R.id.button);
        contentLayout = (LinearLayout) findViewById(R.id.content_layout);
        btn.setOnClickListener(new View.OnClickListener() {
            @Override
            public void onClick(View v) {
                LinearLayout.LayoutParams params = new LinearLayout.LayoutParams(
                        LinearLayout.LayoutParams.WRAP_CONTENT,
                        LinearLayout.LayoutParams.WRAP_CONTENT);
                TextView addTxt = new TextView(MainActivity.this);
                addTxt.setText("添加的内容");
                addTxt.setTextSize(20);
                contentLayout.addView(addTxt, params);
            }
        });
      }
    }
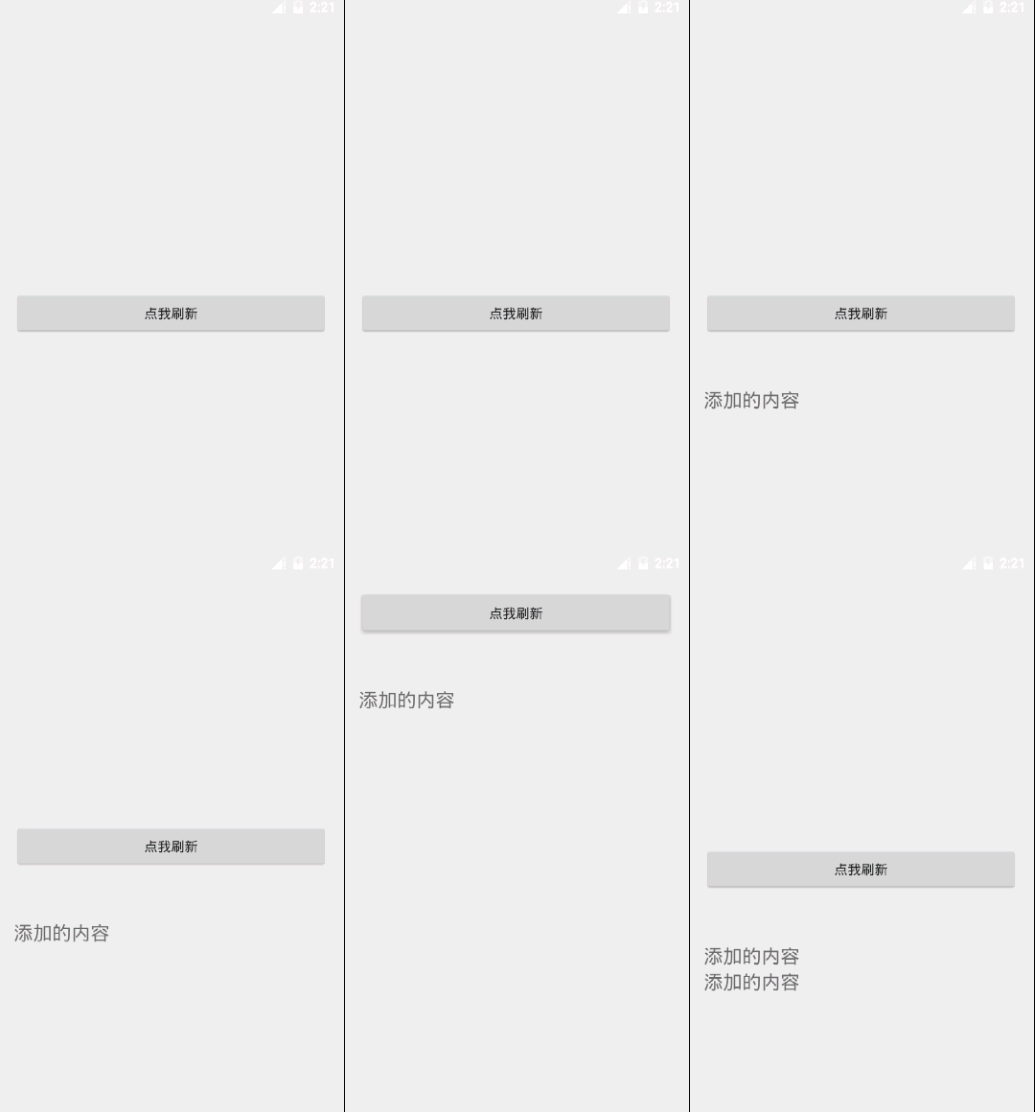
MainActivity中响应Button的点击事件来addview,现在编码已经完成让我们来看看效果。
首先我们先点击button正常的addview(),然后我们再将button滑动到顶部,再次点击button addview
本应再顶部的button在addview之后再次回到了初始位置,看到这里我的内心是崩毁的
我不禁陷入沉思为何会这样
思路
首先这个界面通过addview操作来进行动态改变,那么必然会走界面重画,这里有一个重要的信息,界面重画有2种一种是invalidate() 一种是requestLayout() , invalidate()是迫使view进行重画也就是重走onDraw方法,requestLayout()则会重走 onMeasure()和 onLayout()方法,重走onlayout()就意味着重新进行布局,似乎看到了一点希望了,再看看addView的源码
    public void addView(View child, int index, LayoutParams params) {
        if (DBG) {
            System.out.println(this + " addView");
        }

        if (child == null) {
            throw new IllegalArgumentException("Cannot add a null child view to a ViewGroup");
        }

        // addViewInner() will call child.requestLayout() when setting the new LayoutParams
        // therefore, we call requestLayout() on ourselves before, so that the child's request
        // will be blocked at our level
        requestLayout();
        invalidate(true);
        addViewInner(child, index, params, false);
    }
果然调用了requestLayout() 同时注意这句话addViewInner() will call child.requestLayout() when setting the new LayoutParams 这就意味这整个布局都会重新layout一次,我们的button也有可能就这样重新layout到了原来的位置,如何来证明这个猜想呢? 很简单,判断button滑动到顶部的时候不进行layout
int layoutTop = 0;

    @Override
    public void onViewPositionChanged(View changedView, int left, int top, int dx, int dy)             {
               //不断的获取top坐标用来判断是否已经滑动到顶部
                layoutTop = top;
    }

    @Override
    protected void onLayout(boolean changed, int left, int top, int right, int bottom) {
        //通过顶部坐标判断 button 是否滑动到顶部,滑动到顶部就不走默认的onLayout方法
        if(!(layoutTop <= -topTxt.getMeasuredHeight())){
            super.onLayout(changed, left, top, right, bottom);
        }
    }
首先在onViewPositionChanged方法中获取的顶部坐标,然后onLayout()方法中通过判断顶部坐标是否已经比topText的高度的还要小,也就是topText已经滑触屏幕(注意这里向上是负值),的情况下就不走默认的
super.onLayout(changed, left, top, right, bottom);nice ! 猜想得到了验证,滑动到顶部点击button已经不会重新回到原来的位置了,但是由于没有重新onlayout所以在addview后的新view并没有成功的显示出来,而是在回到原来的位置可以运行onlayout方法的时候才能显示出来,不过这已经难不倒我了,既然要layout自己去定义位置不久好了吗 EZ
    @Override
    protected void onLayout(boolean changed, int left, int top, int right, int bottom) {
        contentLayout.layout(0,layoutTop,contentLayout.getMeasuredWidth(),contentLayout.getMeasuredHeight());
    }
通过通过实时获取的layoutTop坐标我们可以很容易的定义top左边,right和bottom就更简单了,获取contentlayout的宽度和高度就是right和bottom嘛,来再运行一下
完美解决!!
最后一个小细节
onLayout()方法中我是通过contentLayout.getMeasuredHeight()来获取高度,clampViewPositionVertical方法中我是通过getHeight()方法来获取高度,这2个方法有什么区别呢?
其实也不复杂,contentLayout.getMeasuredHeight() 如同他的方法名一样是通过Measure测量的来,也就是说走完了onMeasure方法 getMeasuredHeight()方法就会有值。getHeight()呢?
    public final int getHeight() {
        return mBottom - mTop;
    }
通过源码可以看出来getHeight()的值是通过坐标来算出来的,所以如果你在onLayout中用getHeight()来获取高度是获取不到的,因为layout还没有完成,坐标也没有确定。这个细节很重要!!!!


